P13df Mercedes Fault Code signals a malfunction within the AdBlue system, impacting vehicle performance. AutoExplain.com provides expert diagnostics, remote programming, and software installation to efficiently resolve this issue, ensuring your vehicle operates optimally and minimizing downtime. Trust AutoExplain for your Mercedes-Benz AdBlue system troubleshooting and repair, diesel exhaust fluid (DEF) system expertise, and SCR system solutions.
1. Understanding The P13DF Mercedes Fault Code
The P13DF fault code in Mercedes-Benz vehicles indicates a problem within the Selective Catalytic Reduction (SCR) system, specifically related to the AdBlue system. This code signals that the engine control unit (ECU) has detected a malfunction that affects the system’s ability to reduce nitrogen oxide (NOx) emissions. Understanding the intricacies of this fault code is crucial for accurate diagnostics and effective repair.
1.1. What Does P13DF Really Mean?
P13DF Mercedes fault code is a diagnostic trouble code (DTC) that signifies a fault within the AdBlue system, responsible for reducing NOx emissions. The code is triggered when the ECU detects a discrepancy in the system’s operation, preventing it from functioning as intended. This can stem from various issues, including sensor malfunctions, pump failures, or problems within the control unit.
1.2. The Crucial Role Of The AdBlue System
The AdBlue system is a critical component in modern diesel engines, especially in Mercedes-Benz vehicles adhering to Euro 6 emission standards. Its primary function is to reduce nitrogen oxide (NOx) emissions released into the atmosphere. This is achieved through a process called Selective Catalytic Reduction (SCR), where AdBlue, a urea-based solution, is injected into the exhaust stream.
- Emission Reduction: The AdBlue system significantly lowers NOx emissions, contributing to cleaner air and compliance with stringent environmental regulations.
- Optimized Engine Performance: A properly functioning AdBlue system ensures that the engine operates efficiently, maintaining optimal fuel economy and performance.
- Regulatory Compliance: Ensuring the AdBlue system works correctly is crucial for passing emissions tests and adhering to environmental standards set by regulatory bodies.
1.3. Common Symptoms Associated With P13DF
When the P13DF Mercedes fault code is triggered, several symptoms may manifest, indicating a problem within the AdBlue system:
- Malfunction Indicator Lamp (MIL): The check engine light or malfunction indicator lamp on the dashboard illuminates, signaling that a fault has been detected.
- Reduced Engine Power: The vehicle may experience a noticeable decrease in engine power and performance, limiting acceleration and overall driving capability.
- Emergency Mode: In some cases, the vehicle may enter an emergency or limp mode, restricting the vehicle’s speed to as low as 20 km/h to prevent further damage.
- Start Limit: After a certain mileage (e.g., 900 km), the vehicle may prevent the engine from starting, requiring immediate attention to the AdBlue system.
- Warning Messages: The vehicle’s display screen may show warning messages related to the AdBlue system, such as “AdBlue Malfunction” or “Check AdBlue System.”
- Increased Emissions: The vehicle may emit higher levels of NOx, leading to environmental concerns and potential failure of emissions tests.
Recognizing these symptoms early can help vehicle owners and technicians promptly diagnose and address the underlying issues, preventing further complications and costly repairs.
1.4. Vehicles Most Likely To Be Affected
The P13DF Mercedes fault code is commonly observed in Mercedes-Benz vehicles equipped with diesel engines that adhere to the Euro 6 emission standards. These vehicles utilize the AdBlue system to reduce nitrogen oxide (NOx) emissions. Some of the models most likely to be affected include:
- Mercedes-Benz Sprinter: Widely used for commercial purposes, the Sprinter van is a frequent recipient of the P13DF fault code due to its extensive use and demanding operational conditions.
- Mercedes-Benz C-Class: Diesel variants of the C-Class, especially those manufactured after the introduction of Euro 6 standards, are susceptible to AdBlue system malfunctions.
- Mercedes-Benz E-Class: Similar to the C-Class, the E-Class diesel models often encounter issues with their AdBlue systems, leading to the P13DF code.
- Mercedes-Benz Vito: As a versatile van, the Vito is also prone to AdBlue system failures, particularly in models designed to meet the Euro 6 emission requirements.
- Mercedes-Benz GLE/ML: These SUV models, when equipped with diesel engines, may experience problems with the AdBlue system, resulting in the P13DF fault code.
Understanding which vehicles are more prone to this issue can help technicians and vehicle owners focus their diagnostic efforts and implement targeted solutions.
1.5. How Serious Is The P13DF Fault Code?
The P13DF Mercedes fault code is a serious issue that should be addressed promptly to prevent further complications. Its severity stems from several factors:
- Engine Performance: The fault can lead to reduced engine power and performance, affecting the vehicle’s drivability and overall efficiency.
- Emergency Mode: Activation of emergency mode can severely restrict the vehicle’s speed, making it difficult to operate and potentially dangerous in certain driving conditions.
- Start Limit: The possibility of the vehicle being unable to start after a certain mileage poses a significant inconvenience and may require towing the vehicle for repairs.
- Environmental Impact: Increased NOx emissions contribute to air pollution, violating environmental regulations and potentially harming public health.
- Costly Repairs: Neglecting the issue can lead to more extensive damage to the AdBlue system and other related components, resulting in higher repair costs.
Therefore, it is crucial to address the P13DF fault code as soon as it appears to mitigate these potential consequences and ensure the vehicle operates safely and efficiently. AutoExplain.com offers expert diagnostics and remote support to help resolve this issue quickly and effectively.
2. Diagnosing The Root Cause Of The P13DF Code
Diagnosing the root cause of the P13DF Mercedes fault code requires a systematic approach to pinpoint the exact issue within the AdBlue system. This process involves several steps, from initial inspection to advanced diagnostic procedures, ensuring that no potential problem area is overlooked.
2.1. Initial Inspection And Preliminary Checks
Begin the diagnostic process with a thorough visual inspection and several preliminary checks:
- Visual Inspection: Check for any visible damage, leaks, or corrosion around the AdBlue tank, pump, injector, and related components.
- Fluid Level: Ensure that the AdBlue tank is filled to the appropriate level. Low fluid levels can trigger the P13DF code.
- Cap Check: Verify that the AdBlue tank cap is securely fastened. An improperly sealed cap can lead to contamination and system errors.
- Wiring and Connections: Inspect all wiring and connectors associated with the AdBlue system for signs of damage, corrosion, or loose connections.
- Error Code Verification: Use an OBD-II scanner to confirm the presence of the P13DF code and check for any other related fault codes that may provide additional clues.
These initial steps can help identify obvious issues and provide a foundation for more detailed diagnostics.
2.2. Utilizing OBD-II Scanners For Error Code Analysis
An OBD-II scanner is an indispensable tool for diagnosing the P13DF Mercedes fault code. Here’s how to effectively use it:
- Connect the Scanner: Plug the OBD-II scanner into the vehicle’s diagnostic port, typically located under the dashboard.
- Read Error Codes: Turn on the ignition and use the scanner to read and record all stored error codes, including the P13DF code and any related codes.
- Clear Error Codes: After recording the codes, clear them from the system. This allows you to see if the P13DF code returns after testing, indicating an ongoing issue.
- Live Data Analysis: Use the scanner to monitor live data from the AdBlue system, such as sensor readings, pump activity, and injector performance. This can help identify irregularities in real-time.
- Freeze Frame Data: Examine the freeze frame data associated with the P13DF code. This data provides a snapshot of the vehicle’s operating conditions when the code was triggered, offering valuable insights into the potential cause.
By carefully analyzing the error codes and live data, technicians can narrow down the potential causes of the P13DF fault and develop a targeted diagnostic plan.
2.3. Checking The AdBlue Injector
The AdBlue injector is a critical component of the SCR system. A malfunctioning injector can directly trigger the P13DF code. Here’s how to check it:
- Visual Inspection: Inspect the injector for any signs of physical damage, corrosion, or urea deposits.
- Resistance Test: Use a multimeter to measure the resistance of the injector solenoid. Compare the reading to the manufacturer’s specifications. An abnormal resistance reading indicates a faulty injector.
- Activation Test: Use a diagnostic tool to activate the injector and check for proper spray pattern and volume. An irregular spray pattern or insufficient volume suggests a problem with the injector.
- Leak Test: Check for any leaks around the injector. Leaks can reduce the system’s efficiency and trigger fault codes.
- Cleaning: If the injector is clogged with urea deposits, carefully clean it using a specialized injector cleaning solution.
If the injector fails any of these tests, it likely needs to be replaced to resolve the P13DF code.
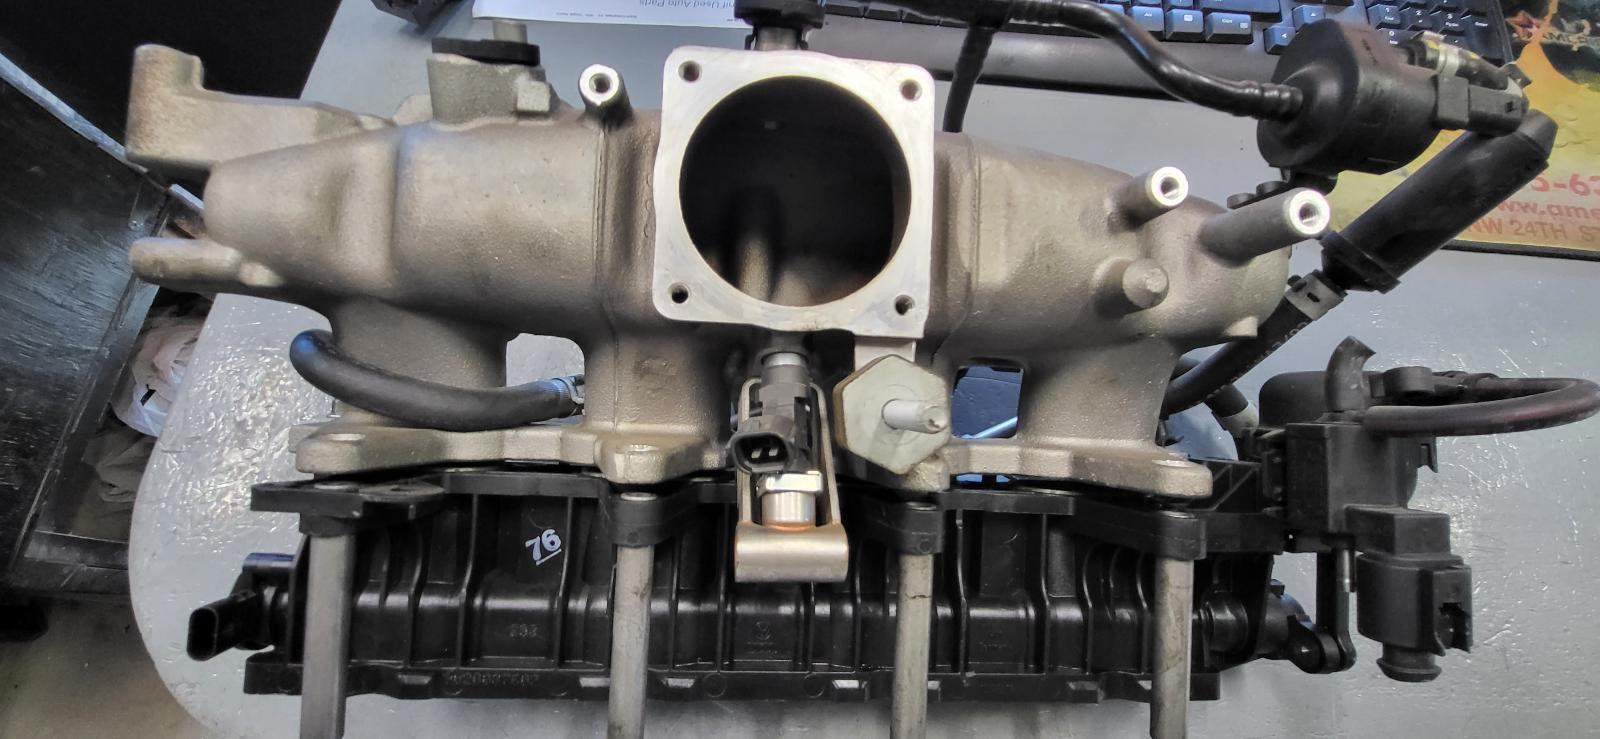
 AdBLUE fault Mercedes Sprinter
2.4. Testing The AdBlue Pump
The AdBlue pump is responsible for delivering the urea solution to the injector. A failing pump can lead to the P13DF fault code. Here’s how to test it:
- Voltage Check: Use a multimeter to check the voltage supply to the pump. Ensure that the pump is receiving the correct voltage as specified by the manufacturer.
- Amperage Test: Measure the amperage draw of the pump while it is operating. Compare the reading to the manufacturer’s specifications. An abnormal amperage draw indicates a potential issue with the pump motor.
- Pressure Test: Use a pressure gauge to measure the pressure output of the pump. Insufficient pressure can prevent the AdBlue system from functioning correctly.
- Flow Test: Perform a flow test to measure the volume of AdBlue delivered by the pump over a specific period. A low flow rate indicates a problem with the pump.
- Noise Check: Listen for any unusual noises coming from the pump during operation. Grinding or whining noises can indicate internal damage.
If the pump fails any of these tests, it may need to be replaced to resolve the P13DF code.
2.5. Examining The NOX Sensor
The NOX sensor monitors the levels of nitrogen oxides in the exhaust stream. A faulty NOX sensor can provide incorrect data to the ECU, triggering the P13DF code. Here’s how to examine it:
- Visual Inspection: Check the sensor for any physical damage or corrosion.
- Resistance Test: Measure the resistance of the sensor using a multimeter. Compare the reading to the manufacturer’s specifications. An abnormal resistance reading indicates a faulty sensor.
- Live Data Analysis: Use a diagnostic tool to monitor the live data from the NOX sensor. Check for erratic or illogical readings.
- Signal Test: Perform a signal test to verify that the sensor is sending a proper signal to the ECU. An incorrect signal can indicate a sensor malfunction.
- Wiring and Connections: Inspect the wiring and connectors associated with the NOX sensor for any signs of damage or loose connections.
If the NOX sensor fails any of these tests, it may need to be replaced to resolve the P13DF code.
2.6. Evaluating The AdBlue Control Unit
The AdBlue control unit (ECU) manages the entire AdBlue system. A malfunctioning control unit can cause various issues, including the P13DF fault code. Here’s how to evaluate it:
- Visual Inspection: Check the control unit for any signs of physical damage or corrosion.
- Power and Ground: Verify that the control unit is receiving proper power and ground.
- Communication Test: Use a diagnostic tool to communicate with the control unit. Failure to communicate indicates a problem with the unit.
- Software Check: Check the software version of the control unit and update it if necessary. Outdated software can cause malfunctions.
- Component Test: Perform component tests using a diagnostic tool to check the functionality of the control unit’s internal circuits.
If the control unit fails any of these tests, it may need to be replaced or reprogrammed to resolve the P13DF code. AutoExplain.com offers remote programming services to ensure your AdBlue control unit functions correctly.
2.7. Checking For Wiring And Connection Issues
Wiring and connection problems are common causes of the P13DF Mercedes fault code. Here’s how to thoroughly check for these issues:
- Visual Inspection: Inspect all wiring harnesses and connectors associated with the AdBlue system for any signs of damage, corrosion, or fraying.
- Continuity Test: Use a multimeter to perform continuity tests on all wiring circuits. This ensures that there are no breaks or shorts in the wiring.
- Voltage Drop Test: Perform voltage drop tests to identify any excessive resistance in the wiring circuits. High resistance can prevent proper signal transmission.
- Connector Inspection: Check all connectors for proper seating and secure connections. Clean any corroded terminals and apply dielectric grease to prevent future corrosion.
- Harness Routing: Ensure that the wiring harnesses are properly routed and secured to prevent chafing or damage from moving parts.
Addressing wiring and connection issues can often resolve the P13DF code and restore proper AdBlue system function.
2.8. Testing AdBlue Quality And Concentration
The quality and concentration of the AdBlue solution are crucial for the proper functioning of the SCR system. Here’s how to test it:
- Visual Inspection: Check the AdBlue solution for any signs of contamination, such as sediment or discoloration.
- Refractometer Test: Use a refractometer to measure the concentration of the AdBlue solution. The concentration should be between 32.5% and 33.5% urea.
- Contamination Test: Perform a contamination test to check for the presence of any foreign substances in the AdBlue solution.
- Expiry Date: Check the expiry date of the AdBlue solution. Expired AdBlue can degrade and cause system malfunctions.
- Storage Conditions: Ensure that the AdBlue solution has been stored properly, away from direct sunlight and extreme temperatures.
Using substandard or contaminated AdBlue can lead to the P13DF code and damage the SCR system. Always use high-quality AdBlue that meets the required specifications.
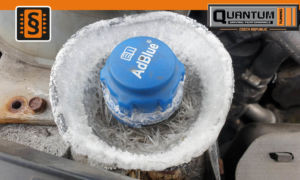
 oprava-adblue-chyba-sprinter-diagnostika
3. Step-By-Step Guide To Fixing The P13DF Fault Code
Once the root cause of the P13DF Mercedes fault code has been identified through thorough diagnostics, the next step is to implement the necessary repairs. This section provides a detailed, step-by-step guide to effectively resolve the issue.
3.1. Replacing A Faulty AdBlue Injector
If the AdBlue injector is found to be faulty, replacing it is essential. Follow these steps:
- Preparation: Gather the necessary tools, including a wrench set, socket set, screwdriver, and a new AdBlue injector.
- Disconnect Power: Disconnect the vehicle’s battery to prevent electrical damage.
- Locate the Injector: Identify the AdBlue injector, typically located on the exhaust system near the SCR catalytic converter.
- Disconnect Electrical Connector: Disconnect the electrical connector from the injector.
- Remove the Old Injector: Use a wrench or socket to carefully remove the old injector. Be cautious not to damage the surrounding components.
- Install the New Injector: Install the new AdBlue injector, ensuring it is properly seated and tightened to the manufacturer’s specified torque.
- Reconnect Electrical Connector: Reconnect the electrical connector to the new injector.
- Reconnect Battery: Reconnect the vehicle’s battery.
- Test the System: Use an OBD-II scanner to clear the P13DF code and test the AdBlue system to ensure the new injector is functioning correctly.
- Verify Operation: Start the engine and monitor for any leaks or unusual noises. Confirm that the engine is running smoothly and that the P13DF code does not return.
3.2. Replacing A Defective AdBlue Pump
If the AdBlue pump is identified as the source of the problem, replacing it involves these steps:
- Preparation: Collect the necessary tools, including a wrench set, socket set, pliers, and a new AdBlue pump.
- Disconnect Power: Disconnect the vehicle’s battery to prevent electrical hazards.
- Locate the Pump: Find the AdBlue pump, usually located near the AdBlue tank.
- Drain AdBlue Tank (If Necessary): If the pump is submerged in the AdBlue tank, drain the tank to a safe level before proceeding.
- Disconnect Hoses and Connectors: Disconnect the hoses and electrical connectors attached to the pump.
- Remove the Old Pump: Remove the old AdBlue pump, taking note of its orientation for proper installation of the new pump.
- Install the New Pump: Install the new AdBlue pump, ensuring it is correctly oriented and securely mounted.
- Reconnect Hoses and Connectors: Reconnect the hoses and electrical connectors to the new pump.
- Refill AdBlue Tank (If Necessary): If the AdBlue tank was drained, refill it with fresh AdBlue solution.
- Reconnect Battery: Reconnect the vehicle’s battery.
- Test the System: Use an OBD-II scanner to clear the P13DF code and test the AdBlue system to confirm the new pump is working correctly.
- Verify Operation: Start the engine and monitor for any leaks or unusual noises. Confirm that the engine is running smoothly and that the P13DF code does not reappear.
3.3. Replacing A Malfunctioning NOX Sensor
If the NOX sensor is determined to be the cause of the P13DF code, follow these steps to replace it:
- Preparation: Gather the necessary tools, including a wrench set, socket set, and a new NOX sensor.
- Disconnect Power: Disconnect the vehicle’s battery to prevent electrical damage.
- Locate the NOX Sensor: Identify the NOX sensor, typically located in the exhaust system before or after the catalytic converter.
- Disconnect Electrical Connector: Disconnect the electrical connector from the NOX sensor.
- Remove the Old Sensor: Use a wrench or socket to carefully remove the old NOX sensor.
- Install the New Sensor: Install the new NOX sensor, ensuring it is properly seated and tightened to the manufacturer’s specified torque.
- Reconnect Electrical Connector: Reconnect the electrical connector to the new sensor.
- Reconnect Battery: Reconnect the vehicle’s battery.
- Test the System: Use an OBD-II scanner to clear the P13DF code and monitor the NOX sensor readings to ensure it is functioning correctly.
- Verify Operation: Start the engine and monitor for any unusual readings. Confirm that the engine is running smoothly and that the P13DF code does not return.
3.4. Reprogramming Or Replacing The AdBlue Control Unit
If the AdBlue control unit (ECU) is faulty, it may need to be reprogrammed or replaced. This process typically requires specialized equipment and expertise. AutoExplain.com offers remote programming services to assist with this:
- Preparation: Gather the necessary tools, including a diagnostic tool, programming interface, and the appropriate software.
- Backup Existing Data: Before reprogramming, back up the existing data from the control unit to prevent data loss.
- Connect to the Control Unit: Connect the diagnostic tool and programming interface to the vehicle’s diagnostic port and establish communication with the control unit.
- Reprogram the Control Unit: Follow the instructions provided by the diagnostic tool and software to reprogram the control unit with the latest software version or the correct calibration data.
- Verify Programming: After reprogramming, verify that the process was successful and that the control unit is functioning correctly.
- Clear Error Codes: Use the diagnostic tool to clear the P13DF code and any other related error codes.
- Test the System: Perform a system test to ensure that the AdBlue system is functioning correctly and that the P13DF code does not return.
If reprogramming is not possible or successful, the control unit may need to be replaced. Follow the manufacturer’s instructions for replacing the control unit and then reprogram it as described above. AutoExplain.com can provide the necessary remote support and programming services to ensure a successful outcome.
3.5. Repairing Wiring And Connection Issues
Addressing wiring and connection issues is crucial for resolving the P13DF Mercedes fault code. Follow these steps:
- Preparation: Gather the necessary tools, including a multimeter, wire stripper, crimping tool, soldering iron, and electrical tape.
- Identify Damaged Wires or Connectors: Locate any damaged, corroded, or loose wires and connectors in the AdBlue system.
- Repair Damaged Wires: Repair damaged wires by stripping the insulation, twisting the wires together, soldering them for a secure connection, and covering them with electrical tape or heat shrink tubing.
- Replace Damaged Connectors: Replace damaged connectors with new ones, ensuring they are properly crimped and securely connected.
- Clean Corroded Terminals: Clean corroded terminals with a wire brush or terminal cleaner to ensure a good electrical connection.
- Secure Connections: Ensure that all connections are properly seated and secured to prevent future issues.
- Test the Circuits: Use a multimeter to test the repaired circuits for continuity and proper voltage.
- Protect Wiring: Protect the repaired wiring by routing it properly and securing it with cable ties or clamps.
3.6. Ensuring Proper AdBlue Quality And Concentration
Maintaining the correct quality and concentration of AdBlue is essential for the proper functioning of the SCR system. Follow these steps:
- Drain Contaminated AdBlue: If the AdBlue solution is contaminated or expired, drain the tank completely.
- Clean the Tank: Clean the AdBlue tank to remove any sediment or debris.
- Refill with Fresh AdBlue: Refill the tank with fresh, high-quality AdBlue solution that meets the required specifications (32.5% to 33.5% urea concentration).
- Test the Concentration: Use a refractometer to test the concentration of the AdBlue solution and ensure it is within the acceptable range.
- Store AdBlue Properly: Store AdBlue in a cool, dry place away from direct sunlight and extreme temperatures to prevent degradation.
- Regularly Check AdBlue Quality: Regularly check the quality and concentration of the AdBlue solution to ensure it remains in good condition.
By following these steps, you can ensure that the AdBlue system functions correctly and that the P13DF code is resolved. AutoExplain.com is here to assist you with any questions or concerns you may have during this process.

4. Preventing Future AdBlue System Problems
Preventing future AdBlue system problems is essential for maintaining the performance and reliability of your Mercedes-Benz vehicle. Regular maintenance and proactive measures can help avoid issues that trigger the P13DF Mercedes fault code.
4.1. Regular Maintenance Tips For The AdBlue System
- Check AdBlue Levels Regularly: Monitor the AdBlue level and refill the tank as needed. Low levels can trigger warning lights and affect system performance.
- Use High-Quality AdBlue: Always use AdBlue that meets ISO 22241 standards. This ensures the correct concentration and purity, preventing contamination and system damage.
- Inspect the AdBlue Injector: Periodically inspect the AdBlue injector for any signs of clogging or damage. Clean or replace it as necessary to maintain proper spray patterns and system efficiency.
- Check for Leaks: Regularly inspect the AdBlue tank, pump, and lines for any leaks. Address leaks promptly to prevent fluid loss and potential system malfunctions.
- Monitor System Performance: Use an OBD-II scanner to monitor the AdBlue system’s performance. Check for any pending or active fault codes and address them promptly to prevent further issues.
- Inspect Wiring and Connections: Regularly inspect the wiring and connections associated with the AdBlue system. Ensure they are secure and free from corrosion.
4.2. The Importance Of Using High-Quality AdBlue
Using high-quality AdBlue is crucial for the proper functioning and longevity of the SCR system. Low-quality AdBlue can contain impurities that damage the AdBlue injector, pump, and catalytic converter. Ensure that the AdBlue you use meets the ISO 22241 standard to prevent these issues.
4.3. Proper Storage Of AdBlue
Proper storage of AdBlue is essential to maintain its quality and prevent degradation. Follow these guidelines:
- Store in a Cool, Dry Place: Store AdBlue in a cool, dry place away from direct sunlight and extreme temperatures.
- Use a Sealed Container: Keep AdBlue in a sealed container to prevent contamination from dirt, dust, and other foreign substances.
- Avoid Metal Containers: Do not store AdBlue in metal containers, as it can corrode and contaminate the solution.
- Check Expiry Date: Always check the expiry date of AdBlue before use. Expired AdBlue may degrade and cause system malfunctions.
- Handle with Clean Equipment: Use clean equipment when handling AdBlue to prevent contamination.
4.4. Recognizing Early Warning Signs Of AdBlue System Issues
Recognizing early warning signs of AdBlue system issues can help prevent more significant problems down the road. Be alert for the following:
- Warning Lights: Pay attention to any warning lights on the dashboard related to the AdBlue system. These lights indicate that a fault has been detected and should be investigated promptly.
- Reduced Engine Performance: Notice any decrease in engine power or fuel efficiency. This can be a sign of AdBlue system issues affecting engine performance.
- Unusual Noises: Listen for any unusual noises coming from the AdBlue pump or injector. These noises can indicate a malfunctioning component.
- Increased Emissions: Notice any increase in exhaust emissions or a strong odor. This can be a sign that the AdBlue system is not effectively reducing NOx emissions.
- Frequent Refills: If you find yourself needing to refill the AdBlue tank more frequently than usual, it could indicate a leak or other system problem.
4.5. The Benefits Of Regular Professional Inspections
Regular professional inspections of the AdBlue system offer several benefits:
- Early Detection: Professional technicians can identify potential issues early, before they lead to more significant problems.
- Accurate Diagnostics: Technicians have the expertise and tools to accurately diagnose AdBlue system issues, including the P13DF Mercedes fault code.
- Proper Maintenance: Technicians can perform necessary maintenance tasks, such as cleaning injectors and checking fluid levels, to keep the system in optimal condition.
- Software Updates: Technicians can ensure that the AdBlue control unit has the latest software updates, which can improve system performance and prevent malfunctions.
- Warranty Compliance: Regular professional inspections can help maintain warranty compliance, ensuring that any covered repairs are handled promptly and correctly.
By following these preventive measures, you can minimize the risk of AdBlue system problems and keep your Mercedes-Benz vehicle running smoothly and efficiently. AutoExplain.com is here to support you with expert advice and remote assistance whenever you need it.
5. AutoExplain.Com: Your Partner In Resolving The P13DF Code
When faced with the P13DF Mercedes fault code, having a reliable partner to provide expert diagnostics, programming, and support is essential. AutoExplain.com offers a comprehensive range of services to help you resolve AdBlue system issues efficiently and effectively.
5.1. Expert Remote Diagnostics For Accurate Solutions
AutoExplain.com provides expert remote diagnostics to accurately identify the root cause of the P13DF fault code. Our experienced technicians use advanced diagnostic tools and techniques to analyze your vehicle’s data and pinpoint the exact issue, ensuring that you receive the most effective solution.
5.2. Remote Programming And Software Installation Services
In many cases, resolving the P13DF code requires reprogramming the AdBlue control unit or installing updated software. AutoExplain.com offers remote programming and software installation services to ensure that your vehicle’s system is functioning correctly. Our technicians can remotely access your vehicle’s ECU and perform the necessary updates and calibrations, saving you time and money.
5.3. Comprehensive Support For AdBlue System Troubleshooting
AutoExplain.com offers comprehensive support for all your AdBlue system troubleshooting needs. Whether you have questions about the P13DF code, need help diagnosing a problem, or require assistance with a repair, our team of experts is here to help. We provide step-by-step guidance and technical assistance to ensure that you can resolve your AdBlue system issues quickly and effectively.
5.4. Why Choose AutoExplain.Com For Your Mercedes-Benz Needs?
Choosing AutoExplain.com for your Mercedes-Benz needs offers several advantages:
- Expertise: Our team of technicians has extensive experience working with Mercedes-Benz vehicles and their AdBlue systems.
- Remote Convenience: We offer remote diagnostics, programming, and support, allowing you to resolve your vehicle’s issues from the comfort of your own home or shop.
- Cost-Effectiveness: Our services are competitively priced, helping you save money on costly repairs.
- Timely Solutions: We understand the importance of getting your vehicle back on the road quickly, so we provide timely and efficient solutions to your AdBlue system issues.
- Comprehensive Support: We offer comprehensive support for all your AdBlue system needs, from diagnostics to repairs.
5.5. Contact Us For Fast And Professional Assistance
If you are experiencing the P13DF Mercedes fault code or any other AdBlue system issues, don’t hesitate to contact AutoExplain.com for fast and professional assistance. Our team is ready to help you diagnose and resolve your vehicle’s problems quickly and efficiently.
Contact Information:
- Address: 4590 Angus Road, New York, United States
- WhatsApp: (+84)967469410
- Email: [email protected]
- Website: AutoExplain.com
6. Understanding The Technical Aspects Of The AdBlue System
To effectively diagnose and resolve issues related to the P13DF Mercedes fault code, it’s important to understand the technical aspects of the AdBlue system. This knowledge enables technicians and vehicle owners to approach troubleshooting with a deeper understanding of the system’s components and functions.
6.1. Detailed Look At SCR Technology
Selective Catalytic Reduction (SCR) is an advanced emissions control technology used in modern diesel engines to reduce nitrogen oxide (NOx) emissions. The SCR system injects a liquid reductant agent, typically AdBlue, into the exhaust stream. This solution reacts with the NOx in the presence of a catalyst to convert it into harmless nitrogen and water.
6.2. Key Components Of The AdBlue System
The AdBlue system consists of several key components that work together to reduce NOx emissions:
- AdBlue Tank: Stores the AdBlue solution.
- AdBlue Pump: Delivers AdBlue from the tank to the injector.
- AdBlue Injector: Injects AdBlue into the exhaust stream.
- NOX Sensor: Monitors the levels of nitrogen oxides in the exhaust.
- SCR Catalytic Converter: Facilitates the chemical reaction between AdBlue and NOx.
- Control Unit (ECU): Manages the entire AdBlue system.
6.3. How The AdBlue System Works In Mercedes-Benz Vehicles
In Mercedes-Benz vehicles, the AdBlue system operates as follows:
- The ECU monitors the engine’s operating conditions and determines the amount of AdBlue needed to reduce NOx emissions.
- The AdBlue pump delivers AdBlue from the tank to the injector.
- The injector sprays AdBlue into the exhaust stream, where it mixes with the hot exhaust gases.
- The mixture passes through the SCR catalytic converter, where the chemical reaction converts NOx into nitrogen and water.
- The NOX sensor monitors the levels of nitrogen oxides in the exhaust and provides feedback to the ECU, which adjusts the AdBlue injection rate as needed.
6.4. Common Failure Points In The AdBlue System
Several common failure points can lead to issues with the AdBlue system and trigger the P13DF Mercedes fault code:
- AdBlue Injector Clogging: Deposits can clog the injector, preventing it from spraying AdBlue properly.
- AdBlue Pump Failure: The pump can fail due to wear and tear or contamination of the AdBlue solution.
- NOX Sensor Malfunction: The sensor can fail due to exposure to high temperatures and corrosive exhaust gases.
- Wiring and Connection Issues: Damaged or corroded wiring and connectors can disrupt the system’s electrical signals.
- Control Unit Failure: The ECU can fail due to electrical damage or software issues.
6.5. Understanding Diagnostic Trouble Codes (DTCs) Related To The AdBlue System
Diagnostic Trouble Codes (DTCs) provide valuable information about the nature of the problem within the AdBlue system. In addition to the P13DF code, other common DTCs related to the AdBlue system include:
- P203B: Reductant Level Sensor Circuit Range/Performance.
- P20FA: Reductant Injection Valve Circuit Open.
- P208A: Reductant Pump Control Circuit Open.
- P229F: NOx Sensor Circuit Range/Performance.
Understanding these technical aspects of the AdBlue system can help technicians and vehicle owners more effectively diagnose and resolve issues related to the P13DF Mercedes fault code. AutoExplain.com is dedicated to providing the expertise and support needed to keep your Mercedes-Benz vehicle running smoothly and efficiently.
7. FAQ: Addressing Common Questions About The P13DF Code
Here are some frequently asked questions (FAQ) to help you better understand and address the P13DF Mercedes fault code:
1. What does the P13DF fault code mean?
The P13DF fault code indicates a malfunction within the AdBlue system of a Mercedes-Benz vehicle, specifically related to its ability to reduce nitrogen oxide (NOx) emissions.
2. What are the common symptoms associated with the P13DF code?
Common symptoms include the check engine light, reduced engine power, emergency mode, start limit, and warning messages related to the AdBlue system.
3. Can I drive my car with the P13DF code?
Driving with the P13DF code may be possible, but it’s not recommended. The vehicle may enter emergency mode with limited speed, and eventually, a start limit may be imposed, preventing the engine from starting.
4. What are the possible causes of the P13DF code?
Possible causes include a faulty AdBlue injector, a defective AdBlue pump, a malfunctioning NOX sensor, issues with the AdBlue control unit, wiring and connection problems, and poor AdBlue quality.
5. How can I diagnose the P13DF code?
Diagn