P2201 Mercedes fault code indicating issues with the NOx sensor circuit range or performance can be a diagnostic challenge. AutoExplain.com offers expert remote support to help you accurately diagnose and efficiently resolve P2201 errors, minimizing downtime. Get insights into sensor malfunctions and effective repair strategies, ensuring optimal vehicle performance through detailed troubleshooting and system optimization.
1. Understanding the Mercedes P2201 Fault Code
The Mercedes-Benz P2201 fault code signifies a problem within the nitrogen oxide (NOx) sensor circuit range or performance, particularly related to the upstream NOx sensor. This fault code is triggered when the Engine Control Unit (ECU) detects that the electrical signal from the NOx sensor is out of the expected range or that the sensor is not performing as expected. The NOx sensor plays a crucial role in monitoring the levels of nitrogen oxides in the exhaust gases, helping the engine management system regulate emissions and ensure compliance with environmental standards. When the P2201 code appears, it is essential to address the issue promptly to prevent potential damage to the catalytic converter and maintain optimal engine performance. AutoExplain.com provides in-depth diagnostic assistance and repair guidance to resolve P2201 errors efficiently, ensuring your Mercedes-Benz operates smoothly and within emission regulations.
1.1 What Does the P2201 Code Mean?
The P2201 diagnostic trouble code (DTC) specifically refers to the “Nitrogen Oxides (NOx) Sensor Circuit Range/Performance (Bank 1 Sensor 1).” This means the vehicle’s computer, or ECU, has detected an issue with the NOx sensor located on Bank 1, Sensor 1, which is usually the upstream sensor. The NOx sensor is designed to measure the levels of nitrogen oxides in the exhaust gas. The ECU uses this information to optimize the engine’s combustion process and control emissions. When the P2201 code is triggered, it indicates that the signal from the NOx sensor is either out of the expected range or not performing as it should. This can result from various factors, including a faulty sensor, wiring issues, or problems with the ECU itself. Addressing this issue promptly is crucial to ensure the vehicle complies with emission standards and maintains optimal performance. AutoExplain.com offers expert assistance in diagnosing and resolving P2201 errors, providing comprehensive solutions for your Mercedes-Benz.
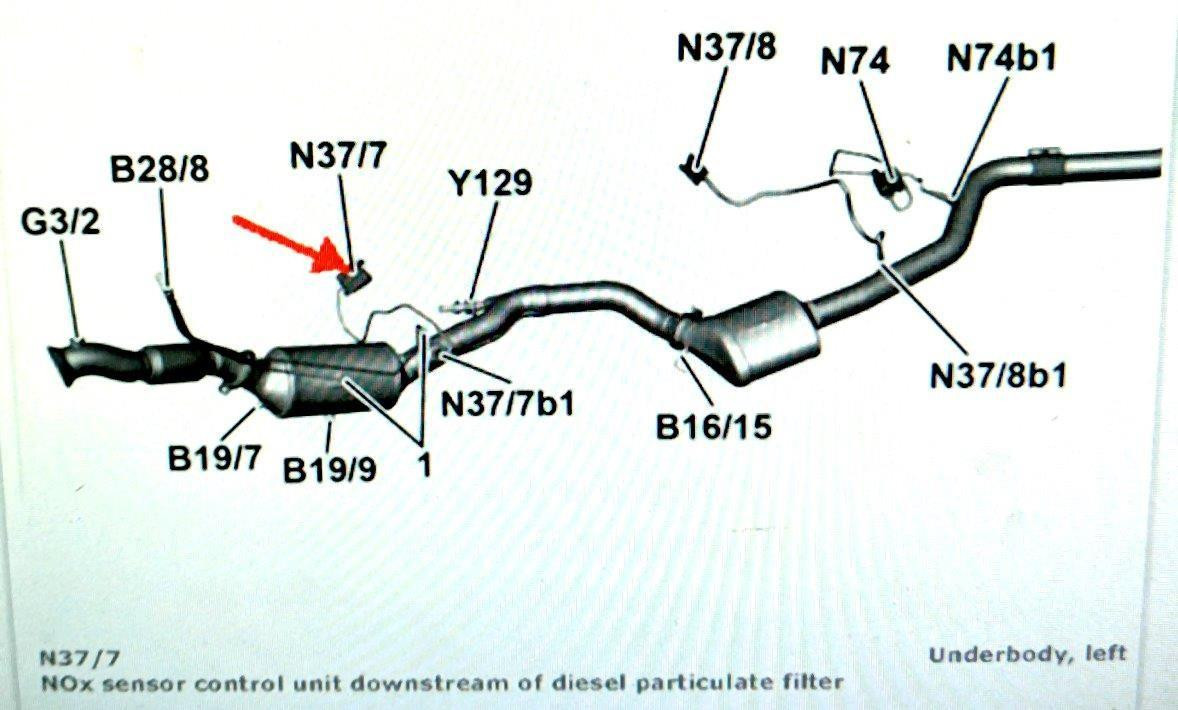
1.2 Location of the NOx Sensor in Mercedes Vehicles
The location of the NOx sensor in Mercedes-Benz vehicles is crucial for accurate diagnosis and repair. Typically, Mercedes vehicles are equipped with two NOx sensors: an upstream sensor (before the catalytic converter) and a downstream sensor (after the catalytic converter). The P2201 code specifically refers to the upstream sensor on Bank 1.
- Upstream NOx Sensor (Bank 1 Sensor 1): This sensor is usually positioned before the catalytic converter. It is responsible for measuring the NOx levels directly from the engine’s exhaust. In Mercedes vehicles, it is often found near the turbocharger or exhaust manifold.
- Downstream NOx Sensor (Bank 1 Sensor 2): Located after the catalytic converter, this sensor monitors the effectiveness of the catalytic converter in reducing NOx emissions.
Identifying the correct sensor location is essential for accurate diagnosis and repair. The upstream NOx sensor (Bank 1 Sensor 1) is the focus when dealing with the P2201 code. AutoExplain.com provides detailed diagrams and guidance to help you locate the NOx sensors in your specific Mercedes model, ensuring efficient and accurate repairs.
 Upstream NOx sensor and downstream NOx sensor
1.3 Common Symptoms Associated with the P2201 Code
When the P2201 code is triggered in a Mercedes-Benz, several symptoms may become noticeable, indicating an issue with the NOx sensor circuit. Recognizing these symptoms can aid in early diagnosis and prevent further complications. Common symptoms associated with the P2201 code include:
- Check Engine Light: The most common indicator is the illumination of the Check Engine Light on the dashboard. This light signals that the vehicle’s computer has detected a problem.
- Reduced Engine Performance: The engine may exhibit decreased power, acceleration, and overall performance. This can result from the ECU adjusting engine parameters to compensate for incorrect NOx sensor readings.
- Poor Fuel Economy: Inefficient combustion due to incorrect NOx readings can lead to a noticeable drop in fuel efficiency.
- Rough Idling: The engine may idle roughly or stall, particularly at low speeds or when stopped.
- Increased Emissions: Failure of the NOx sensor can lead to elevated levels of nitrogen oxides in the exhaust, causing the vehicle to fail emissions tests.
- Delayed Regeneration of Diesel Particulate Filter (DPF): In diesel vehicles, the DPF may not regenerate properly, leading to further performance issues and potential damage.
Identifying these symptoms early can help you address the P2201 code promptly, preventing further damage and maintaining optimal vehicle performance. AutoExplain.com offers expert diagnostic support to help you pinpoint the exact cause of these symptoms and implement effective solutions.
2. Causes of the Mercedes P2201 Fault Code
Identifying the root causes of the Mercedes P2201 fault code is essential for effective and lasting repairs. The P2201 code indicates a problem with the NOx sensor circuit range or performance, but several underlying issues can trigger this code. Here are some common causes:
- Faulty NOx Sensor: The sensor itself may be defective due to age, contamination, or physical damage. A malfunctioning sensor can provide inaccurate readings to the ECU, triggering the P2201 code.
- Wiring Issues: Damaged, corroded, or loose wiring connected to the NOx sensor can disrupt the signal transmission. This includes issues with the sensor’s wiring harness or connectors.
- Exhaust Leaks: Leaks in the exhaust system near the NOx sensor can affect the accuracy of the sensor readings. Exhaust leaks can introduce additional air or alter the gas composition, leading to incorrect measurements.
- Contaminated Sensor: The NOx sensor can become contaminated by oil, soot, or other debris, affecting its performance and accuracy.
- ECU Issues: Although less common, a malfunctioning Engine Control Unit (ECU) can cause the P2201 code. The ECU may fail to interpret the sensor signals correctly or send incorrect commands.
- Software Problems: Outdated or corrupted ECU software can lead to misinterpretation of sensor data.
- Catalytic Converter Problems: A failing catalytic converter can affect the NOx levels, leading to inaccurate readings and triggering the P2201 code.
Understanding these potential causes can help you approach the diagnosis methodically, identifying the precise issue and implementing the appropriate repair. AutoExplain.com provides detailed diagnostic procedures and expert support to help you pinpoint the exact cause of the P2201 code in your Mercedes-Benz.
2.1 Common Wiring and Connector Issues
Wiring and connector issues are frequent causes of the P2201 fault code in Mercedes vehicles. The NOx sensor’s wiring and connectors are exposed to harsh conditions, including high temperatures, vibrations, and exposure to corrosive elements, making them susceptible to damage. Common wiring and connector problems include:
- Corrosion: Corrosion on the connector pins can impede electrical conductivity, disrupting the signal between the sensor and the ECU.
- Loose Connections: Connectors may become loose due to vibration or accidental disconnections during maintenance, leading to intermittent or absent signals.
- Damaged Wires: Wires can be damaged by heat, abrasion, or physical stress. This can result in shorts, open circuits, or erratic signals.
- Wire Breaks: Wires may break internally, particularly near connectors or points of stress, making them difficult to detect visually.
- Poor Ground Connections: Inadequate grounding can lead to inaccurate sensor readings. Ensure that the ground connections for the NOx sensor and the ECU are clean and secure.
- Harness Damage: The wiring harness itself may suffer damage from rubbing against other components or exposure to chemicals.
Inspecting the wiring and connectors thoroughly is crucial when diagnosing the P2201 code. Use a multimeter to check for continuity and voltage at the sensor connector. Clean any corroded connectors with electrical contact cleaner and repair or replace damaged wiring as necessary. AutoExplain.com offers detailed wiring diagrams and diagnostic procedures to help you identify and resolve wiring and connector issues effectively.
2.2 NOx Sensor Failure: Signs and Diagnosis
NOx sensor failure is a primary cause of the P2201 fault code in Mercedes-Benz vehicles. The NOx sensor is a critical component in the exhaust system, responsible for monitoring nitrogen oxide levels and helping the ECU regulate emissions. When the NOx sensor fails, it can lead to inaccurate readings and trigger the P2201 code. Here are some signs and diagnostic steps to identify NOx sensor failure:
Signs of NOx Sensor Failure:
- Illuminated Check Engine Light: This is the most common indicator of a NOx sensor issue.
- Reduced Engine Performance: The engine may exhibit decreased power and acceleration.
- Poor Fuel Economy: Inaccurate sensor readings can lead to inefficient combustion and reduced fuel efficiency.
- Rough Idling: The engine may idle unevenly or stall.
- Increased Emissions: The vehicle may fail emissions tests due to elevated NOx levels.
- Delayed DPF Regeneration (Diesel Vehicles): The Diesel Particulate Filter (DPF) may not regenerate correctly, leading to further complications.
Diagnostic Steps:
- Visual Inspection: Check the NOx sensor for any signs of physical damage, such as cracks, corrosion, or melted components.
- Scan Tool Diagnosis: Use an OBD-II scanner to confirm the presence of the P2201 code and check for any other related codes.
- Live Data Monitoring: Monitor the NOx sensor readings using a scan tool. Compare the readings with the manufacturer’s specifications. Inconsistent or out-of-range values indicate a potential sensor failure.
- Wiring and Connector Check: Inspect the wiring and connectors leading to the NOx sensor for damage, corrosion, or loose connections.
- Resistance Test: Use a multimeter to check the resistance of the NOx sensor. Compare the measured resistance with the values specified in the service manual.
- Signal Voltage Test: With the engine running, use a multimeter to measure the voltage signal from the NOx sensor. The voltage should vary as the engine load changes.
- Sensor Adaptation Reset: After replacing the NOx sensor, use a diagnostic tool to reset the sensor adaptation values in the ECU.
If the diagnostic steps indicate a faulty NOx sensor, replacement is usually necessary. AutoExplain.com provides expert guidance and technical support to help you diagnose NOx sensor failures accurately and perform the replacement efficiently.
2.3 Exhaust Leaks and Their Impact on Sensor Readings
Exhaust leaks can significantly impact the readings of the NOx sensor and contribute to the P2201 fault code in Mercedes-Benz vehicles. Leaks in the exhaust system, particularly near the NOx sensor, can introduce external air into the exhaust stream or alter the composition of the exhaust gases. This can lead to inaccurate measurements and trigger the P2201 code. Here’s how exhaust leaks affect sensor readings:
- Dilution of Exhaust Gases: Exhaust leaks allow fresh air to enter the exhaust system, diluting the concentration of exhaust gases. This dilution can cause the NOx sensor to read lower NOx levels than are actually present.
- Altered Gas Composition: Leaks can change the overall composition of the exhaust gases, affecting the sensor’s ability to accurately measure NOx levels.
- Erratic Sensor Readings: The introduction of air and changes in gas composition can cause the NOx sensor to produce inconsistent or erratic readings, leading to the P2201 code.
- Oxygen Sensor Interference: Exhaust leaks can also affect the readings of oxygen sensors, which work in conjunction with the NOx sensor to manage emissions. Inaccurate oxygen sensor readings can further complicate the engine’s ability to regulate emissions.
To diagnose exhaust leaks, perform a thorough visual inspection of the exhaust system, looking for signs of damage, corrosion, or loose connections. Pay particular attention to areas near the NOx sensor, exhaust manifold, catalytic converter, and exhaust pipes. Use a smoke machine to introduce smoke into the exhaust system and identify any leaks. Repair any exhaust leaks promptly by welding, patching, or replacing damaged components. After repairing the leaks, clear the P2201 code and monitor the NOx sensor readings to ensure they are within the specified range. AutoExplain.com offers expert guidance and technical support to help you diagnose and repair exhaust leaks, ensuring accurate sensor readings and optimal engine performance.
3. Diagnosing the P2201 Code: A Step-by-Step Guide
Diagnosing the P2201 code in a Mercedes-Benz requires a systematic approach to identify the root cause of the problem. This step-by-step guide provides a comprehensive procedure for diagnosing the P2201 code effectively:
Step 1: Preliminary Inspection
- Visual Inspection: Begin by visually inspecting the NOx sensor, wiring, and connectors for any signs of damage, corrosion, or loose connections.
- Check Engine Light: Verify that the Check Engine Light is illuminated and note any other active trouble codes.
Step 2: Retrieve Diagnostic Trouble Codes
- OBD-II Scanner: Use an OBD-II scanner to retrieve all diagnostic trouble codes (DTCs) stored in the ECU.
- Record Codes: Record all the codes present, including the P2201 code. This information will help you understand the overall context of the problem.
Step 3: Clear Codes and Test Drive
- Clear Codes: Clear all the DTCs using the OBD-II scanner.
- Test Drive: Perform a test drive under similar conditions when the code was triggered to see if the P2201 code returns.
Step 4: Inspect Wiring and Connectors
- Wiring Inspection: Carefully inspect the wiring harness leading to the NOx sensor for any signs of damage, such as cuts, abrasions, or melted insulation.
- Connector Inspection: Check the connectors for corrosion, bent pins, or loose connections. Clean the connectors with electrical contact cleaner and ensure they are securely connected.
Step 5: Test the NOx Sensor
- Resistance Test: Use a multimeter to measure the resistance of the NOx sensor. Compare the measured resistance with the values specified in the service manual.
- Voltage Test: With the engine running, use a multimeter to measure the voltage signal from the NOx sensor. The voltage should vary as the engine load changes.
- Live Data Monitoring: Use the OBD-II scanner to monitor the live data from the NOx sensor. Compare the readings with the manufacturer’s specifications.
Step 6: Check for Exhaust Leaks
- Visual Inspection: Inspect the exhaust system for any signs of leaks, such as soot deposits or corrosion.
- Smoke Test: Use a smoke machine to introduce smoke into the exhaust system and identify any leaks.
Step 7: ECU Diagnostics
- Software Update: Check if there are any available software updates for the ECU. Outdated software can sometimes cause misinterpretation of sensor data.
- ECU Testing: If all other components check out, the ECU itself may be faulty. Consult with a qualified technician to perform ECU diagnostics.
By following this step-by-step guide, you can systematically diagnose the P2201 code and identify the root cause of the problem. AutoExplain.com provides expert guidance and technical support to help you navigate each step of the diagnostic process, ensuring accurate and effective repairs.
3.1 Using an OBD-II Scanner for Diagnosis
An OBD-II (On-Board Diagnostics II) scanner is an indispensable tool for diagnosing the P2201 code in Mercedes-Benz vehicles. It allows you to retrieve diagnostic trouble codes, monitor live data, and perform various tests to pinpoint the source of the problem. Here’s how to use an OBD-II scanner effectively:
Step 1: Connect the Scanner
- Locate the OBD-II port in your Mercedes-Benz. It is typically found under the dashboard on the driver’s side.
- Plug the OBD-II scanner into the port.
Step 2: Power On and Read Codes
- Turn the ignition key to the “ON” position without starting the engine.
- Power on the OBD-II scanner and follow the on-screen prompts to read the stored diagnostic trouble codes (DTCs).
- Record all the codes present, including the P2201 code, along with any other related codes.
Step 3: Understand the Codes
- Use the scanner’s built-in code lookup function or consult a reliable online resource to understand the meaning of each code.
- The P2201 code specifically indicates a problem with the NOx sensor circuit range or performance on Bank 1 Sensor 1.
Step 4: Clear the Codes
- After recording the codes, use the scanner to clear the DTCs from the ECU.
- This step helps to determine if the P2201 code returns after addressing potential issues.
Step 5: Monitor Live Data
- Select the “Live Data” or “Data Stream” function on the scanner.
- Monitor the readings from the NOx sensor, including voltage, current, and NOx levels.
- Compare the live data with the manufacturer’s specifications to identify any discrepancies.
Step 6: Perform Diagnostic Tests
- Some advanced OBD-II scanners can perform specific diagnostic tests, such as sensor activation and circuit testing.
- Use these tests to further evaluate the performance of the NOx sensor and related components.
Tips for Using an OBD-II Scanner:
- Consult the Manual: Refer to the scanner’s user manual for detailed instructions on its features and functions.
- Use Reliable Resources: Cross-reference the diagnostic trouble codes with reliable online resources or service manuals to ensure accurate interpretation.
- Keep Software Updated: Ensure that the scanner’s software is up-to-date to access the latest diagnostic information.
By following these steps, you can effectively use an OBD-II scanner to diagnose the P2201 code and identify the root cause of the problem. AutoExplain.com offers expert guidance and technical support to help you interpret the scanner data and perform the necessary repairs.
3.2 Testing the NOx Sensor with a Multimeter
Testing the NOx sensor with a multimeter is an essential step in diagnosing the P2201 code in Mercedes-Benz vehicles. A multimeter allows you to measure the electrical characteristics of the sensor, helping you determine if it is functioning correctly. Here’s how to test the NOx sensor with a multimeter:
Step 1: Gather Information
- Service Manual: Consult the service manual for your specific Mercedes-Benz model to obtain the correct testing procedures and specifications for the NOx sensor.
- Wiring Diagram: Obtain a wiring diagram to identify the correct terminals for testing.
Step 2: Prepare the Multimeter
- Set the Multimeter: Set the multimeter to the appropriate settings for measuring resistance (Ohms) and voltage (Volts).
- Safety Precautions: Ensure the vehicle is turned off and the ignition is in the “OFF” position before beginning the test.
Step 3: Perform a Resistance Test
- Disconnect the Sensor: Disconnect the NOx sensor from its wiring harness.
- Measure Resistance: Use the multimeter to measure the resistance between the specified terminals on the sensor.
- Compare Readings: Compare the measured resistance values with the specifications in the service manual. A significantly high or low resistance reading indicates a faulty sensor.
Step 4: Perform a Voltage Test
- Reconnect the Sensor: Reconnect the NOx sensor to its wiring harness.
- Start the Engine: Start the engine and allow it to reach operating temperature.
- Measure Voltage: Use the multimeter to measure the voltage between the specified terminals on the sensor while the engine is running.
- Vary Engine Load: Observe how the voltage changes as the engine load varies. The voltage should fluctuate within a specified range.
- Compare Readings: Compare the measured voltage values and fluctuations with the specifications in the service manual. Inconsistent or out-of-range voltage readings indicate a potential sensor failure.
Step 5: Analyze the Results
- Faulty Sensor: If the resistance or voltage readings are outside the specified range, the NOx sensor is likely faulty and needs to be replaced.
- Wiring Issues: If the readings are erratic or inconsistent, check the wiring and connectors for damage, corrosion, or loose connections.
Tips for Testing with a Multimeter:
- Accuracy: Ensure the multimeter is calibrated and in good working condition for accurate readings.
- Safety: Follow all safety precautions when working with electrical components.
- Documentation: Record all readings and observations for future reference.
By following these steps, you can effectively test the NOx sensor with a multimeter and determine if it is functioning correctly. AutoExplain.com offers expert guidance and technical support to help you interpret the multimeter readings and perform the necessary repairs.
3.3 Inspecting the Exhaust System for Leaks
Inspecting the exhaust system for leaks is a critical step in diagnosing the P2201 code in Mercedes-Benz vehicles. Exhaust leaks can affect the readings of the NOx sensor, leading to inaccurate measurements and triggering the P2201 code. Here’s how to inspect the exhaust system for leaks effectively:
Step 1: Visual Inspection
- Preparation: Ensure the vehicle is cool before starting the inspection.
- Exhaust Components: Examine all exhaust components, including the exhaust manifold, catalytic converter, exhaust pipes, and mufflers, for signs of damage, corrosion, or soot deposits.
- Connections: Check all connections and joints for tightness and signs of leakage.
Step 2: Listen for Leaks
- Start the Engine: Start the engine and listen for any unusual hissing or roaring sounds coming from the exhaust system.
- Identify Leak Location: Try to pinpoint the location of the sound to identify potential leak areas.
Step 3: Use a Smoke Machine
- Preparation: If a visual inspection and listening test do not reveal any leaks, use a smoke machine for a more thorough inspection.
- Connect Smoke Machine: Connect the smoke machine to the exhaust system, typically through the tailpipe.
- Introduce Smoke: Introduce smoke into the exhaust system and observe where the smoke escapes.
- Identify Leaks: Any escaping smoke indicates the presence of an exhaust leak.
Step 4: Soapy Water Test
- Preparation: If a smoke machine is not available, you can use a soapy water solution to detect leaks.
- Apply Soapy Water: Mix water with a small amount of dish soap to create a soapy solution.
- Spray Solution: Spray the soapy solution onto the exhaust system, focusing on joints, connections, and areas of suspected leaks.
- Observe Bubbles: Look for bubbles forming in the soapy solution, which indicates the presence of an exhaust leak.
Step 5: Repair Leaks
- Welding: If the leak is small and the surrounding metal is in good condition, welding may be an option.
- Patching: Exhaust patches or wraps can be used for temporary repairs.
- Component Replacement: For severe leaks or damaged components, replacement is necessary.
Tips for Inspecting the Exhaust System:
- Safety: Ensure the exhaust system is cool before performing a visual inspection.
- Thoroughness: Be thorough and methodical in your inspection, checking all components and connections.
- Documentation: Record all findings and repairs for future reference.
By following these steps, you can effectively inspect the exhaust system for leaks and address any issues that may be contributing to the P2201 code. AutoExplain.com offers expert guidance and technical support to help you diagnose and repair exhaust leaks, ensuring accurate sensor readings and optimal engine performance.
4. Repairing the P2201 Code: Solutions and Procedures
After diagnosing the root cause of the P2201 code in your Mercedes-Benz, the next step is to implement the appropriate repairs. This section provides detailed solutions and procedures for addressing the common issues associated with the P2201 code.
4.1 Replacing a Faulty NOx Sensor
Replacing a faulty NOx sensor is a common solution for the P2201 code. Here’s a step-by-step procedure to replace the NOx sensor effectively:
Step 1: Preparation
- Gather Tools and Materials: Collect the necessary tools, including a wrench or socket set, a new NOx sensor, and safety gloves.
- Safety Precautions: Ensure the engine is cool and the ignition is in the “OFF” position before starting the replacement.
- Locate the Sensor: Identify the location of the faulty NOx sensor (Bank 1 Sensor 1) based on your vehicle’s service manual.
Step 2: Disconnect the Old Sensor
- Disconnect Electrical Connector: Disconnect the electrical connector from the NOx sensor. Be careful not to damage the connector or wiring.
- Remove Sensor: Use a wrench or socket to carefully unscrew the old NOx sensor from the exhaust system. Note the orientation of the sensor for proper installation of the new one.
Step 3: Install the New Sensor
- Apply Anti-Seize Lubricant: Apply a small amount of anti-seize lubricant to the threads of the new NOx sensor. This will help prevent corrosion and make future removal easier.
- Install Sensor: Carefully screw the new NOx sensor into the exhaust system, ensuring it is properly aligned and tightened to the manufacturer’s specified torque.
- Connect Electrical Connector: Reconnect the electrical connector to the new NOx sensor, ensuring it is securely attached.
Step 4: Verify the Repair
- Clear DTCs: Use an OBD-II scanner to clear the P2201 code and any other related diagnostic trouble codes (DTCs) from the ECU.
- Start the Engine: Start the engine and allow it to run for a few minutes to ensure the new NOx sensor is functioning correctly.
- Monitor Sensor Readings: Use the OBD-II scanner to monitor the live data from the new NOx sensor. Compare the readings with the manufacturer’s specifications.
- Test Drive: Perform a test drive under similar conditions when the code was triggered to verify that the P2201 code does not return.
Tips for Replacing the NOx Sensor:
- Use Quality Parts: Use a high-quality replacement NOx sensor from a reputable manufacturer to ensure reliable performance.
- Follow Torque Specifications: Tighten the new NOx sensor to the manufacturer’s specified torque to prevent leaks and damage.
- Document the Repair: Record the date of the replacement and the part number of the new NOx sensor for future reference.
By following these steps, you can effectively replace a faulty NOx sensor and resolve the P2201 code in your Mercedes-Benz. AutoExplain.com offers expert guidance and technical support to help you perform the replacement efficiently and accurately.
4.2 Repairing Damaged Wiring and Connectors
Repairing damaged wiring and connectors is crucial for resolving the P2201 code in Mercedes-Benz vehicles. Faulty wiring and connectors can disrupt the signal between the NOx sensor and the ECU, leading to inaccurate readings and triggering the code. Here’s a detailed procedure for repairing damaged wiring and connectors:
Step 1: Inspect Wiring and Connectors
- Visual Inspection: Carefully inspect the wiring harness and connectors leading to the NOx sensor for signs of damage, such as cuts, abrasions, corrosion, or loose connections.
- Continuity Test: Use a multimeter to perform a continuity test on each wire in the harness to check for breaks or shorts.
- Voltage Test: With the engine running, use a multimeter to measure the voltage at the connector to ensure proper power and ground.
Step 2: Repair Wiring
- Cutting and Splicing: If a wire is damaged, cut out the damaged section and splice in a new section of wire using butt connectors or soldering.
- Heat Shrink Tubing: Use heat shrink tubing to insulate the splice and protect it from moisture and corrosion.
- Wire Routing: Ensure the repaired wire is properly routed and secured to prevent future damage.
Step 3: Repair Connectors
- Cleaning: Clean corroded connector pins with electrical contact cleaner and a small brush.
- Tightening: Tighten loose connector pins using a small screwdriver or pick.
- Replacement: If the connector is severely damaged, replace it with a new connector. Ensure the new connector is properly crimped or soldered to the wires.
Step 4: Verify the Repair
- Reconnect Components: Reconnect the wiring harness and connectors to the NOx sensor and ECU.
- Clear DTCs: Use an OBD-II scanner to clear the P2201 code and any other related diagnostic trouble codes (DTCs) from the ECU.
- Start the Engine: Start the engine and allow it to run for a few minutes to ensure the repaired wiring and connectors are functioning correctly.
- Monitor Sensor Readings: Use the OBD-II scanner to monitor the live data from the NOx sensor. Compare the readings with the manufacturer’s specifications.
- Test Drive: Perform a test drive under similar conditions when the code was triggered to verify that the P2201 code does not return.
Tips for Repairing Wiring and Connectors:
- Use Quality Materials: Use high-quality wiring, connectors, and repair materials to ensure reliable performance.
- Follow Proper Procedures: Follow proper splicing, soldering, and crimping procedures to create secure and durable connections.
- Protect Repairs: Protect repaired wiring and connectors from moisture, corrosion, and physical damage.
By following these steps, you can effectively repair damaged wiring and connectors and resolve the P2201 code in your Mercedes-Benz. AutoExplain.com offers expert guidance and technical support to help you perform the repairs efficiently and accurately.
4.3 Addressing Exhaust Leaks Near the NOx Sensor
Addressing exhaust leaks near the NOx sensor is crucial for resolving the P2201 code in Mercedes-Benz vehicles. Exhaust leaks can affect the readings of the NOx sensor, leading to inaccurate measurements and triggering the P2201 code. Here’s how to address exhaust leaks effectively:
Step 1: Locate the Exhaust Leak
- Visual Inspection: Inspect the exhaust system for signs of leaks, such as soot deposits, corrosion, or damage.
- Listening Test: Start the engine and listen for hissing or roaring sounds coming from the exhaust system.
- Smoke Test: Use a smoke machine to introduce smoke into the exhaust system and identify the location of any leaks.
- Soapy Water Test: Spray a soapy water solution onto the exhaust system and look for bubbles forming, which indicates the presence of a leak.
Step 2: Repair the Exhaust Leak
- Welding: If the leak is small and the surrounding metal is in good condition, welding may be an option. Clean the area around the leak and weld it shut.
- Exhaust Patch: For larger leaks or areas with weakened metal, use an exhaust patch or wrap to seal the leak. Follow the manufacturer’s instructions for application.
- Component Replacement: If the exhaust component is severely damaged or corroded, replace it with a new component.
Step 3: Verify the Repair
- Visual Inspection: After repairing the leak, inspect the area to ensure the repair is secure and there are no remaining leaks.
- Smoke Test: Perform another smoke test to verify that the leak has been completely sealed.
- Clear DTCs: Use an OBD-II scanner to clear the P2201 code and any other related diagnostic trouble codes (DTCs) from the ECU.
- Start the Engine: Start the engine and allow it to run for a few minutes to ensure the repaired exhaust system is functioning correctly.
- Monitor Sensor Readings: Use the OBD-II scanner to monitor the live data from the NOx sensor. Compare the readings with the manufacturer’s specifications.
- Test Drive: Perform a test drive under similar conditions when the code was triggered to verify that the P2201 code does not return.
Tips for Addressing Exhaust Leaks:
- Safety: Ensure the exhaust system is cool before starting any repairs.
- Use Quality Materials: Use high-quality welding equipment, exhaust patches, and replacement components to ensure reliable performance.
- Follow Proper Procedures: Follow proper welding techniques and manufacturer’s instructions for applying exhaust patches.
By following these steps, you can effectively address exhaust leaks near the NOx sensor and resolve the P2201 code in your Mercedes-Benz. AutoExplain.com offers expert guidance and technical support to help you diagnose and repair exhaust leaks, ensuring accurate sensor readings and optimal engine performance.
5. Preventing the P2201 Code: Maintenance and Best Practices
Preventing the P2201 code in your Mercedes-Benz involves regular maintenance and adopting best practices to keep the NOx sensor and related components in good working condition. This section outlines essential maintenance tasks and best practices to help prevent the P2201 code.
5.1 Regular Vehicle Maintenance
Regular vehicle maintenance is crucial for preventing the P2201 code and ensuring the overall health of your Mercedes-Benz. Here are some key maintenance tasks to include in your routine:
- Scheduled Oil Changes: Follow the manufacturer’s recommended oil change intervals to keep the engine properly lubricated and prevent excessive wear.
- Air Filter Replacement: Replace the air filter regularly to ensure clean air flows into the engine, optimizing combustion and reducing emissions.
- Fuel Filter Replacement: Replace the fuel filter to prevent contaminants from reaching the engine, ensuring proper fuel delivery and combustion.
- Spark Plug Replacement: Replace the spark plugs at the recommended intervals to maintain efficient combustion and reduce emissions.
- Exhaust System Inspection: Regularly inspect the exhaust system for leaks, corrosion, or damage. Address any issues promptly to prevent further complications.
- NOx Sensor Inspection: Periodically inspect the NOx sensor and its wiring for damage, corrosion, or loose connections. Clean the sensor and connectors as needed.
- Software Updates: Keep the ECU software up-to-date to ensure proper interpretation of sensor data and optimal engine performance.
5.2 Best Driving Practices
Adopting best driving practices can also help prevent the P2201 code and maintain the health of your Mercedes-Benz. Here are some driving habits to consider:
- Avoid Short Trips: Short trips can prevent the engine from reaching its optimal operating temperature, leading to incomplete combustion and increased emissions.
- Smooth Acceleration: Avoid aggressive acceleration, which can put unnecessary strain on the engine and increase emissions.
- Regular Highway Driving: Occasional highway driving can help burn off deposits in the exhaust system and keep the catalytic converter functioning efficiently.
- Use Quality Fuel: Use high-quality fuel from reputable sources to ensure proper combustion and reduce the risk of contaminants entering the engine.
- Avoid Idling: Excessive idling can lead to incomplete combustion and increased emissions. Turn off the engine when stopped for extended periods.
Monitoring your vehicle’s performance can help you identify potential issues early and prevent the P2201 code. Here are some tips for monitoring vehicle performance:
- Pay Attention to Warning Lights: Take note of any warning lights on the dashboard, such as the Check Engine Light, and address them promptly.
- Monitor Fuel Economy: Track your fuel economy and note any significant changes, which may indicate an issue with the engine or exhaust system.
- Listen for Unusual Noises: Pay attention to any unusual noises coming from the engine or exhaust system, which may indicate a problem.
- Use a Scan Tool: Periodically use an OBD-II scan tool to check for diagnostic trouble codes (DTCs) and monitor live data from the NOx sensor and other components.
By following these maintenance tasks and best practices, you can help prevent the P2201 code and keep your Mercedes-Benz running smoothly. AutoExplain.com offers expert guidance and technical support to help you maintain your vehicle and address any issues that may arise.
6. Advanced Diagnostic Techniques for P2201
When standard diagnostic procedures fail to pinpoint the exact cause of the P2201 code, advanced diagnostic techniques can provide deeper insights and help resolve complex issues. These techniques often require specialized tools and expertise but can be invaluable in diagnosing elusive problems.
6.1 Using an Oscilloscope to Analyze Sensor Signals
An oscilloscope is a powerful tool for analyzing the electrical signals from the NOx sensor and other components in real-time. It can display the voltage and current waveforms, allowing you to identify subtle anomalies that may not be visible with a multimeter or scan tool. Here’s how to use an oscilloscope for advanced diagnostics:


