
To Virginize VGS2-NAG2 transmission control unit (TCU) is essential when replacing a used unit in a Mercedes-Benz. This process resets the TCU to factory settings, allowing it to be adapted to a new vehicle. Using Vediamo, a powerful engineering software for Mercedes-Benz, you can efficiently reset the VGS2NAG2 module to a virgin state.
This guide will walk you through the step-by-step process of how to virgin VGS2NAG2 using Vediamo.
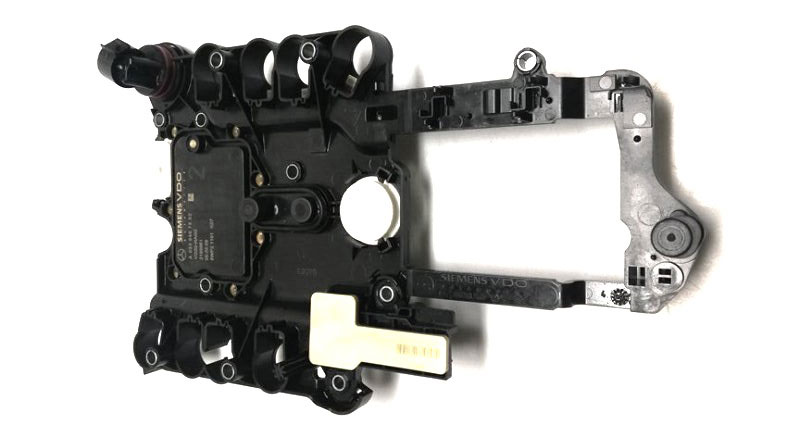
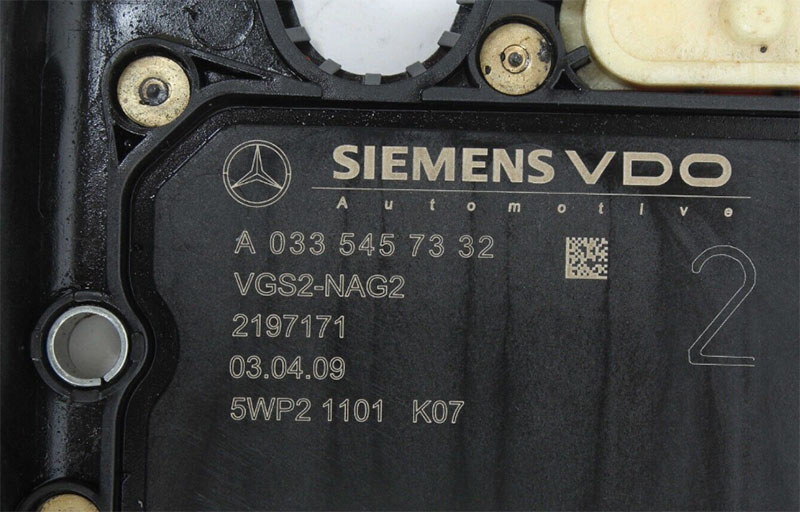
The VGS2NAG2 refers to the second-generation Transmission Control Unit used in Mercedes-Benz’s 7G-Tronic automatic transmissions (722.9). VGS stands for “Vollelektronische Getriebesteuerung,” which translates to “fully electronic transmission control.”
Vehicle examples: E-Class W212, S-Class W221, ML W164, GLK X204, etc.
Function: It controls gear shifting, torque converter lock-up, and adaptation strategies.
VGS2 versions include: 033 545 73 32, and similar units.
These TCUs are personalized and activated to the car’s VIN, immobilizer, and other modules—making reuse a challenge without virginizing first.
When dealing with Mercedes-Benz 7G-Tronic transmissions (722.9), particularly those equipped with VGS2NAG2 Transmission Control Units (TCUs), many technicians mistakenly believe that simply swapping in a used unit will restore functionality. However, the reality is far more complex due to the security architecture and vehicle personalization protocols embedded into the Mercedes-Benz drivetrain control network.
1.2.1. Each VGS2NAG2 Is Locked to Its Original Vehicle
From the moment a VGS2NAG2 TCU is first installed and programmed, it becomes “personalized and activated” to that specific vehicle. This means:
It stores the Vehicle Identification Number (VIN)
It’s activated via SCN (Software Calibration Number) coding
It syncs with Drive Authorization (DAS/Drive Auth) systems
It may also be involved in immobilizer and anti-theft functions
So when you take a used VGS2NAG2 from another car, it’s still tied electronically to its original vehicle. If you plug it into a different vehicle without virginizing, the control unit will refuse to communicate or function, resulting in errors and complete TCU lockout.
1.2.2. Common Issues If You Don’t Virginize
When a non-virginized (used) VGS2NAG2 is installed into a different vehicle, it will cause a series of critical errors that prevent the transmission from operating. These may include:
“Control Unit is Already Personalized”
This means the unit contains old VIN and security data.
“Drive Authorization Denied”
The TCU doesn’t match the current vehicle’s immobilizer and won’t allow gear engagement.
“Control Unit Not Personalized / Not Activated”
The system detects mismatches or incomplete status flags.
No communication with the ECU or limited diagnostics
In many cases, the used TCU won’t even communicate properly with Xentry or OBD tools.
The result? The vehicle stays stuck in Park or Limp Mode, and your client may assume the transmission itself is faulty—when in fact, the problem is purely electronic and procedural.
1.2.3. Virginizing Resets the TCU to a Factory State
Virginizing the VGS2NAG2 wipes its memory of the previous vehicle and resets the following:
Erases stored VIN
Deletes personalization status
Removes SCN coding history
Clears activation flags
Once virginized, the TCU behaves like a brand-new unit—ready to be installed in a different car, re-personalized, and SCN-coded via official diagnostic software like Xentry or Vediamo.
This process effectively unlocks the TCU, allowing it to be matched to a new vehicle, coded to the current hardware setup, and accepted by the vehicle’s security systems.
1.2.4. Why This Matters to Technicians and Customers
New VGS2NAG2 units from Mercedes-Benz are expensive—often costing $1000–$2000 USD or more. For many repair shops or DIY technicians, sourcing a used but working TCU is a cost-effective alternative.
However, without proper virginizing:
The used TCU is essentially useless
You risk bricking the module if you try to code it directly
You waste hours trying to force it to adapt to a new vehicle
By virginizing the unit first, you:
Save significant time and money
Offer clients a professional, cost-saving solution
Before starting, ensure you have the following tools:
=> Download Vediamo software free guidance
=> Learn how to use Vediamo with these books:
Why it matters:
The VGS2NAG2 is a sensitive and expensive component. Any fluctuation in voltage, weak hardware, or unstable connection during the process can result in bricking the TCU — making it unusable.
Checklist:
Work in a static-free, clean environment.
Preferably use a workbench setup with a TCU test harness if available.
Ensure the car battery is fully charged, or better yet, connect a 12V power supply or battery maintainer to avoid voltage drops during operations.
Recommended Interface:
SD Connect C4 or C5 – Most stable and widely supported for Vediamo.
C6 DOIP – Works well with newer vehicles but ensure full compatibility.
Passthru devices (J2534) – Not recommended unless you are highly experienced and know your limitations with seed-key access.
Please note: Avoid cheap or unstable Chinese clone tools, especially Bluetooth versions. These may work for reading ECUs but often fail during write or reset operations — leading to partial flashes or corrupted memory.
=> Learn how to set up diagnostic hardware before using Vediamo software with this post: How to use Vediamo software
Before running Vediamo:
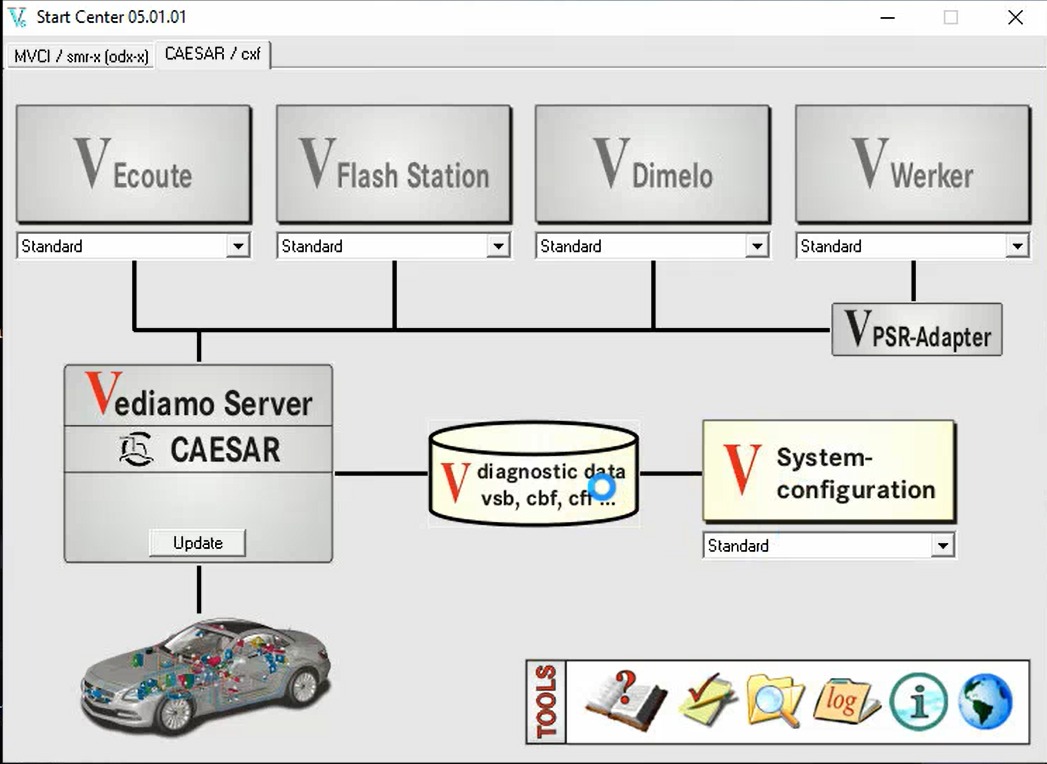
Install Vediamo 5.01.01 or later.
Install the correct C:\Vediamo\CBF database folder.
Ensure your file is present and matches your specific TCU hardware part number.
Common files: VGS2_NAG2.cbf, vgsn2_03_10.cbf, etc.
Test device connection and access rights:
Open Vediamo > Test connection via SD Connect > Confirm COM port and CAN channel.
Ensure Seed-Key algorithm plugin is available if needed for unlock access (some ECUs are protected).
Once everything is connected and powered:
Open Vediamo and load the correct .CBF file.
Select “ECU Search” to locate and connect to the TCU.
Read:
ECU Identification
Personalization and Activation Status
This gives you a complete snapshot of the TCU’s current status and helps verify whether it’s already locked or previously virginized.
Make sure you’re working with the correct VGS2NAG2 TCU. Mercedes-Benz used multiple versions of 722.9 control units:
| Type | Description | Can Be Virginized via Vediamo? |
|---|---|---|
| VGS1 | Early 7G | Yes (easier) |
| VGS2 | Common 2007–2014 | ✅ Yes |
| VGS3 | Newer units | ❌ Harder; may require online unlock |
If you’re unsure, match the hardware number (e.g., A 033 545 73 32) to the correct CBF file and look up compatibility with offline tools.
Virginizing is a low-risk but advanced-level operation. Still, it’s good practice to:
Inform your customer that the process involves resetting critical memory.
Get consent in writing, especially if you’re working on a used or salvaged TCU.
Clearly state that post-virginizing, SCN coding and Teach-In procedures will still be required before the vehicle is fully functional.
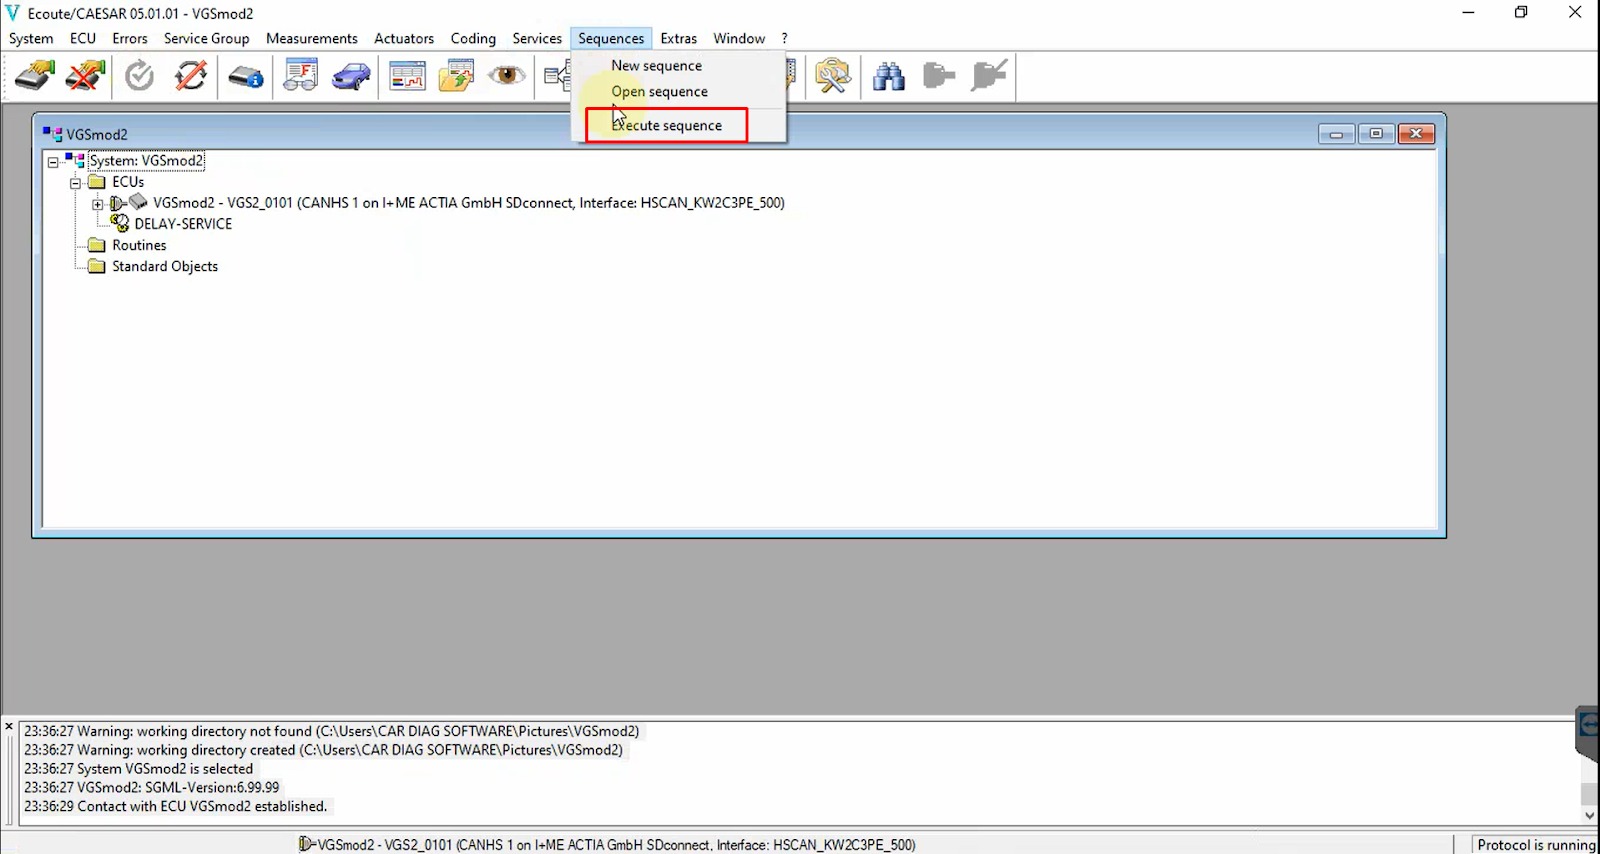
Step 1: Open Vediamo and Select the VGSNG2 Project
Step 2: Execute Sequences in Vediamo
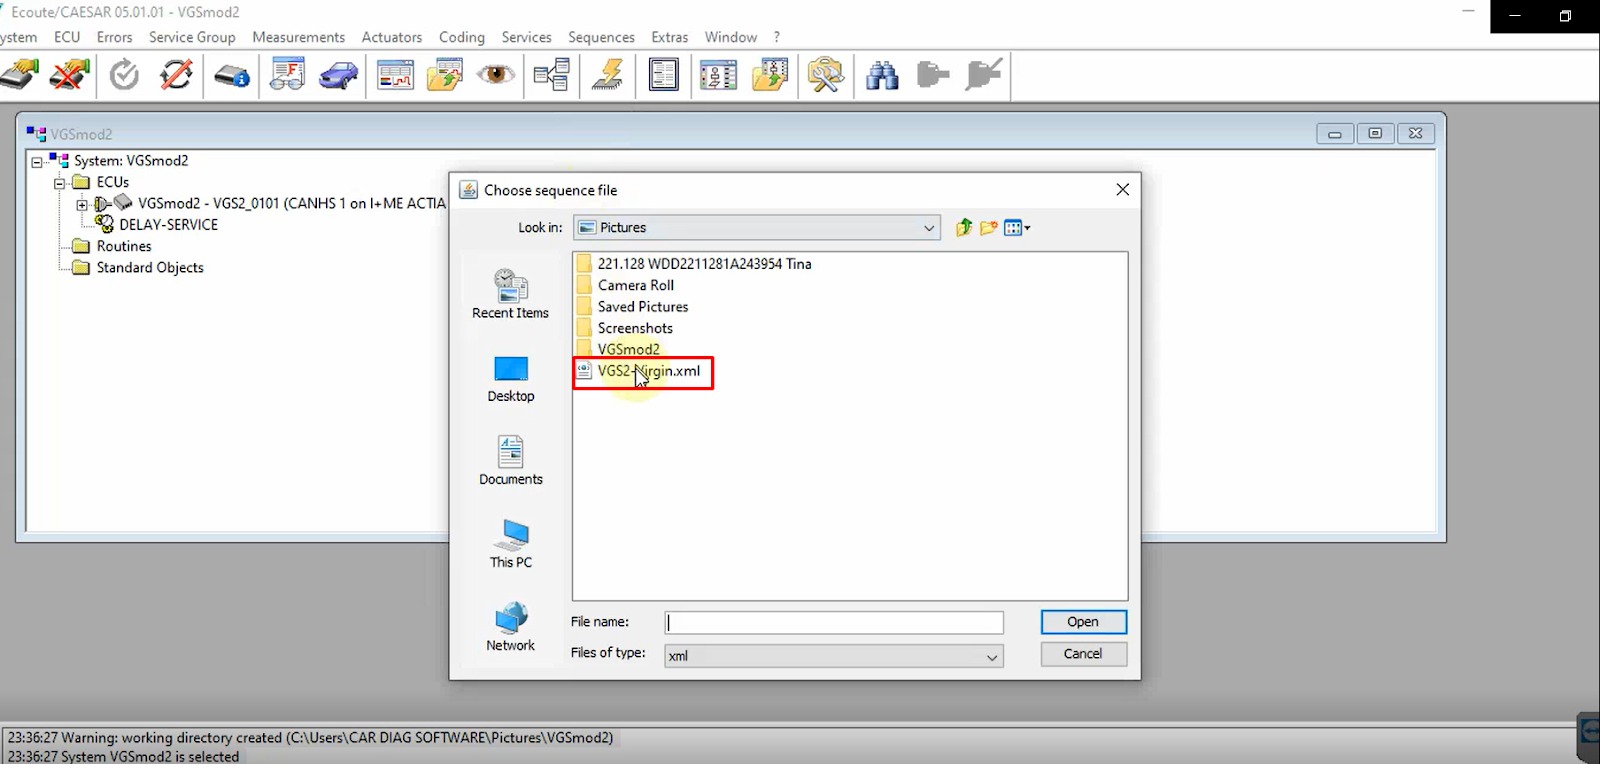
Step 3: Load the VGS2 Virgin File
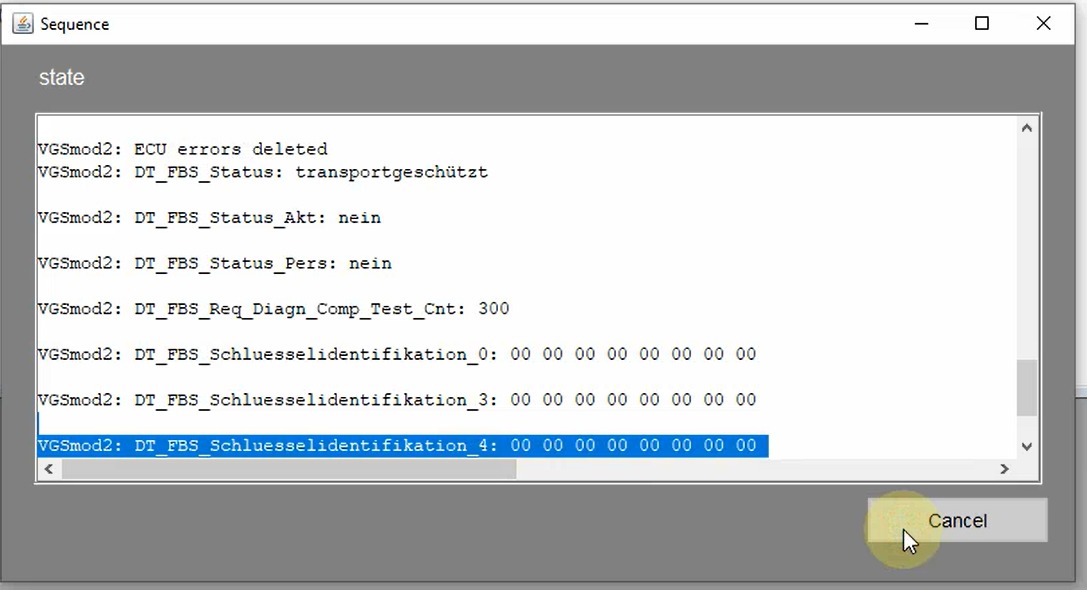
Step 4: Start the Virginizing Process
Step 5: Verify the Virginization Status
Important Note: This method may not be compatible with all Mercedes-Benz models or TCU variants. If you’re unable to apply the steps in your specific case, don’t worry—our expert technicians at AutoExplain are here to assist you.
Reach out to us on WhatsApp at +1 (936) 289-6695, and we’ll provide personalized support right away.
Successfully virginizing the VGS2NAG2 TCU is only half the journey. Once the module is wiped and reset to factory state, you must now properly integrate it into the new vehicle using authorized tools and procedures. This includes installation, SCN coding, personalization, activation, adaptation, and final system checks.
Failing to complete these post-virginizing steps can lead to errors like “Drive Authorization Denied,” “TCU Not Activated,” or “No Gear Engagement.” Below is a step-by-step guide on how to finalize the setup.
Once the TCU has been virginized using Vediamo:
Disconnect it from the bench setup (if used).
Install it in the target vehicle, ensuring:
Proper connection to the transmission harness
Battery is fully charged or connected to a 12V stabilizer
Wait a few minutes before turning on the ignition to allow module initialization.
Tip: On some models, you’ll need to turn the ignition on/off multiple times for the ECU handshake to complete.
Now, launch Xentry Diagnostic Software:
Go to the Transmission (EGS) module.
Perform an Initial Startup (Initialisierung).
This procedure begins the process of personalization and activation.
The vehicle will attempt to assign VIN and generate Drive Authorization data.
If the virginization process was successful, Xentry should recognize the module as not yet personalized, and allow the system to proceed with setup.
=> This book will help you gain all the information, from basic to advanced about Xentry/DAS, WIS and Starfinder software. I highly recommend it to you:
SCN (Software Calibration Number) coding is the official Mercedes process of configuring an ECU/TCU for the specific vehicle it’s installed in. This step loads:
Transmission behavior calibration
Torque converter parameters
Gearshift strategies
Regional settings (e.g., EU vs. US)
You have two options:
5.3.1. Option A: Online SCN Coding
Requires active Xentry account and internet access.
More accurate and updated to the latest firmware.
Performs personalization, activation, and SCN automatically.
5.3.2. Option B: Offline SCN Coding
Requires access to matching .xml or .smr-d SCN files.
Used in independent workshops without online login.
Tools like Vediamo or DTS Monaco can inject these files manually.
Without SCN coding, the vehicle may:
Remain in limp mode
Display fault codes related to invalid coding
Fail to communicate with other modules properly
After SCN coding, verify that the TCU is:
Personalized to the new vehicle’s VIN
Activated and synced with the immobilizer (Drive Authorization)
To confirm, go into Vediamo or Xentry and check these status fields:
| Parameter | Expected Value |
|---|---|
Personalisierung |
Aktiv (Active) |
Aktivierung |
Aktiv (Active) |
VIN |
Matches current VIN |
Drive Authorization |
Yes / Valid |
Now that the TCU is installed and coded, it needs to learn specific characteristics of the vehicle. These are essential to ensure smooth shifting, proper torque management, and long-term reliability.
Key Teach-In Functions:
Gear Recognition Learning
Torque Converter Lock-Up Adaptation
Shift Timing Optimization
Clutch Pressure Adaptation
In Xentry, navigate to:
Transmission > Adaptations > Teach-In Procedures
Run each process step-by-step with ignition ON and engine OFF or ON as instructed
Pro Tip: Test drive the vehicle at various speeds to allow the TCU to adapt dynamically. Shifts may feel harsh initially but should smooth out after learning.
Once all steps are completed:
Use Xentry, Vediamo, or any professional scanner to:
Read DTCs (Diagnostic Trouble Codes)
Clear all stored and pending fault codes
Re-scan to confirm no active issues remain
Look out for:
Faults related to Drive Authorization
CAN communication errors
Variant Coding mismatches
Some vehicles or TCU variants require a final hard reset to finalize memory programming and reinitialize the system.
In Vediamo, use the command:
FN_ECU_Reset or FN_HardReset
This forces the module to power cycle and reload all configuration data. Alternatively, you can disconnect the battery for 5–10 minutes as a physical reset method.
=> These books will help you learn how to use Vediamo and DTS Monaco to perform ECU reset:
Learn to use Vediamo with this book:
This 210-page-printed book will help you learn how to use DTS Monaco:
Take the vehicle on a road test covering various conditions:
Start/Stop traffic
Highway speeds
Upshift/Downshift behavior
Manual mode (if equipped)

Ensure:
Smooth gear changes
No lag, flares, or slipping
No MIL (Malfunction Indicator Light) or transmission-related warnings
While the process of virginizing a VGS2NAG2 TCU with Vediamo is straightforward in theory, in practice, technicians often run into unexpected errors, failed functions, or locked modules. These issues can arise due to mismatched software, hardware limitations, or even human error.
In this section, we’ll cover the most frequent problems you might encounter, explain their likely causes, and guide you on how to resolve them like a pro.
What’s happening:
When you attempt to run key functions like Lösche Personalisierung (Delete Personalization) or Lösche Aktivierung (Delete Activation), Vediamo either doesn’t display them or greys them out.
Possible Causes:
You’re using the wrong .cbf file.
Your hardware interface lacks seed-key security access.
The ECU is locked (security level not reached).
How to Fix:
Double-check that you’re using a verified and matching .cbf file for your specific VGS2NAG2 hardware version.
Ensure your diagnostic tool supports seed-key algorithms. Some clone SD C4/C5 units won’t unlock ECUs properly.
Try using a different .cbf file (e.g., vgs2nag2.cbf, vgsn2_03_10.cbf) as some files expose more functions than others.
Consider using a plugin or seed-key calculator if your Vediamo setup supports custom security access.
What’s happening:
Vediamo fails to establish a connection with the TCU, or the connection drops mid-session.
Possible Causes:
Faulty connection via OBD port or bench harness.
TCU is bricked or damaged.
Low vehicle voltage or unstable power source.
How to Fix:
Confirm that your OBD cable and power source are secure and stable.
Always connect a 12V stabilizer or charger when working on a vehicle or bench setup.
Try connecting to the TCU outside the car (on a test bench) to isolate it from CAN interference.
Use another TCU to confirm your setup is working.
What’s happening:
You’ve installed the virginized TCU in the vehicle, but the transmission won’t engage, and you receive errors related to Drive Authorization or the immobilizer.
Possible Causes:
TCU was not successfully personalized or activated.
SCN coding has not been completed.
DAS system and TCU are not synced.
How to Fix:
Recheck the status of the TCU in Xentry or Vediamo:
Personalisierung should be Aktiv
Aktivierung should be Aktiv
VIN should match the vehicle
Complete SCN coding if not yet done.
Perform Drive Authorization Learn-In from Xentry (if required).
Ensure the car’s key is valid and the ESL/ECU/TCU handshake is intact.
What’s happening:
During SCN coding, Xentry throws an error or fails to complete the coding process.
Possible Causes:
The TCU is still not properly virginized.
Internet connection or Daimler server access is unstable.
VIN mismatch or hardware version mismatch.
The module is blacklisted or not recognized.
How to Fix:
Re-check TCU status. If Personalisierung or Aktivierung is still active from the previous car, redo the virginizing process.
Check internet connection for online SCN coding.
Use Offline SCN Coding if you have the correct files for the car model.
If SCN still fails, try coding via Vediamo manually using .cod or .xml file.
What’s happening:
The TCU becomes completely unresponsive after running a reset command or if power was interrupted during operation.
Possible Causes:
Power loss during EEPROM operation or reset procedure.
Incomplete command execution corrupted TCU memory.
Improper voltage caused a failed write.
How to Fix:
Attempt a full power cycle (disconnect battery or bench power).
Use Vediamo’s recovery functions (if accessible).
As a last resort, use a BDM programmer to reflash the TCU’s EEPROM/Flash memory—requires advanced tools and knowledge.
If not recoverable, replacement is required.
What’s happening:
The vehicle powers on and moves, but gear changes are rough, delayed, or incorrect. Or variant coding doesn’t match the car’s configuration.
Possible Causes:
SCN coding did not apply the correct transmission calibration.
Incorrect Teach-In procedures or skipped adaptations.
Variant coding fields remain unset or mismatched.
How to Fix:
Use Vediamo or Xentry to check and manually correct Variant Coding under the TCU.
Perform Teach-In Procedures (gearbox adaptation, clutch learning).
Ensure that the TCU’s configuration matches the transmission hardware (e.g., E-Class vs. ML-Class ratios).
Performing TCU virginization and other advanced coding requires expertise and specialized tools. If you need professional help with Mercedes-Benz diagnostics, coding, programming, or troubleshooting, AutoExplain is here to assist you.
At AutoExplain, we offer:
=> Discover other AutoExplain’s car repair online service here!
Contact AutoExplain today for expert assistance:
WhatsApp: +1(936)2896695
Email: [email protected]
Website: AutoExplain
Office: 1500 N Grant ST Sten Denver, CO 80203
Virginizing a VGS2NAG2 module using Vediamo is an essential step when replacing or reprogramming a Mercedes-Benz transmission control unit. By following the steps outlined in this guide, you can successfully reset the VGS2NAG2 TCU and prepare it for adaptation to a new vehicle.
For expert automotive coding and diagnostics, trust AutoExplain. We provide high-quality support to ensure your vehicle performs at its best.
👉 Get in touch with us today for professional diagnostic and coding solutions!
Other coding hidden features tips: