How to use Vediamo software—that’s probably what you Googled after realizing your basic OBD2 scanner just won’t cut it for your Mercedes anymore. Maybe you want to unlock hidden features, fix nagging faults the dealer couldn’t, or flash a control unit like a nerd.
But here’s the catch: Vediamo speaks its own language, plays by its own rules, and one wrong click can turn your luxury car into a very expensive paperweight.
In this article, we’ll break down how to install and use Vediamo software step-by-step, show you how to connect to ECUs, safely perform variant coding, and even flash modules like a pro—without the panic attack.
Vediamo (VEhicle DIagnostic, MOnitoring, ADministration) is the proprietary engineering-level diagnostic and programming suite developed by Daimler AG for Mercedes-Benz vehicles. Unlike dealer-grade tools such as Xentry, Vediamo exposes the full range of OEM‐level functionality—allowing you to communicate directly with ECUs (Engine Control Units), TCU (Transmission Control Units), ESP (Electronic Stability Program) modules, and nearly every other control module on the vehicle.
Vediamo isn’t your average diagnostic tool—it’s the same engineering-grade software used by Daimler AG during development and testing. With Vediamo, you get unfiltered access to the inner workings of nearly every ECU in a Mercedes-Benz vehicle. Below are its most powerful features that make it a must-have for serious technicians and retrofitters:
Vediamo allows direct communication with every Electronic Control Unit (ECU) in the vehicle via CAN, K-Line, UDS, or DoIP protocols. Unlike Xentry or OBD tools, it lets you:
Connect to any ECU manually, even if it doesn’t respond automatically
Enter Engineering, Development, or Extended sessions to access hidden functions
View raw data streams, security levels, and ECU metadata
Use Case: Want to access the VGS (7G-Tronic TCU) and tweak shift logic? Vediamo lets you go far beyond what the dealer tools allow.
Below are some posts about coding hidden function with Vediamo software:
One of Vediamo’s most-used features is variant coding, which allows you to unlock or configure hidden features that are not accessible through standard diagnostics.
With variant coding, you can:
Enable or disable features (e.g., ECO Start/Stop default off, Video in Motion, seat belt reminders)
Modify region-specific settings (e.g., fog light behavior, DRL configurations)
Adjust thresholds or logic in control units (e.g., fan speeds, ESP calibration)
Bonus: Changes are written directly to the EEPROM or coding memory of the module.
Vediamo supports firmware flashing (software updates or downgrades) for compatible ECUs using Daimler’s flash container (.cbf or .cff) files.
Upload updated firmware to resolve known bugs
Flash retrofitted control units to make them compatible
Replace corrupt ECUs by matching firmware versions
Warning: ECU flashing is sensitive—use correct files, stabilize battery voltage, and never interrupt the process.
You can trigger actuator tests and run self-diagnostic routines within each ECU. These are especially useful for:
Diagnosing mechanical issues (e.g., open an EGR valve, test turbo actuator)
Calibrating sensors and components (e.g., throttle adaptation, fuel pressure test)
Resetting learned values or adaptations
Example: After replacing the swirl flap motor on a CDI engine, you can run the adaptation sequence to recalibrate it using Vediamo.
Vediamo allows real-time monitoring of actual values from virtually any ECU. You can watch:
Sensor readings (oxygen sensors, wheel speed, temperature)
Actuator responses
Control loop behavior
Internal ECU status flags
Tip: Live data is critical when diagnosing intermittent faults or verifying coding changes.
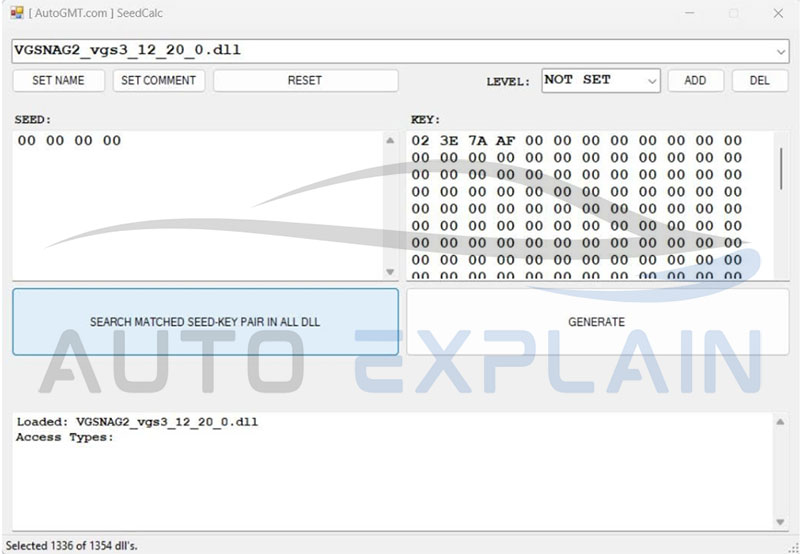
Many ECUs require security access before you can perform coding or flashing. Vediamo manages this through Seed-Key algorithms embedded in the CBF files.
Automatically handles authentication if the correct key is present
Allows access to protected functions like developer sessions, variant changes, EEPROM programming
Pro Tip: Always use the correct and updated CBF files to avoid getting locked out of the ECU.
Vediamo includes a built-in macro scripting editor, allowing you to automate complex or repetitive tasks such as:
Batch flashing multiple ECUs
Auto-testing and logging results
Coding multiple vehicles in one session
Advanced Use: Workshops that retrofit fleets (e.g., taxis or delivery vans) can create standardized scripts to code or flash them in batches.
At the core of Vediamo is its ability to use CBF files (CAN-based Function files), which define the functions and coding structure of each ECU.
Load custom or OEM CBF files per vehicle model or ECU type
Browse CBF structure to understand parameter logic
View hidden menus and engineering notes embedded by developers
Best Practice: Keep a well-organized library of CBF files by model year and ECU type to ensure compatibility.
3.1. Recommended Interfaces:
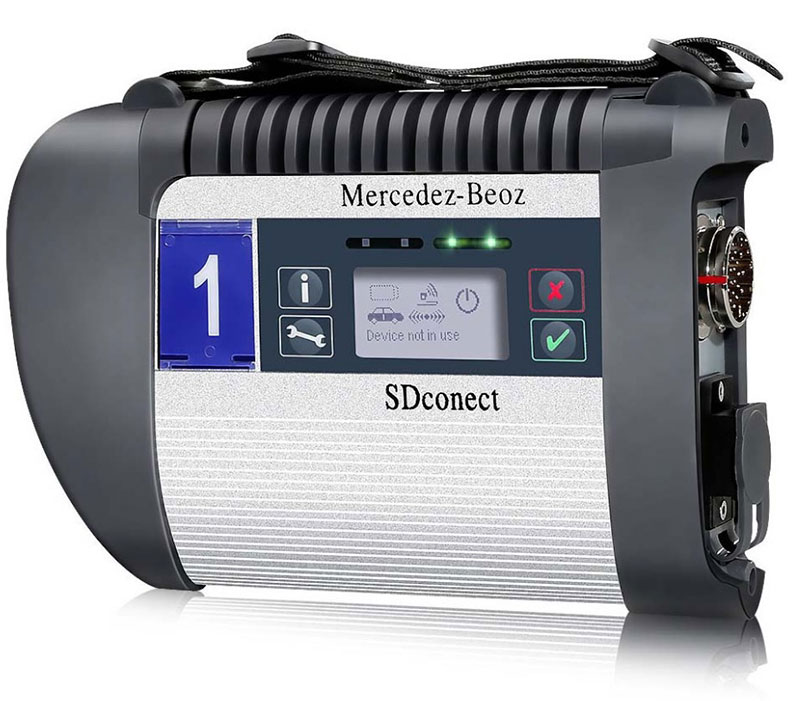
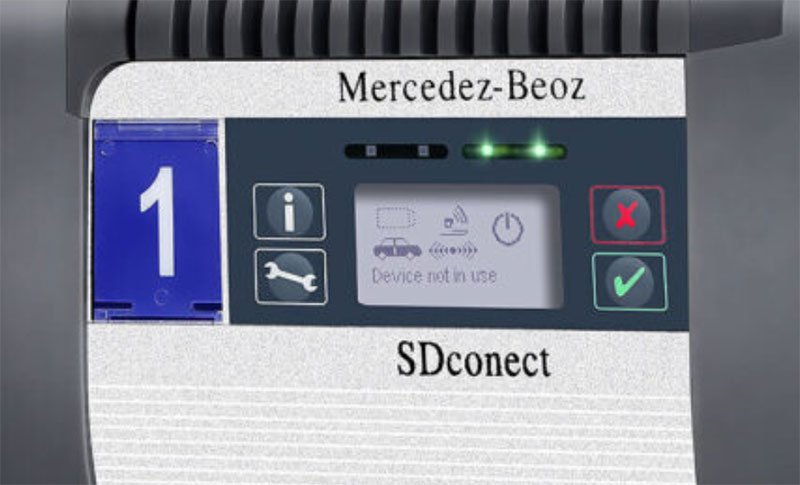
SD Connect C4 (Most Popular & Reliable)
Full compatibility with Vediamo
Supports K-Line, CAN, UDS, and DoIP (on some clones)
Wired LAN and Wi-Fi options
Stable for ECU flashing and variant coding
SD Connect C5 (C4 Clone with Same Functionality)
Internally similar to C4 but with improved housing
Slightly more expensive but often preferred for workshop use
C6 DOIP (For Newer Vehicles with DoIP Protocol)
Best for 2017+ Mercedes models (e.g., W213, W222, W223)
Faster communication but may not be fully supported by all Vediamo versions
Often better suited for DTS Monaco
Please note: Avoid cheap ELM327 or generic OBD2 interfaces—they will not work with Vediamo.
3.2. Laptop or PC Running Windows
You’ll need a dedicated Windows-based laptop or PC to run Vediamo software smoothly.
Minimum Requirements:
Operating System: Windows 7 or Windows 10 (32-bit or 64-bit)
CPU: Intel i3 or higher
RAM: 4GB minimum (8GB recommended for stability)
Ports: At least 1 USB port or Ethernet port (for LAN connection to SD Connect)
Admin Rights: Required for software installation and configuration
Please note: Using a virtual machine (VMware or VirtualBox) is common to isolate Vediamo from your main system.
3.3. CBF Files (CAN-Based Function Files)
Vediamo uses CBF files to define communication and functions for each specific ECU.
Each ECU requires a specific CBF file
Files contain variant coding options, diagnostic parameters, routines, and seed/key access
Usually included in engineering software packages or downloaded from trusted sources (e.g., forums like MHHAuto or CarTechnology)
Set up connection via OBD II Port of Vehicle
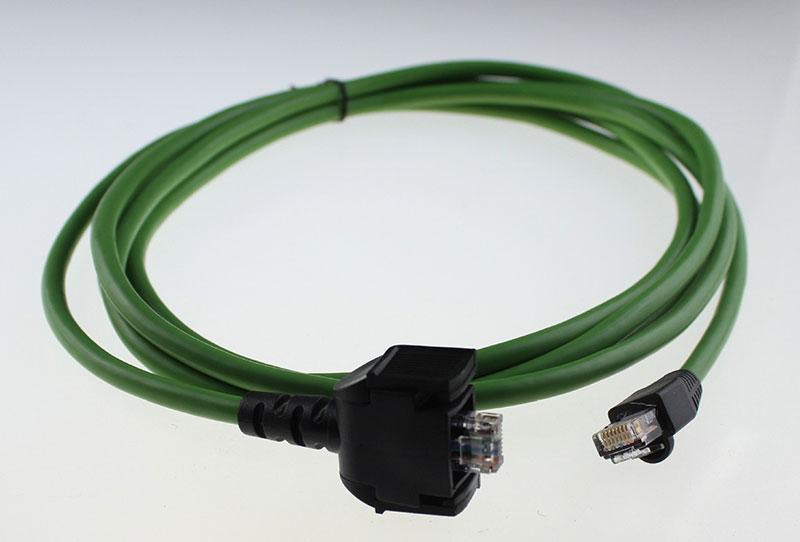
Step 1: Prepare interface and car
Step 2: Connect VCI to Vehicle and Laptop
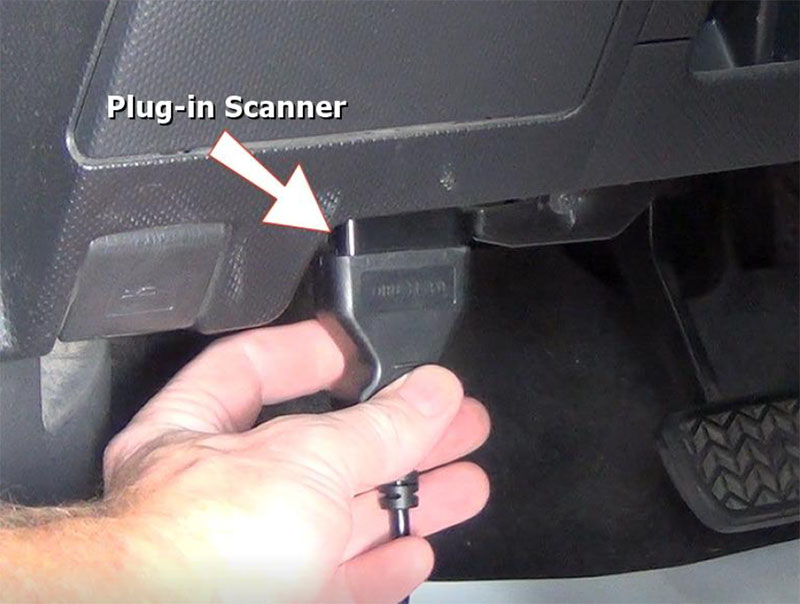
For example: SD Connect C4
Step 3: Connect cable to laptop and Vediamo
Step 4: Check connection in Vediamo
You can see the signal from interface at Vediamo Server CAESAR
If you use SD Connect, it will show I+ME ACTIA SDconnect
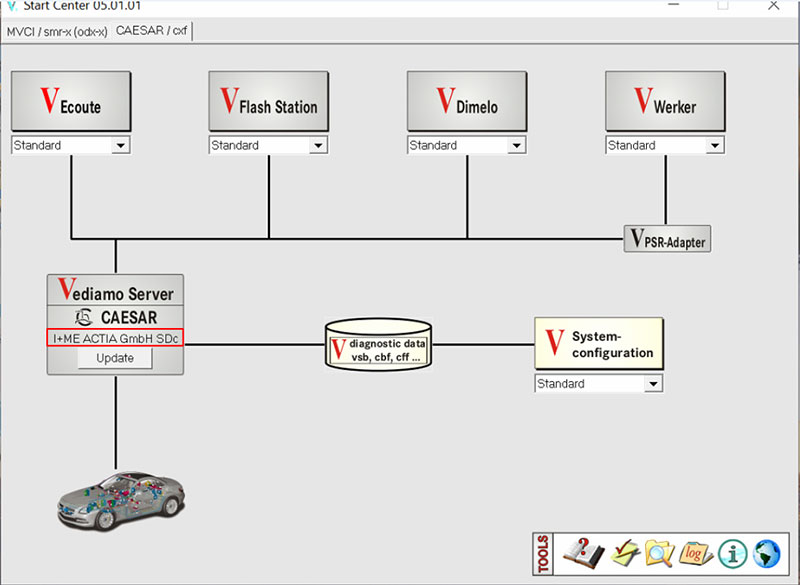
If connect to only an ECU, you need prepare cable for the ECU which you want to connect with Vediamo
The information of this post is cited from this book: Vediamo Unlocked: Expert Techniques For Mercedes ECU Programming
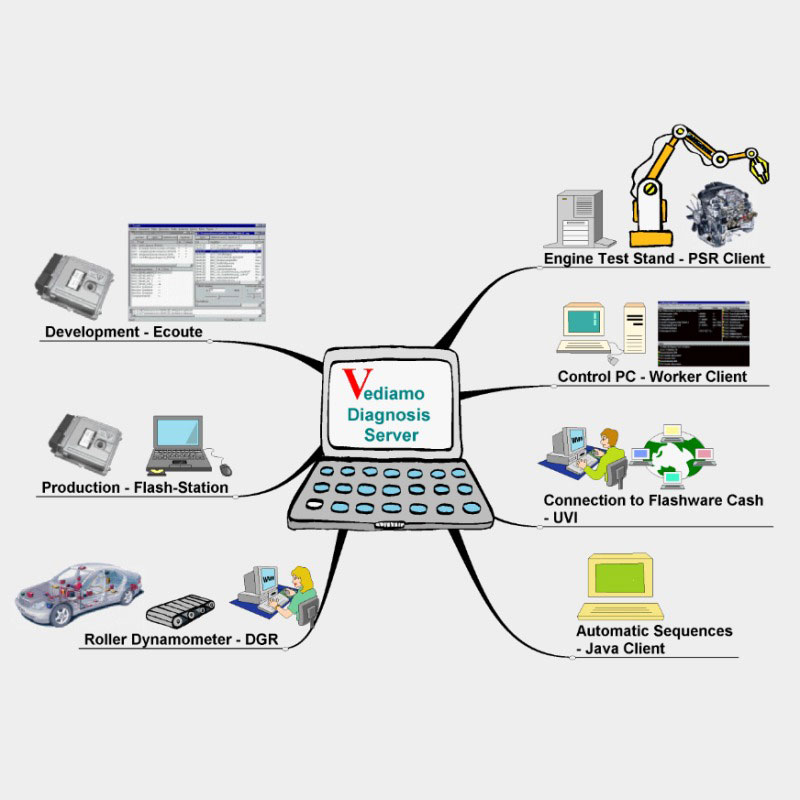
When working with Vediamo, you will need to connect to ECUs. So you need files to be able to do this, they are very important. You should have a big database for most model vehicles. It includes:
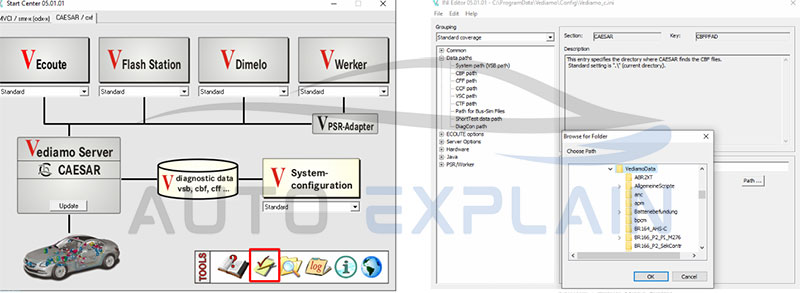
You can set up Data Paths in INI Editor for VSB and CBF Files
However, most of the modules are now available as CBF files. You can easily find them with Xentry Caesar folder or contact us via WhatsApp, we will advise and help you download CBF database for most car. We have divided the files into folders suitable for each vehicle model. We have divided the files into folders suitable for each vehicle model. You can refer to the table below:
| Class | Model | Year | Project | Note |
| A | W169 | 2004-2012 | cbf | |
| A | W176 | 2012-2018 | cbf | |
| B | W245 | 2004-2011 | cbf | |
| B | W242/246 | 2011-2018 | cbf | |
| GLA | X156 | 2013-2019 | cbf | |
| CLA | C117 X117 (shooting brake) |
2013-2019 | cbf | |
| C | W203 S203 (Wagon) CL203 (Sport Coupé) |
2000-2007 | cbf | |
| C/GLK | W204 S204 (Wagon) C204 (Coupé) X204 (GLK) |
2007-2015/2008-2015 | cbf | |
| C | W205 S205 (Wagon) C205 (Coupé) A205 (Cabriolet) |
2014-2017 | cbf | Normally that model should be used smr-d files with DTS Monaco 8.16. |
| CLK | C209(Coupé) A209(Cabriolet) |
2001-2009 | cbf | |
| E | C207 (Coupé) A207 (Cabriolet) |
2008–2017 | cbf | |
| E | W211 S211 (Wagon) |
2002-2008 | cbf | |
| E | W212 S212 (Wagon) |
2009-2015 | cbf | |
| CLS | C219 | 2004-2009 | cbf | |
| CLS | C218 | 2010-2017 | cbf | |
| S | W220 | 1998-2004 | cbf | |
| S | W221 | 2005-2012 | cbf | |
| S | W222
V222 (Sedan long) X222 (Maybach) |
2014-2017 | cbf | Normally that model should be used smr-d files with DTS Monaco 8.16. |
| CL | C215 | 1998–2006 | cbf | |
| CL | C216 | 2006–2014 | cbf | |
| M | W163 | 1997-2004 | cbf | |
| M
GL |
W164
X164 |
2005-2011/2006-2012 | cbf | |
| M/GLE
GL/GLS |
W166
C292 (Coupé) X166 |
2011-2019/2013-2019 | cbf |
| G | W463 | 2012-2018 | cbf | With model up to 2012 you can only work with DAS;
With model as of 2018, have to use smr-d files with DTS Monaco 8.16. |
| SLK | R170 | 1995–2004 | cbf | |
| SLK | R171 | 2004–2010 | cbf | |
| SLK | R172 | 2011–2020 | cbf | |
| SL | R230 | 2000–2011 | cbf | |
| SL | R231 | 2011–2020 | cbf | |
| SLR McLaren | C199 / R199 / Z199 | 2003–2010 | cbf | |
| SLS AMG | C197 / R197 | 2010–2015 | cbf | |
| Smart Fortwo | C451 A451 |
2006–2014 | cbf | |
| Viano | W639 | 2003–2014 | cbf | |
| Sprinter NVC3 | W906 | 2006–2013 | cbf
|
Table 3: CBF Files
After this part, you may have some doubts about the vehicle models up to present. These models you should use DTS Monaco 8.16 to work. And for older models not in the above table, you can try working with DAS. If you are interested in DAS and DTS Monaco 8.16, you can contact us for installation support.
=> Download DTS Monaco Software
As the model table is showed at previous page, there are many CBF files corresponding to each vehicle model. Therefore, to ensure that you can choose the correct CBF files suitable for the vehicle model or ECU which you are working on, we will give you some procedures you can refer to below.
In case of selecting files for all ECUs on your vehicle:
Step 1: Determine the vehicle’s VIN (Vehicle Identification Number) or FIN (Fahrzeug Identifizierungs Nummer) to to be able to determine the model code
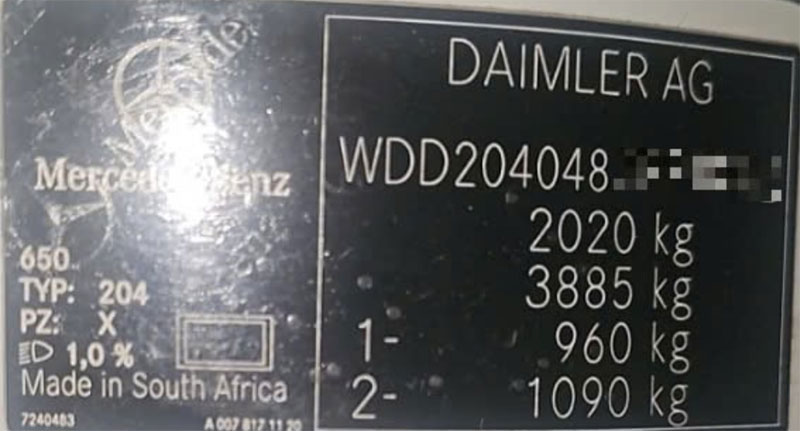
With European vehicles, you can see the model code in the VIN. The model code for w204, from there you can easily select the BR_204 folder and start working.

If the vehicle you are working on is not from Europe, the VIN will be regulated by a different standard. Therefore, we need another method to determine the model code.

Example with this CLA, the model code is on the right of VIN. You can easily identify the model code C117


Press to Get Datacard you will get the results.
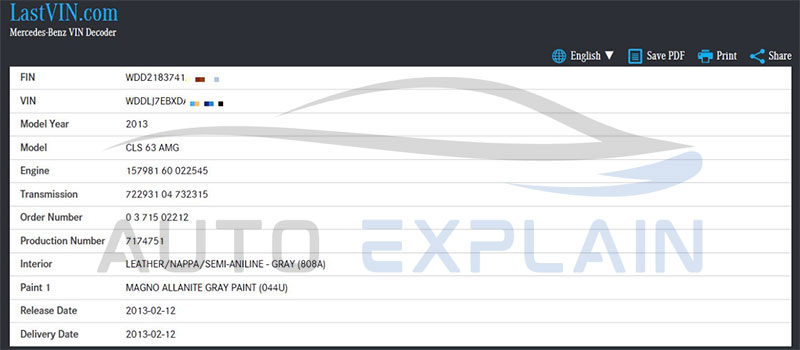
Example with a 2012 MERCEDES-BENZ C 250 BlueEFFICIENCY, you can easily identify this is w204 with vehicle model table on previous page.
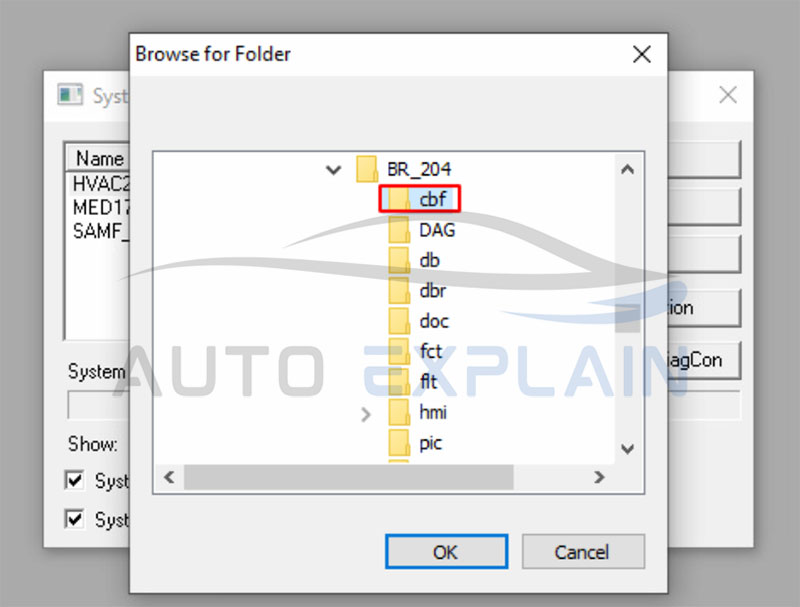
Step 2: Once you have located the CBF files folder, open and choose cbf folder
And of course, you need to understand clearly about the ECU names corresponding to each CBF files. We will list some ECUs and CBF names in the following table.
| Engine ECU – Motor electronics | CR6, CR42. CR43, CR60LS, CRD, CRD2, CRD3, CR60NFZ
ME28, MED40, MED97, ME97, ME97AMG, MED177, SIM271DE20, SIM271KE20, SIM4LSE. |
| Electronic transmission control | EGS52,
EGS53, VGSNAG2. |
| Intelligent servo module
Electronic selector module |
ISM,
DSM. |
| Control unit ‘Fuel pump’ | FSCM. |
| Electronic ignition lock | EZS,
EIS. |
| Central gateway | ZGW169, ZGW203, ZGW211, ZGW220
CGW204, CGW212, CGW231 |
| Electronic stability program | SBC121/221,
ESP164, ESP166, ESP212, ESP_E1, ESP9_212, ESP 463. |
| Front signal acquisition and actuation module(Driver-side SAM) | SAMV164, SAMV171, SAMV203, SAMV211,
SAMF_172, SAMF_204, SAMF_212, SAMF220, SAMF 221, SAMF230. |
| Passenger-side signal acquisition and actuation module
(Pass-side SAM) |
SAMB211, SAMB220, SAMB230. |
| Rear signal acquisition and actuation module (REAR SAM) | SAMH164, SAMH 171, SAMH203, SAMH211, SAMH220, SAMH221, SAMH 230, SAMH463,
SAMR_204, SAMR_212, SAMR_231. |
| Signal acquisition and actuation module (W117, W156, W166, W176, W463) | CBC,
CBCBOLERO. |
| Supplemental restraint system(SRS) | ARCADE164, ARCADE211, ARCADE221, ARCADE906,
ARIAN906, ORC_172, ORC_204, ORC_212, ORC166. |
| Left headlamp (SG-SW-L) | HLI_FL176,
HLI_FL212. |
| Right headlamp (SG-SW-R) | HLI_FR176,
HLI_FR212. |
| Controlunit ‘Headlamp'(SG-SW) | HLC166. |
| Actuation module, LED exterior lighting, left front (AMLAB-L) | LAMSL,
LCU_FL212. |
| Actuation module, LED exterior lighting, right front (AMLAB-R) | LAMSR,
LCU_FR212. |
| Electrical power steering | EPS212,
EPS218. |
| COMAND (Head unit) | HU_204,
HU25, HU45, HU5S1. |
| Instrument cluster (IC) | KI164, KI171, KI203, KI211, KI221,
IC172, IC_204. |
| Electric parking brake (EFB) | EPKB166 |
| Left front reversible emergency tensioning retractor (RevETR-LF) | RBTMFL |
| Air conditioning (AAC) | HVAC_204, HVAC_212, HVAC166 |
| Left front door (DCU-LF) | DMFL_204, DMFL_212 |
| Right front door(DCU-RF) | DMRL_204, DMRL_212 |
| Electrical seat adjustment ‘Driver’ with memory function (ESA ‘Driver’) | SEATD |
| Tailgate control (HKS) | PTCM_204 |
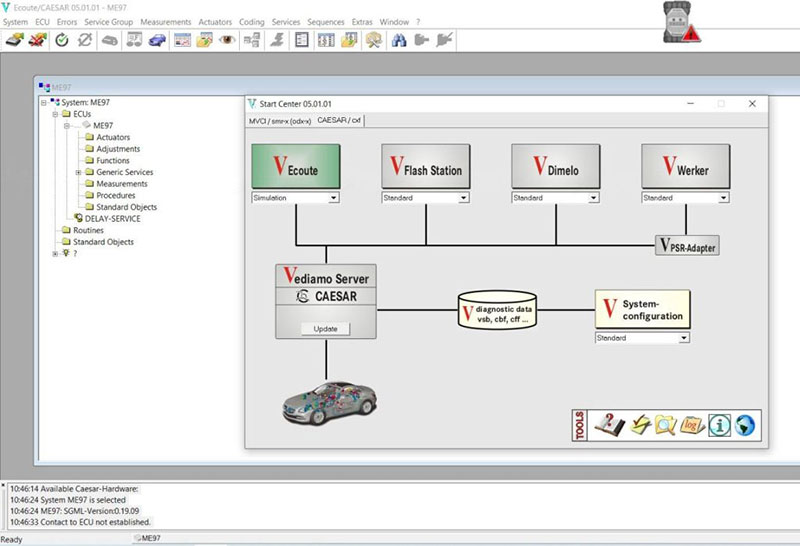
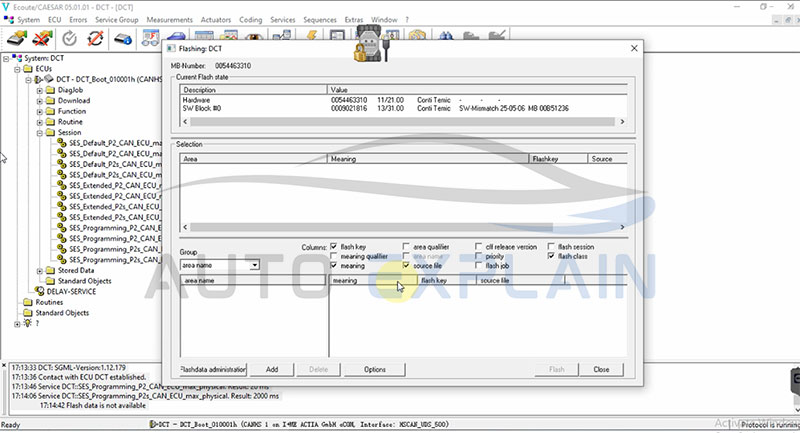
Now, we will start using Ecoute with CAESAR Server. First, you must know how to select CBF Files for ECU. Of course, you can select the system to be diagnosed either from the menu System / Select… or using Alt-A.
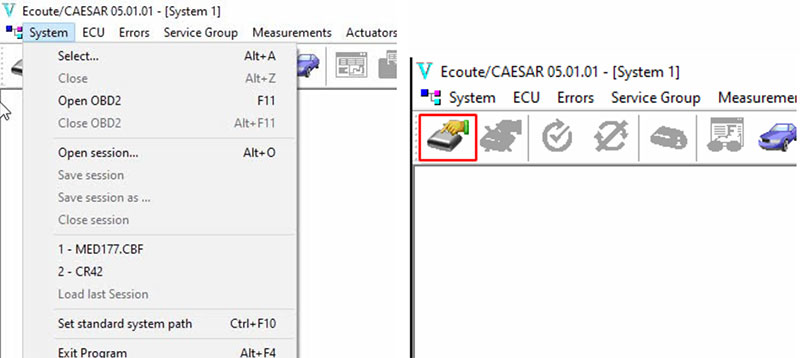


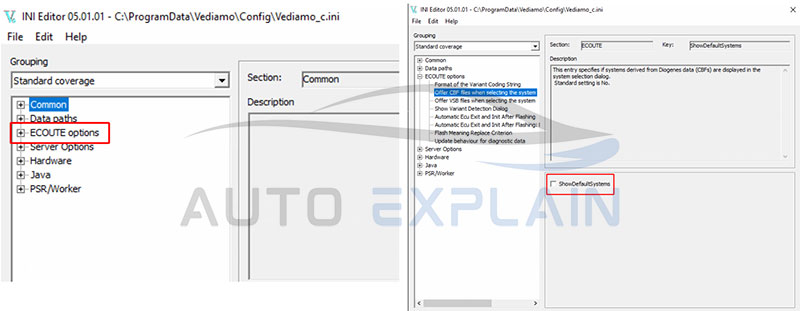
Choose “Offer CBF files when selecting the system and click to Show Default Systems to change setting
You can disable setting for VSB files and work only with CBF files. Combine with setting up CBF Path in Vediamo Data Paths section to be able to quickly when selecting System
A system can be closed using the menu selection System / Close. All windows displaying ECU-relevant data (system, error, measurement, trace) are then closed.
The system is automatically closed if:
Now we come to Variant Coding – one of the important sections of working with ECUs. Coding an ECU involves modifying your vehicle’s Electronic Control Unit so it behaves differently. Whether you’re adjusting settings to enable hidden features (commonly called ECU coding), the process requires a clear understanding of what you want to achieve and the right tools to get there. So, in the process of Coding an ECU, careful consideration and understanding of ECU Coding is essential. Here, we’ll walk you through the essentials to get the job done.
Step 1: Access the Variant Coding Window
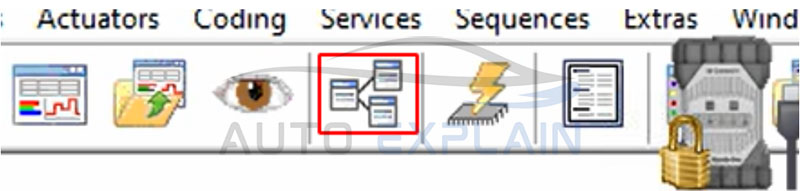
First, we need to know how to access this feature. The current state of the variant coding can be read and modified with Ecoute. You can open Variant Coding window for that as follows:
Coding > Variant Coding from the top menu, or simply press Alt + V.
Once opened, Vediamo checks for preconditions defined in the current ECU’s system description. If any services require input (like vehicle VIN or hardware configuration), a dialog will appear for you to fill in the required parameters.
⚠️ Note: If the Variant Coding window fails to read current data (with a “Read codstring failed” error), it could be due to:
Wrong or incompatible VCI type
Incorrect or mismatched CBF file
ECU protection or lack of access permissions
Try using a supported VCI (like SDconnect C4 or C6) and ensure you’re using the correct CBF file for the ECU you’re coding. In some cases, you may borrow a CBF from a similar model as a workaround.
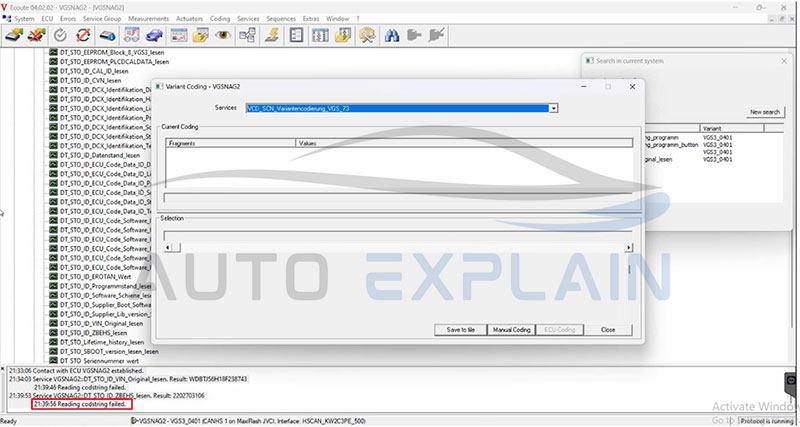
You can get a good VCI type or you can borrow a CBF file from another model series to read. This error can occur for many different reasons. We will talk more about VCI in another chapter.
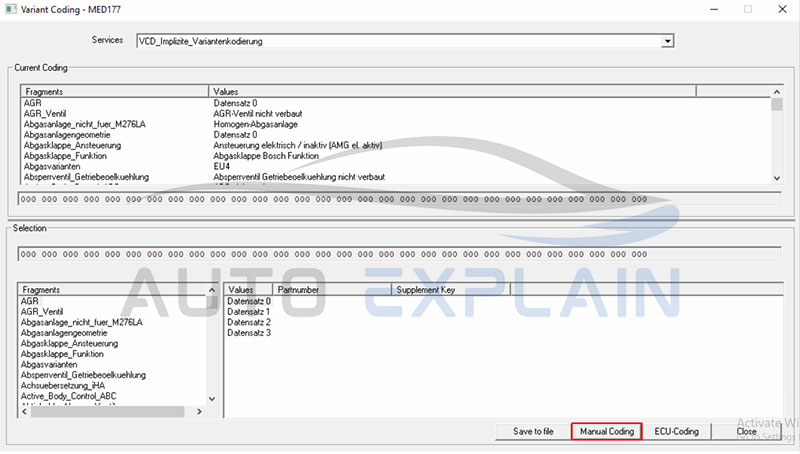
Step 2: Understanding the Coding Interface
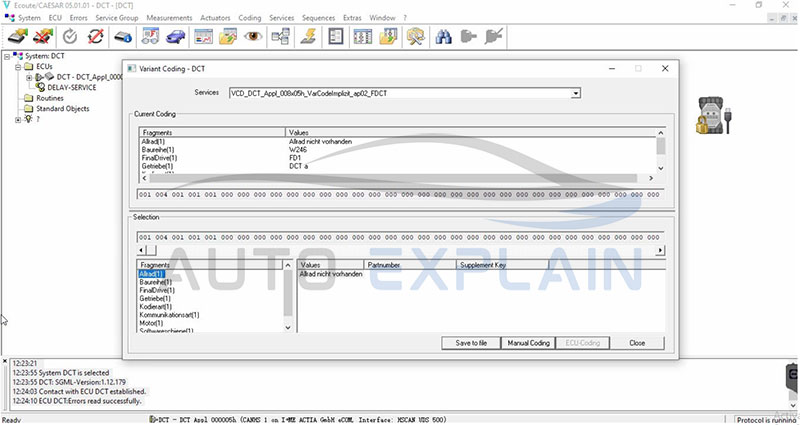
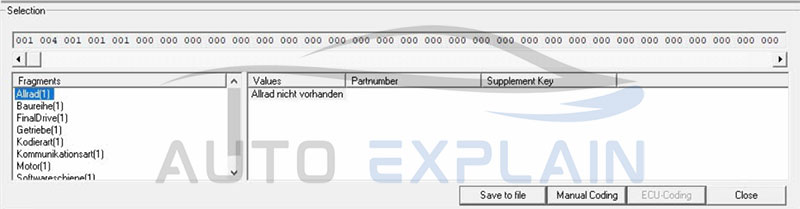
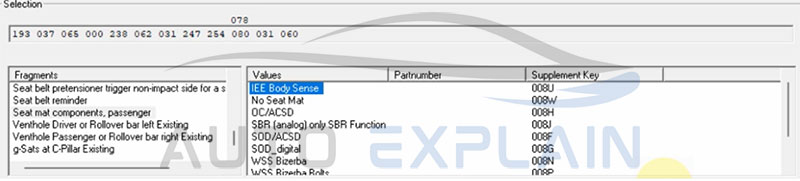
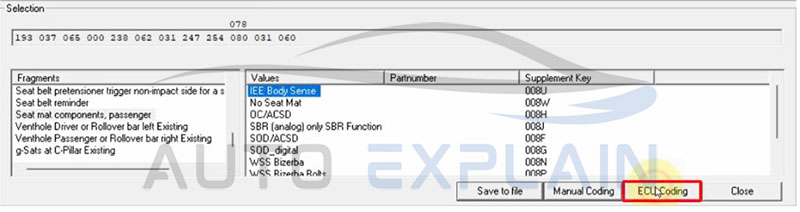
1. Services List
All the ECUs coding services are displayed in this dialog field. When a service is selected from the selection list, all fragments and the respective values in the “selection window” are displayed in the lower section of the dialog. You can open the selection list to change the service you want to work on.

2. Current Coding:
The current coding string from the ECU is read and displayed when the dialog is opened. Fragments and values matching the coding are displayed in a list field. If the coding is not found in the parameterization, “unknown” is entered under values. You can resize the Variant Coding window or scroll down to display more Fragments and Values.

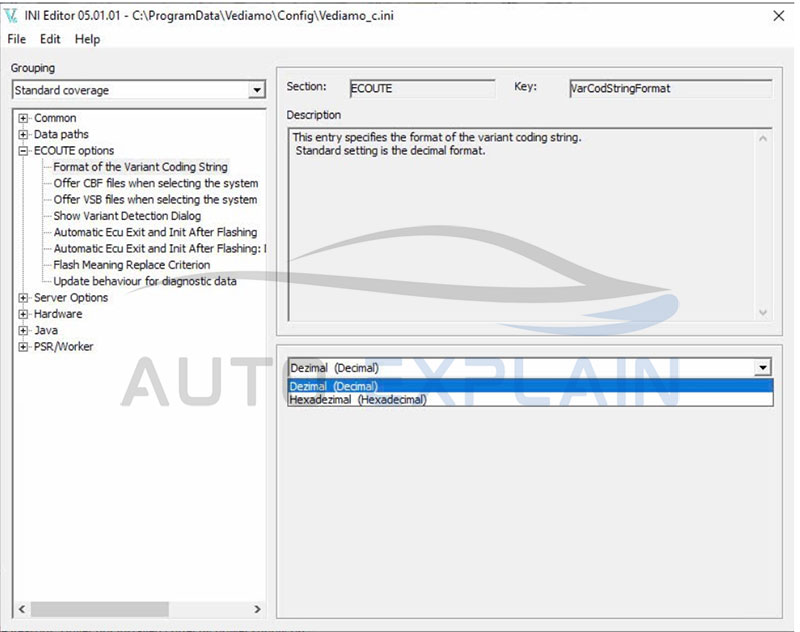
The coding string can be displayed either in decimal or hexadecimal format depending on the setting in Vediamo.ini. The coding string format is specified by the “VarCodStringFormat” entry in the [ECOUTE] section of Vediamo.ini.
This entry can have the value “Decimal” or “Hexadecimal”. To change display format:
Edit Vediamo.ini in the [ECOUTE] section.
Modify VarCodStringFormat = Decimal or Hexadecimal.
The value “Decimal” means that the coding string is displayed in decimal form. The value “Hexadecimal” means the coding string is displayed in hexadecimal form. The coding string is in decimal format by default. You can change to hexadecimal format if it is better for your work
3. Selection Area
All parameterized fragments of the selected service are displayed along with their values in this section of the dialog. Normally the current code will be displayed corresponding to the values in the fragments.
When a new value is selected:
Vediamo instantly recalculates the new coding string.
A diff is shown, highlighting which values or bits have changed.
Step 3: Change the Coding Values
You can change coding by changing a value in fragments list. As soon as a value is selected from the list, the corresponding coding string is displayed immediately. In addition, the difference between the current coding string and the selected coding string is evaluated and the position where the two strings differ is marked with the numerical value of the difference (decimal: absolute value of the difference of the two values; hexadecimal: bitmask of changed bits).
Here’s how to modify the ECU’s behavior:
In the fragments list, select the value you want to change.
Verify the new coding string displayed.
Once you’re satisfied, click the ECU Coding button.
Note: Vediamo will display a confirmation dialog before writing the changes to the ECU. You can skip this warning in the future by checking “Do not show this window again.”
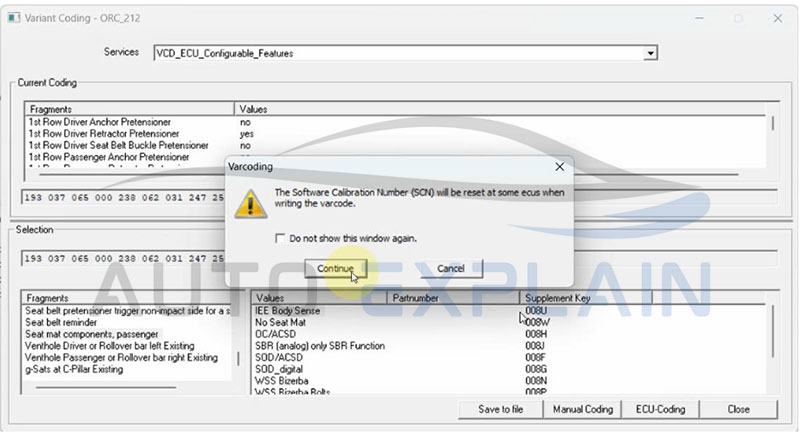
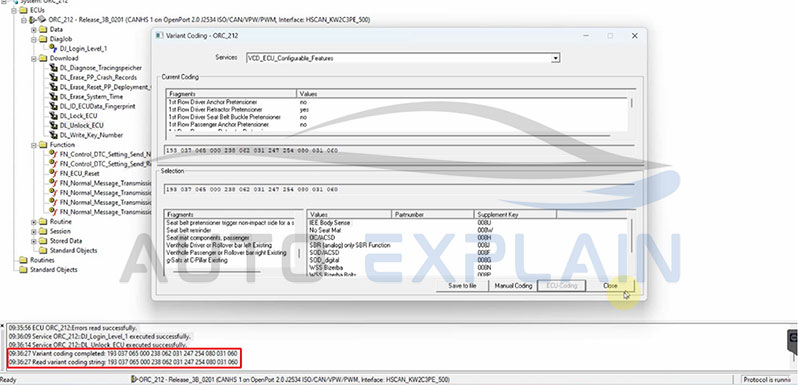
After confirmation, the coding process begins.
If successful, you’ll see Variant Coding completed and Read variant coding string in the status window.
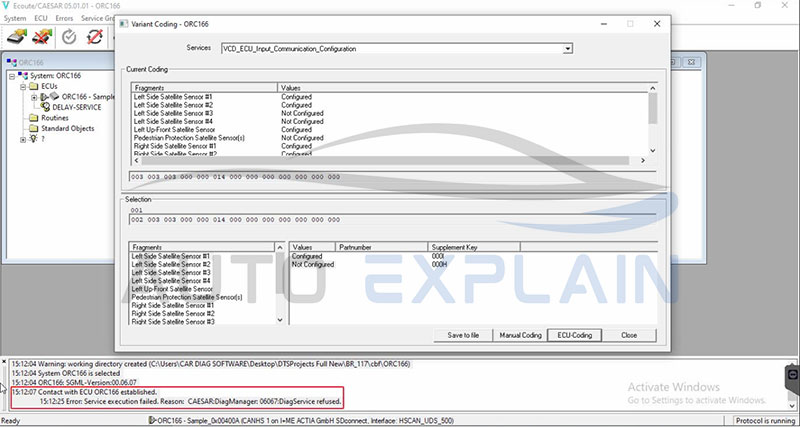
If access is denied, you’ll receive a DiagService refused error—this typically means the ECU is locked.
Step 4: Unlock ECU (If Required)
Some ECUs are protected and do not allow coding unless unlocked. If coding fails with an access error:
Perform the Unlock ECU procedure first.
Once the ECU is unlocked, repeat the coding process.
Detailed steps for unlocking ECUs are covered in the next section.
Please Note: If you try to perform ECU Coding without knowing or forgetting to unlock the ECU, you don’t need to worry about this because Variant Coding will not be changed and status window will appear a message to tell you that your action has been refused
In this case, you can perform Unlock ECU and continue Coding. About the steps to Unlock ECU, we will help you learn the details in the next section.
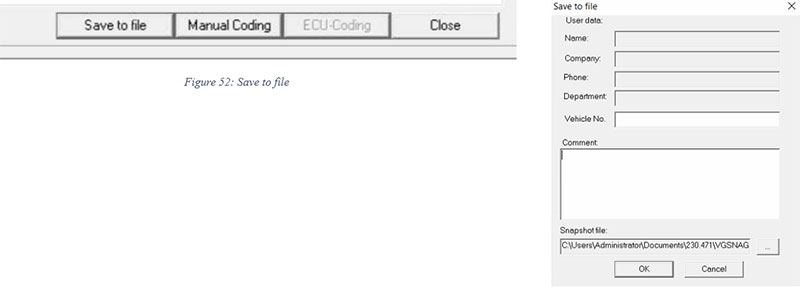
Step 5: Save Variant Coding Snapshot
Before or after making changes, it’s a best practice to save the current coding:
Click the Save to File button.
Choose the file name and location.
Add comments for future reference.
This feature is especially useful when working with multiple vehicles or modules—allowing you to quickly revert or reuse known-good configurations.
This makes it easier for you to work between multiple ECUs and multiple vehicles.
Clicking this button to close the variant coding dialog. After the button is pressed, any postconditions regarding variant coding included in the system description are executed, in the same way as the preconditions described above.

Another way you can change Variant Coding string is Manual Coding. Clicking on the button Manual Coding opens a dialog, in which the coding string can be edited manually.
Step 1: Click the Manual Coding button.
The coding string in the edit field is taken from the selection field. If the selection field does not contain a string, the coding string is taken from the field of the current coding string. The user can edit the coding string and execute the variant coding by clicking on the ECU-Coding button. The dialog is closed without coding by clicking on the button Close.
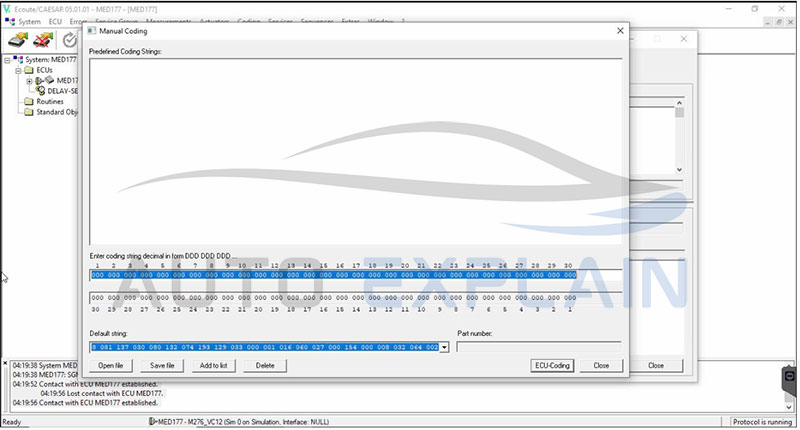
Step 2: Save/load custom strings from files.
You have the possibility of naming your own coding strings and storing them in a list (Add to list button). Strings in the list can also be deleted (Delete button). The compiled list can be stored in a file (Save file), or previously compiled lists can be loaded from a file (Open file). This is particularly useful when the number of combinations is very high and working with your own selection lets you work more effectively.
The coding string loaded from the file is displayed in a decimal or hexadecimal format, according to the parameter VarCodStringFormat in the file Vediamo.ini. The format in which the string is stored in the file might be decimal, hexadecimal or even mixed and it has no influence on the display and entering format.
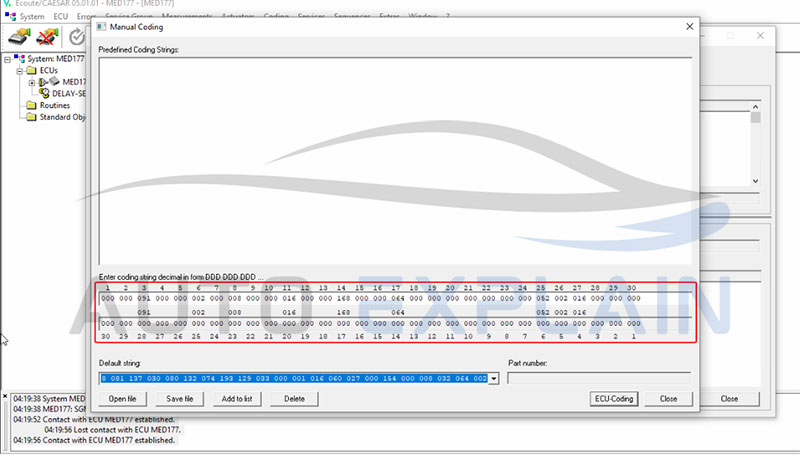
Manual Coding is very useful when you work with a module that has a long Variant Coding string. With copy Variant coding string you can write fast and perform ECU Coding.
Then there will be a dialog box similar to when you do ECU Coding with fragments and the result will be the same, will be displayed on the Status window.
Step 3: ECU Reset after ECU Coding
Finally, after perform ECU Coding with any ECU, you need to perform Hard reset (will be displayed differently for each different ECU like FN_HardReset, FN_ECU_Reset, …) to reset the ECU.
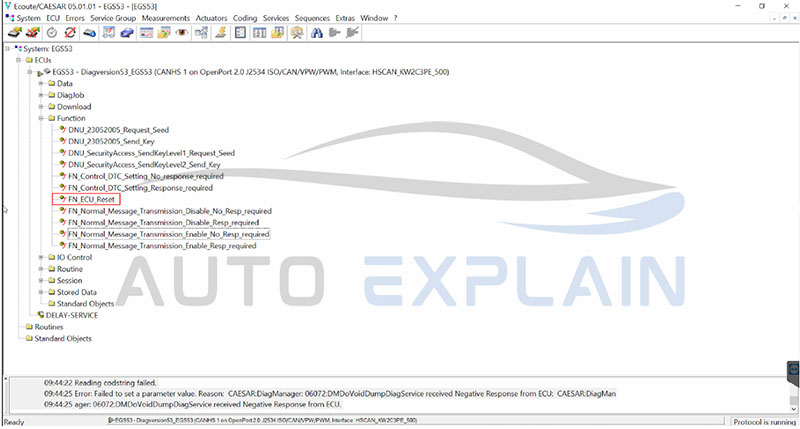
You can check the error to determine the effectiveness of the ECU Coding process, you can perform different methods to get the best results.
=> Learn other tips to do coding Vediamo with this post: Vediamo Unlocked: Expert Techniques For Mercedes ECU Programming
Use the correct VCI and CBF files.
Always save the original coding before making changes.
Double-check ECU lock status before writing.
Use Manual Coding for more control and speed.
Review the status window carefully for success/failure messages.
Vediamo lacks the safeguards found in diagnostic software like Xentry, making it essential to take extra precautions:
Now that you know how to use Vediamo software to unlock hidden features, code ECUs, and flash like a factory technician, the next step is putting that knowledge into action—with the right tools, files, and support.
At AutoExplain, we help technicians, retrofitters, and enthusiasts like you take full control of their Mercedes-Benz vehicles.
We’ve got your back.
Don’t just scan your car. Learn to speak its language—with AutoExplain and Vediamo.
Using Vediamo software can be a powerful way to customize and program Mercedes-Benz vehicles. However, it requires a high level of expertise and caution. Always prioritize safety, back up data, and double-check modifications to avoid potential damage. If you’re unsure, consult with a professional who has experience using Vediamo.
Contact AutoExplain today for expert assistance:
WhatsApp: +1(936)2896695
Email: [email protected]
Website: AutoExplain
Office: 1500 N Grant ST Sten Denver, CO 80203