If you own a BMW and have encountered the P1290 fault code, you’re not alone. This diagnostic trouble code (DTC) is particularly common across various BMW models. While the P1290 BMW code can seem confusing, this in-depth guide will help you understand what it means, why it happens, and how to fix it.
The P1290 BMW fault code is a manufacturer-specific code, meaning its interpretation can vary depending on the vehicle’s engine, control module, and year of production. It is not a universal OBD-II code with a fixed meaning like P0300 or P0171.
In most BMW models, the P1290 code translates to one of the following:
Because of this variability, the P1290 BMW code should always be diagnosed in the context of the specific model and engine.
You may also like:
The P1290 code in BMW vehicles is commonly seen in:
It’s especially prevalent in turbocharged 4-cylinder models using the N20 engine, which can trigger this fault for turbocharger-related issues.
Since the meaning of the P1290 BMW fault code can vary depending on engine type and model year, so do its root causes. Below are the most frequently encountered causes, grouped by engine and system type:
In naturally aspirated engines like the N52 found in models such as the E90 325i, the CHT sensor is a critical component. It measures the temperature of the cylinder head and informs the ECM (Engine Control Module). If the signal is too low, the ECM may interpret the engine as too cold, affecting ignition timing, fuel mixture, and emissions.
Common failure reasons:
Symptoms of failure:
In turbocharged engines like the BMW N20 (found in F30 328i, X1, X3, etc.), the P1290 code is often triggered when the wastegate actuator fails to learn or complete its initialization during cold start.
Modern BMW turbo systems use an electronic wastegate actuator, which performs a position calibration at startup. If the stop point isn’t “learned,” the ECM will assume improper boost control.
Common causes:
Symptoms include:
In older V8 engines like the N62 (used in 545i, 750Li, etc.) or inline-6 engines like the N52, the code P1290 may be triggered if the engine takes too long to warm up, or never reaches proper operating temperature.
This condition prevents the ECM from entering closed-loop operation, affecting fuel trim, emissions, and combustion efficiency.
Typical causes include:
Notable symptoms:
Across all engine variants, bad wiring or poor sensor connectivity can trigger false P1290 codes. Sensor data is very sensitive to voltage ranges and grounding, so even minor disruptions can cause fault detection.
Common causes:
Symptoms may include:
Modern BMWs rely on software-based learning systems. If adaptations (such as wastegate stop positions) are corrupted or the software version is buggy, P1290 may appear even with all hardware functioning.
Triggers for software-related P1290 include:
Symptoms of software issues:
When DTC P1290 is triggered in a BMW, the driver may observe several indicators or behaviors on the dashboard, depending on the root cause (sensor failure, turbo issue, or coolant problem). Here’s a breakdown of what you may see or experience directly from the driver’s seat:
4.1. Check Engine Light (CEL)
Appearance: Amber-colored engine icon.
When: Often lights up shortly after startup, especially in cold conditions or after a failed wastegate adaptation.
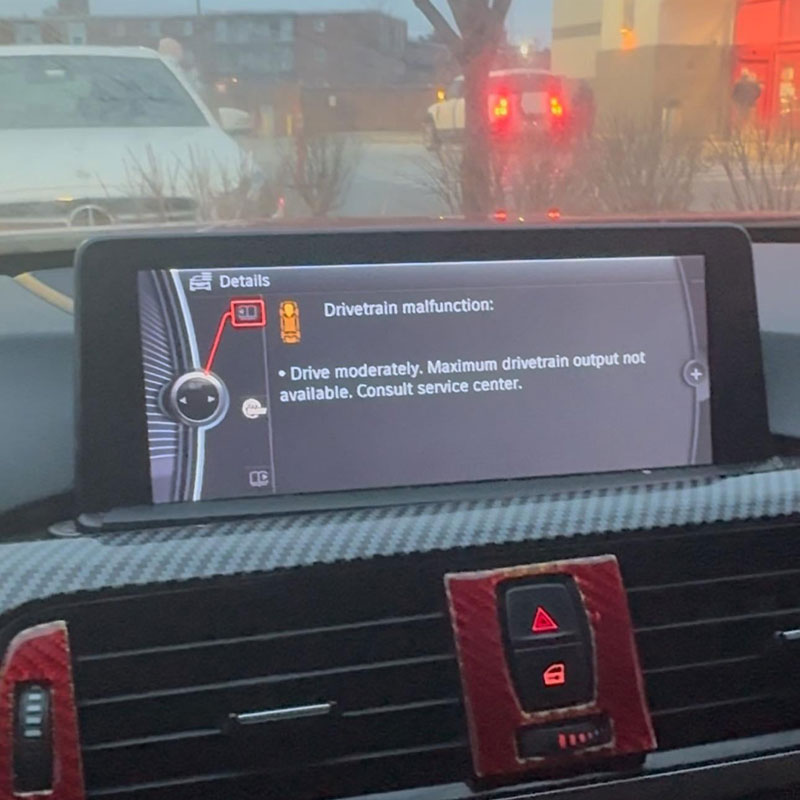
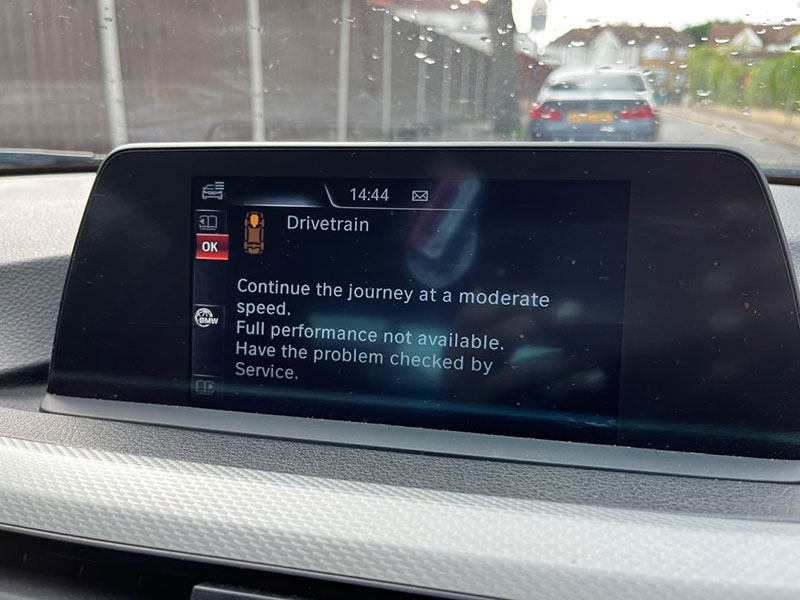
Additional Info: In some models, an iDrive warning message like “Drivetrain Malfunction” may appear.
4.2. “Drivetrain Malfunction” Message (iDrive and Cluster Display)
When it Appears: Frequently seen on turbocharged models (e.g., BMW 328i F30 with N20 engine).
Display Text:
“Drivetrain malfunction: Drive moderately. Full performance not available. Consult service center.”
Cause: Usually tied to underboost, turbo wastegate issues, or engine running too cold to operate efficiently.
Result: ECM limits power (limp mode), and the car may feel sluggish or slow to respond.
4.3. Fan Running Loudly from Cold Start
Dashboard Clue: No specific icon, but you may hear the radiator fan running at full speed even when the engine is cold and A/C is off.
Cause: Faulty cylinder head temp sensor or coolant temp sensor reporting low or invalid data, triggering failsafe cooling strategy.
4.4. Temperature Gauge May Stay Low or Fluctuate
Where: Instrument cluster coolant temperature gauge (if equipped).
Symptoms:
The needle stays stuck in the cold zone even after 10–15 minutes of driving.
May fluctuate erratically if the coolant temp sensor gives intermittent readings.
Cause: Open thermostat or faulty coolant temperature sensor.
4.5. Reduced Acceleration / Throttle Hesitation
Experience: When you press the gas pedal, the car feels slower or responds with a delay.
Dashboard Message: Often accompanied by “Drivetrain Malfunction”, but not always.
Cause: Wastegate malfunction (in N20/N26 engines) or limp mode activation by ECM.
4.6. iDrive or Service Menu Warning: “Increased Emissions”
Seen in: Later F-series models (F30, F10, etc.) with iDrive 4 or 5.
Display:
“Increased emissions: Consult service center.”
Cause: Engine running rich due to failed sensor or delayed warm-up.
4.7. Diagnostic Trouble Code (DTC) Stored as P1290
Visible With: OBD2 scanner, BMW ISTA-D, or other diagnostic tools.
Accompanying Codes: Often comes with codes like P0128, 30FF, 2EFE, 2A99, 2AB4 depending on the engine variant and issue.
To properly diagnose the P1290 code on BMWs, the following tools are recommended:
| Tool | Purpose |
|---|---|
| OBD2 Scanner (BMW-specific) | Read/clear codes and monitor live data (Recommended: Foxwell NT510 Elite, Autel AP200, or Carly) |
| BMW ISTA+ (or ISTA-D) | Factory-level diagnostic software for detailed error definitions, test plans, and actuator tests |
| Multimeter (Digital) | Test sensor voltages, resistances, and check wiring continuity |
| Infrared Thermometer | Check actual engine and coolant temperatures during warm-up |
| Vacuum Hand Pump | (For turbo models) Manually test turbo wastegate actuator movement |
| Wiring Diagram / BMW TIS Access | For checking sensor pinouts and voltage references |
| OBD2 Bluetooth Dongle (Optional) | For live monitoring using apps like Torque Pro, BimmerLink |
✅ Step 1: Scan for Trouble Codes
Connect an OBD2 scanner or BMW ISTA+ to the vehicle’s OBD-II port.
Retrieve all stored and pending DTCs, not just P1290.
Pay attention to related codes like:
P0128 – Coolant temperature below threshold
2E82/2E84 – Electric water pump malfunction
2EFE – Electric fan activation
30FF – Turbo underboost
2ABC – Wastegate actuator malfunction
📝 Note: The presence of other codes often helps narrow down whether the issue is related to cooling, turbocharging, or sensor inputs.
You may also like:
✅ Step 2: Check Live Data on Cold Start
Use the scanner to monitor the following parameters right after a cold engine start:
Cylinder Head Temperature (CHT)
Coolant Temperature
Turbo Boost Pressure (if equipped)
Wastegate Adaptation Status
Fan speed or status (active/not active)
🔍 Look for:
CHT or coolant temp readings stuck at low or -40°F → possible sensor or wiring issue.
Fan running at high speed with low temp readings → ECM is compensating for bad sensor input.
No turbo boost on acceleration → actuator or adaptation fault.
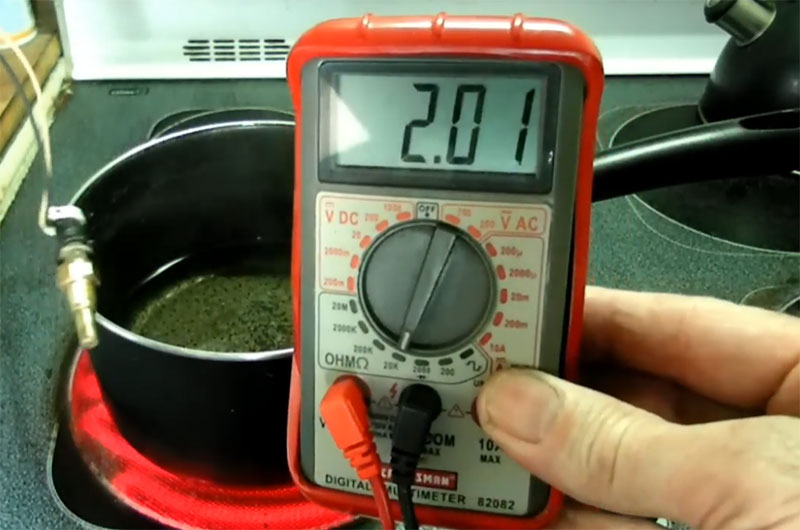
✅ Step 3: Inspect the Cylinder Head Temperature Sensor (N52 engines)
Locate the CHT sensor—commonly on the engine cylinder head near the exhaust side.
Use a multimeter to:
Check resistance (compare with factory specs at ambient temperature).
Check voltage with ignition on (typically 5V reference and signal return).
Wiggle test the wiring while watching live data to detect intermittent faults.
✅ Step 4: Check Coolant Thermostat Operation (All Engines)
Monitor coolant temperature over time during engine warm-up.
If the engine takes excessively long to reach 90°C (194°F) or stays cold:
Thermostat may be stuck open.
Coolant temp sensor may be reporting inaccurately.
Use an infrared thermometer to compare actual radiator temp with scanner data.
✅ Step 5: Test Turbo Wastegate Actuator (N20/N26 Engines)
Visually inspect the wastegate arm and linkage—it should move freely.
Use a vacuum hand pump to check if the actuator diaphragm holds vacuum.
Use ISTA or a BMW scan tool to relearn or re-adapt the actuator:
Go to: “Test Plan → Wastegate adaptation → Teach-in procedure”
If the adaptation fails, actuator may be faulty or sticky.
🛑 Caution: Some turbo actuators are electronic and cannot be manually tested—use ISTA or check for actuator fault codes (e.g., 2ABC, 2ABD).
✅ Step 6: Inspect Wiring and Connectors
Look for corroded, loose, or broken pins at sensor connectors.
Use a multimeter to test for:
5V reference voltage
Proper grounding
Continuity between sensor and ECM
Focus on areas exposed to heat and vibration—these are prone to wire fatigue.
Please note:
The P1290 BMW code is a generic diagnostic trouble code (DTC) that can represent different faults depending on the BMW engine variant—including a failing Cylinder Head Temperature (CHT) sensor, faulty turbo wastegate adaptation, or coolant-related issues. Here’s a detailed breakdown of how to fix P1290 based on the root cause.
🔍 Symptoms:
🧰 Tools Required:
🛠️ How to Fix (Step-by-Step):
Step 1: Locate the CHT Sensor
Step 2: Disconnect Electrical Connector
Step 3: Remove and Replace the Sensor
Step 4: Clear Fault Codes and Verify Operation
OEM Cylinder Head Temperature Sensor
(BMW PN: 13 62 1 433 077 — fits many N52 models including 325i, 328i, 330i)
Optional: Sensor seal washer (if not included)
BMW-approved coolant (if any leakage occurs during removal)
Repair Time: ~30–60 minutes
Estimated Cost: $50–$100 (DIY); $150–$250 (shop)
🔍 Symptoms:
When the P1290 code is related to turbo wastegate adaptation issues, typically caused by a sticking wastegate actuator, you may observe the following symptoms:
“Drivetrain Malfunction” warning on the dashboard, typically accompanied by a check engine light.
Turbo underboost or hesitation during acceleration, especially at higher RPMs. This is a direct result of the wastegate actuator not being properly calibrated.
P1290 stored along with wastegate adaptation codes like 2ABC and 2ABD, which specifically indicate a failure in the learning process of the wastegate’s ‘closed’ position during the adaptation.
🧰 Tools Required:
BMW diagnostic scanner (e.g., ISTA+, Foxwell NT510 Elite, or Carly for BMW) for running adaptation procedure.
Vacuum pump (for mechanical actuator test) or digital scan tool for electronic actuator testing.
Torque wrench and socket set for disassembly and reassembly.
Flashlight (for visibility in tight spaces around the turbocharger).
Small mirror (helpful for inspecting the actuator linkage and wiring in hard-to-reach areas).
🛠️ How to Fix (Step-by-Step):
Step 1: Run Turbo Adaptation Procedure Using ISTA or BMW Scan Tool
Connect your BMW scan tool (such as ISTA+ or Foxwell NT510) to the OBD-II port.
Access the Test Plan:
Navigate to the “Drive” or “Engine Control” module depending on your tool.
Select “Wastegate Actuator” adaptation procedure. On ISTA, this is usually found under:
Test Plan → Wastegate Actuator → Teach-in procedure
Follow on-screen prompts and start the adaptation. The tool will command the wastegate actuator to move through its range, teaching it the ‘closed’ and ‘open’ positions.
Step 2: Check the Actuator’s Functionality
If the adaptation procedure fails, proceed to check the physical components:
Inspect the wastegate linkage: Ensure that it is not sticking, loose, or damaged. Sometimes the linkage can seize or become corroded over time, causing the actuator to fail its learning process.
Test the actuator:
For mechanical actuators (vacuum-operated), use a vacuum pump to simulate the vacuum signal and test actuator movement. Ensure that the actuator moves freely and responds correctly to the applied pressure.
For electronic actuators, you can use the scan tool to activate the actuator directly and check if it moves smoothly without any unusual noises or resistance.
If the actuator is physically malfunctioning, replacement is necessary.
Step 3: Replace the Faulty Actuator
If testing reveals that the wastegate actuator is faulty or stuck, the actuator needs to be replaced.
Separate Wastegate Actuator: If your BMW model uses a separate actuator (some models have a removable actuator for the turbo), you can replace just the actuator without needing to replace the entire turbocharger assembly.
Turbocharger Assembly Replacement: In some BMW models, the actuator is integrated into the turbocharger housing, which means you may need to replace the entire turbo assembly if the actuator is non-serviceable on its own.
To remove the actuator or turbo assembly, you will typically need to:
Remove the air intake system, heat shields, and turbo cooling lines.
Unbolt the actuator (if separate) or remove the entire turbo if the actuator is integrated.
Install the new actuator (or turbo assembly) and reattach the necessary components.
Be sure to replace any worn-out gaskets and use torque specs when reassembling the parts.
Step 4: Clear Fault Codes and Perform a Test Drive
After replacing the actuator or turbo assembly, use your BMW scanner to clear the fault codes and perform a test drive.
During the test drive, monitor boost pressure, fuel trims, and engine behavior to ensure that the system is working correctly.
Pay special attention to how the engine responds to acceleration and boost levels to confirm that the hesitation and underboost issues have been resolved.
Run another adaptation procedure for the wastegate actuator if needed, ensuring the code P1290 does not return.
🧩 Parts Needed:
Turbo Wastegate Actuator (If separate)
(Ensure you order the correct part based on your model and engine type, e.g., BMW PN 11617540229 for certain N20/N26 engines.)
Turbocharger Assembly (If the actuator is integrated and cannot be replaced separately)
Gaskets (Turbo inlet, turbocharger exhaust manifold)
Mounting hardware (Bolts and washers, in case any components are damaged during removal)
Repair Time: 2–6 hours depending on access
Estimated Cost:
Actuator only: $150–$400 (part)
Turbo replacement: $800–$1800 (parts + labor)
🔍 Symptoms:
When the coolant system fails to reach the proper operating temperature, it can cause issues such as:
Engine takes too long to warm up: The engine remains at a low temperature for an extended period, often leading to inefficiency and poor performance.
Temperature gauge stuck low: On the dashboard, the coolant temperature gauge may not move past the low or cold mark, indicating that the engine isn’t warming up as it should.
P1290 stored along with P0128: P0128 is a common code associated with coolant temperature being too low, and together with P1290, this suggests an issue with the coolant thermostat, coolant temperature sensor, or another related component in the cooling system.
🧰 Tools Required:
BMW diagnostic scanner (e.g., ISTA+, Foxwell NT510 Elite, or Carly for BMW) to monitor engine temperature during warm-up.
Infrared thermometer (IR thermometer) to measure the engine’s surface temperature.
Socket set and ratchet for thermostat removal and installation.
Torque wrench for precise reassembly.
Coolant bleeding tools (e.g., pressure bleeder or hand pump) to ensure no air is trapped in the system after replacement.
Flashlight for inspecting the thermostat housing and related components.
🛠️ How to Fix (Step-by-Step):
Step 1: Monitor Engine Temperature During Warm-Up Using Scanner and IR Thermometer
Connect your BMW scanner (e.g., ISTA+ or Foxwell NT510) to the OBD-II port and monitor the coolant temperature in real time.
Alternatively, use an infrared (IR) thermometer to measure the temperature of the engine block and thermostat housing during warm-up.
The engine temperature should gradually increase to around 90°C (194°F) within the first 10-15 minutes of driving. If the temperature remains low, it could indicate a faulty thermostat or coolant sensor.
Step 2: If Temps Stay Low, Replace the Thermostat
Diagnose the thermostat issue:
If the engine fails to reach operating temperature, it’s most likely due to the thermostat being stuck open. This means coolant is continuously circulating, preventing the engine from reaching the correct temperature.
If you notice the temperature gauge is stuck low, a stuck-open thermostat is the most likely cause.
Consider replacing the coolant temperature sensor as well, especially if there are multiple codes related to cooling or temperature issues (e.g., P0128 alongside P1290). Faulty sensors may also misread the temperature, causing the thermostat to act erratically.
Thermostat replacement:
On N52/N54 engines, the thermostat is often integrated into the thermostat housing, which makes the replacement a bit more involved.
Remove the thermostat housing by unbolting it (use a socket set for the bolts).
Replace the old thermostat with a new OEM BMW thermostat. Be sure the new unit is correctly sealed and properly oriented.
Step 3: Bleed the Coolant System Properly After Replacement
Bleed the cooling system to remove any trapped air that might cause hot spots or improper circulation. This can be done with a coolant pressure bleeder or a manual bleeding procedure:
Manual method: With the engine off, remove the coolant reservoir cap, and start the engine. Let it idle and slowly add coolant as the air bubbles are purged. This ensures the coolant circulates and removes any air trapped in the system.
For models like N52/N54, make sure to open the bleed screw (usually located near the thermostat or radiator) to allow any trapped air to escape.
Monitor the temperature while performing this step to ensure the engine reaches optimal temperature and that the thermostat is functioning properly.
Step 4: Clear Codes and Observe on Next Cold Start
After replacing the thermostat, clear any stored fault codes using the BMW diagnostic scanner.
Perform a test drive after the repair. During the test drive:
Monitor coolant temperature through the scanner to ensure it reaches normal operating range (~90°C/194°F).
Check the engine temperature gauge to confirm it operates within the normal range.
Observe if the P1290 and P0128 codes reappear after a full cold start cycle. If the codes stay cleared and the engine heats up properly, the issue should be resolved.
🧩 Parts Needed:
OEM Thermostat (for N62, N52, and similar engines)
(e.g., BMW Part Number: 11 53 7 561 909 for N52 engines)
Coolant Temperature Sensor (optional but recommended for full repair)
(e.g., BMW Part Number: 13 62 7 565 675 for N52 engines)
New Coolant (BMW-approved, typically G48 coolant for most BMW models)
Repair Time: 1–2 hours
Estimated Cost: $120–$300 (DIY); $300–$600 (shop)
🔍Symptoms of Wiring-Related P1290 Issues:
When the issue is electrical — such as a damaged wire or faulty connector — the following symptoms may occur:
Intermittent P1290 Fault Code: The code may not appear every time you drive, and may only trigger under certain conditions (cold start, engine load, vibration, etc.).
Erratic Live Data Readings: Using a scan tool, temperature-related sensors like the Cylinder Head Temperature (CHT) sensor, Coolant Temperature Sensor, or Wastegate Actuator Position Sensor may show values that fluctuate abnormally or spike suddenly.
Multiple Sensor-Related DTCs: You may see related fault codes stored alongside P1290 — such as:
CHT sensor signal high/low
Coolant sensor signal out of range
Turbo actuator learning error (e.g., 2ABC, 2ABD)
These inconsistencies often trace back to electrical faults — either in the sensor connectors, engine harness, or wiring routing points that suffer from wear, vibration, or heat damage.
🧰 Tools Required:
OBD-II diagnostic scanner (ISTA+, Foxwell NT510, Autel, etc.)
Multimeter (for checking voltage, continuity, and resistance)
Back-probing pins or leads (for safe ECM/sensor testing)
Flashlight and inspection mirror
Heat shrink tubing, soldering iron, or OEM harness repair kit
Electrical contact cleaner (for oxidized pins)
Zip ties and wiring loom tape (for securing repaired wiring)
🛠️ How to Fix Wiring or Connector Issues (Step-by-Step)
Step 1: Locate the Sensor in Question
Depending on what variation of P1290 you’re diagnosing, identify which sensor is involved:
Cylinder Head Temperature Sensor (CHT) – often mounted in the cylinder head near the exhaust manifold on N52 engines.
Coolant Temperature Sensor – typically found on the thermostat housing or lower radiator hose.
Turbo Wastegate Actuator Position Sensor – integrated into the electronic wastegate actuator on N20/N26 engines.
Use your scanner to check which sensor is giving erratic or implausible values.
Step 2: Inspect the Wiring Harness Visually
Follow the sensor’s harness 6–12 inches in both directions.
Look for signs of:
Cracked insulation
Chafing against metal brackets
Melted sections (especially near hot components like the exhaust manifold)
Corrosion or moisture inside the connector
Disconnect the sensor’s connector and inspect the pins:
Bent, pushed-back, corroded, or loose terminals can easily cause signal issues.
Use contact cleaner to remove corrosion and allow for better signal transmission if needed.
Step 3: Test Electrical Signals Using a Multimeter
With the ignition ON (engine OFF), use your multimeter to check the following from the ECM side of the wiring or directly at the sensor:
5V Reference Voltage: Most sensors operate on a 5V signal provided by the ECU. Probe the reference wire (typically red or orange) and ground — should read ~4.9–5.0V.
Signal Return (Sensor Output): This wire should vary depending on sensor function. With the sensor plugged in and engine running, live data on the scan tool should match actual temperature. You can also back-probe and compare readings with multimeter.
Ground Continuity: Set multimeter to continuity or resistance mode. Test between sensor ground pin and chassis ground. Should show 0–1 ohms. If open or high resistance, ground wire is compromised.
💡 Tip: Gently wiggle the harness while testing. If readings change dramatically, you likely have an intermittent short or open circuit.
Step 4: Repair or Replace the Wiring as Needed
If you discover any damaged wiring or poor continuity:
Cut out the damaged section of wire using precision cutters.
Splice in a new section of wire with matching gauge.
Solder the connection (preferred over crimping) and use heat shrink tubing to insulate the repair.
Rewrap the harness in OEM-style fabric or PVC loom tape, and secure it using zip ties to avoid future vibration damage.
For bad connectors:
Replace with an OEM connector kit (BMW often uses Bosch, Delphi, or Siemens terminals).
Repin carefully, ensuring proper crimping and insertion depth.
Step 5: Reassemble and Verify Repair
Reconnect all sensors and clear the P1290 fault code using your scan tool.
Start the engine cold and monitor sensor live data:
Coolant and CHT readings should rise smoothly with warm-up.
Turbo actuator should complete adaptation with no error.
Perform a short road test under various engine loads and re-scan for fault codes.
🧩 Parts and Supplies Needed:
Replacement sensor connectors or pigtails (OEM BMW or equivalent)
Automotive-grade wire (16–22 AWG, depending on sensor)
Heat shrink tubing and solder
Contact cleaner and dielectric grease (optional)
Zip ties, loom tape
Repair Time: 30 minutes – 2 hours
Estimated Cost: $10–$150 depending on severity
Clear DTCs using your scan tool or ISTA+.
Perform adaptation resets for:
Turbo actuator (if replaced)
Throttle body
Thermostat system (if applicable)
Test drive the car through a full warm-up and moderate driving cycle.
Re-scan to confirm that P1290 does not return and that sensor readings are normal.
| Repair Type | Estimated Cost (Parts + Labor) |
|---|---|
| CHT Sensor Replacement | $150–$300 |
| Turbo Actuator Replacement | $400–$900 |
| Coolant Thermostat Replacement | $250–$450 |
| Diagnostic Fee (Dealership) | $120–$200 |
Note: Costs can vary by model and region.
A common scenario:
Diagnosis:
Fix:
You can reduce the likelihood of this code appearing by:
Use BMW-approved coolant and replace it every 3–4 years.
Run ISTA adaptations after turbo or sensor replacements.
Monitor temperature and boost values periodically using a scan tool or app like BimmerLink.
Avoid ignoring “Drivetrain Malfunction” warnings even if the car still drives.
1. What does P1290 mean on a 2013 BMW 328i?
On the 2013 F30 328i with N20 engine, it typically relates to a turbo wastegate actuator not completing cold start calibration.
2. Is it safe to drive with P1290 BMW code?
Possibly, but not recommended. Depending on the root cause, it may lead to further engine damage or poor performance.
3. Can I fix the P1290 code myself?
Yes, if you’re comfortable with DIY car repair and have access to proper diagnostic tools. For complex cases like turbo actuator replacement, professional help is advised.
4. Does the P1290 BMW code always mean turbo problems?
No. On some engines, it means CHT sensor or coolant-related issues.
The P1290 BMW fault code is unique in that it can represent different problems depending on the vehicle model and engine. Whether it’s a failed sensor, stuck turbo actuator, or low coolant temp, understanding the context is key.
If you’re experiencing symptoms and see this code, don’t panic—but don’t ignore it either. With the right tools and diagnostic approach, you can identify and fix the underlying issue effectively.
For help with diagnosing and repairing the P1290 BMW code on your 328i, X1, X3, or other models, feel free to contact our expert support team.
Dealing with the P1290 BMW fault code can be frustrating—especially when it points to different problems depending on your model, engine type, or driving conditions. Whether it’s a faulty CHT sensor, a stubborn turbo wastegate actuator, or hidden wiring issues, accurate diagnosis is key to avoiding costly guesswork.
That’s where AutoExplain comes in.
🔧 Real Diagnostic Experts – Our team specializes in BMW diagnostics, coding, and electronic repairs.
🧰 Live Remote Support – We connect directly to your BMW via remote tools to scan, diagnose, and guide you step-by-step.
📂 Verified BMW Repair Files & Data – Access professional-grade data, sensor diagrams, wiring charts, and repair bulletins for your specific model.
⏱️ 24/7 Help, Worldwide – No matter where you are, we provide real-time support when you need it most.
💸 Cost-Effective Repairs – Stop wasting money replacing random parts. Let our experts guide you to fix the real problem—fast.
Contact AutoExplain today for expert assistance:
WhatsApp: +1(936)2896695
Email: [email protected]
Website: AutoExplain
Office: 1500 N Grant ST Sten Denver, CO 80203