The Audi B10C221 fault code signifies a lower limit not reached by the sensor for refrigerant pressure and temperature, which often indicates issues within the air conditioning system. AutoExplain.com is here to help you understand the complexities and resolve your Audi’s A/C problems efficiently with our remote support, ensuring your expertise shines. Dive in to uncover effective strategies for diagnosing and resolving this common Audi ailment, supported by our team ready to offer solutions for all your auto repair issues, including ECU programming and module issues.
1. Understanding the Audi B10C221 Fault Code
The Audi B10C221 fault code indicates that the sensor for refrigerant pressure and temperature is reporting a value below the expected lower limit, which immediately suggests potential problems within the vehicle’s air conditioning system. This means that the sensor, responsible for monitoring both the pressure and temperature of the refrigerant, has detected a condition that falls outside of its normal operating range.
1.1 What Does The B10C221 Code Mean For Audi Technicians?
For Audi technicians, B10C221 is a diagnostic trouble code (DTC) that signals a problem in the air conditioning (A/C) system related to the refrigerant pressure and temperature sensor. This code helps in identifying potential issues such as low refrigerant levels, sensor malfunction, or wiring problems.
1.2 Potential Symptoms Associated with the B10C221 Code?
Several symptoms can manifest when the B10C221 code is triggered in an Audi:
- A/C Not Working: The most noticeable symptom is the air conditioning system failing to produce cold air.
- A/C Button Issues: The A/C button might not stay on when pressed, indicating the system is not engaging.
- Intermittent Cooling: The A/C may work sporadically, providing cooling at times but failing at others.
- Unusual Noises: Strange sounds from the A/C compressor could indicate a problem.
1.3 Is The B10C221 Code Serious for Audi Vehicles?
While the B10C221 code does not typically indicate an immediate threat to the vehicle’s operation, it should be addressed promptly to restore the air conditioning system’s functionality. Ignoring this issue can lead to discomfort for the vehicle’s occupants, especially in hot weather conditions, and may potentially cause further damage to the A/C system components over time.
2. Diagnosing the B10C221 Fault Code in Audi Vehicles
Diagnosing the B10C221 fault code requires a systematic approach to pinpoint the root cause of the issue and ensure accurate repairs. Here’s a step-by-step guide for technicians:
2.1 Initial Inspection: The First Step in Resolving B10C221
- Check the Obvious: Begin by visually inspecting the A/C system components, including the compressor, condenser, and lines, for any signs of damage or leaks.
- Inspect Wiring and Connectors: Examine the wiring and connectors associated with the refrigerant pressure and temperature sensor for corrosion, damage, or loose connections.
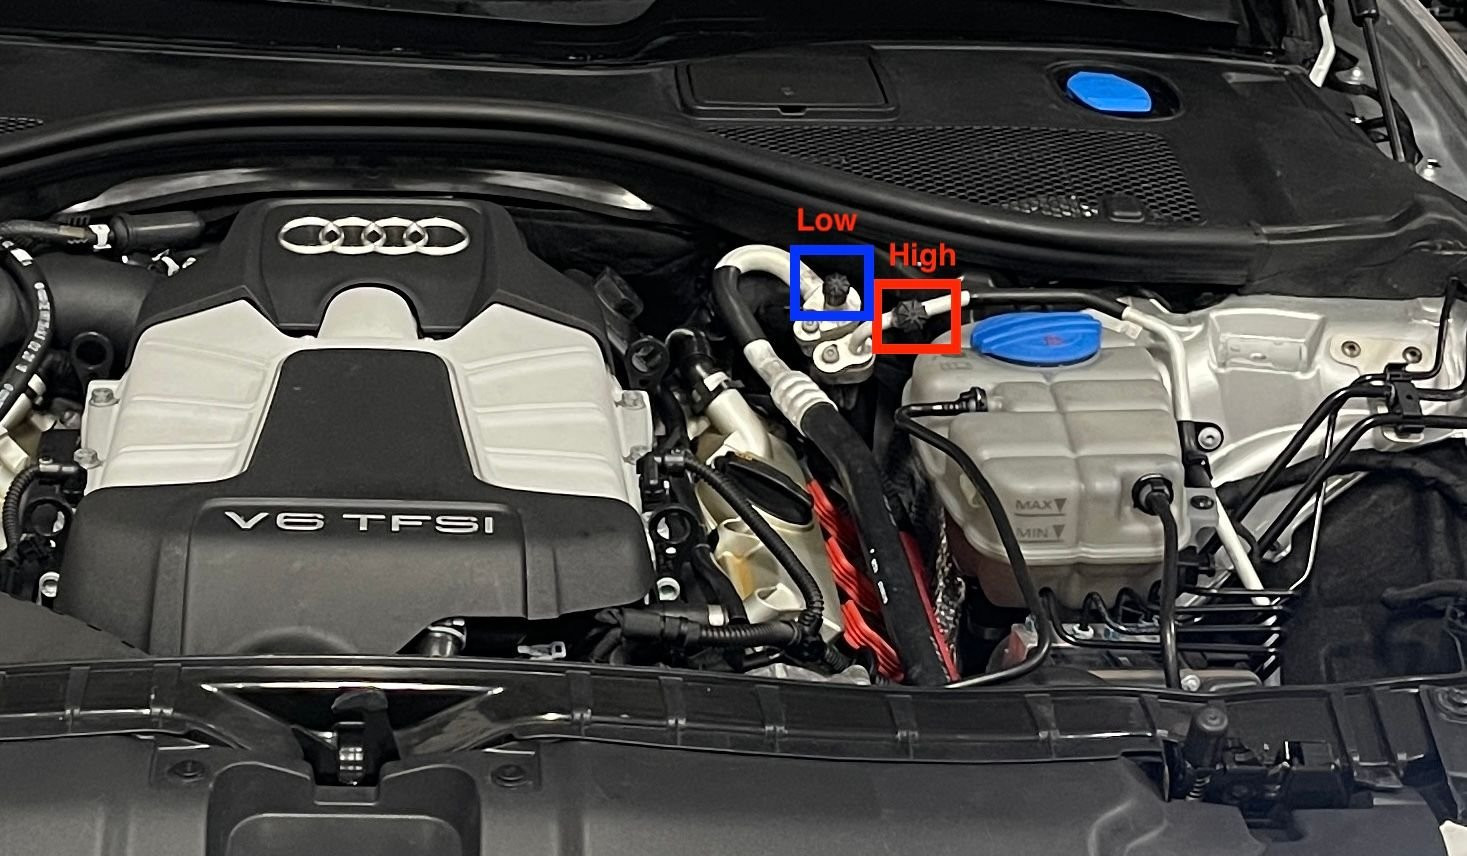
- Verify Refrigerant Level: Use a refrigerant gauge set to check the system’s pressure levels. Low refrigerant levels are a common cause of the B10C221 code.
2.2 Advanced Diagnostics: Using Tools to Uncover B10C221
- OBDII/ODIS Tool Scan: Use an OBDII or ODIS (Offboard Diagnostic Information System) tool to confirm the presence of the B10C221 code and check for any other related fault codes.
- Sensor Testing: Use a multimeter to test the refrigerant pressure and temperature sensor’s voltage and resistance. Compare the readings to the manufacturer’s specifications to determine if the sensor is functioning correctly.
- Wiring Harness Testing: Check the continuity of the wiring harness between the sensor and the ECU (Engine Control Unit) to identify any breaks or shorts in the wiring.
2.3 Step-by-Step Diagnostic Procedure for B10C221
| Step |
Action |
Possible Outcome |
| 1 |
Visual Inspection |
Identifies obvious damage or leaks in A/C components. |
| 2 |
Wiring and Connectors Check |
Reveals corrosion, damage, or loose connections that may affect sensor readings. |
| 3 |
Refrigerant Level Verification |
Confirms low refrigerant levels, indicating a leak in the system. |
| 4 |
OBDII/ODIS Tool Scan |
Validates the presence of the B10C221 code and reveals other related fault codes. |
| 5 |
Sensor Testing with Multimeter |
Determines if the sensor is functioning within the manufacturer’s specified range. |
| 6 |
Wiring Harness Testing for Continuity |
Identifies breaks or shorts in the wiring between the sensor and the ECU. |
| 7 |
ECU Inspection |
Checks for any issues with the ECU that might be causing incorrect readings or communication problems with the sensor. |
| 8 |
Component Isolation |
Isolates specific components to verify their functionality. |
| 9 |
System Pressure Testing |
Measures the high and low-side pressures in the A/C system to confirm if they are within the normal operating ranges. |
| 10 |
Dynamic Testing |
Conducts tests while the system is running to identify intermittent issues. |
| 11 |
Data Logging |
Records sensor data over time to analyze performance under various conditions. |
| 12 |
Consulting Technical Resources |
Refers to manufacturer’s service manuals, technical service bulletins, and online forums for additional diagnostic information and insights. |
| 13 |
Professional Consultation with AutoExplain.com |
Engages with experts for complex or unresolved issues, leveraging their specialized knowledge and remote support capabilities. |
2.4 Common Pitfalls in Diagnosing B10C221
- Ignoring Basic Checks: Skipping visual inspections or refrigerant level checks can lead to misdiagnosis.
- Assuming Sensor Failure: Always test the sensor and wiring before replacing the sensor.
- Overlooking Intermittent Issues: Intermittent problems may not be immediately apparent, requiring thorough testing under various conditions.
3. Repairing the B10C221 Fault Code in Audi Vehicles
Once the diagnosis is complete, the next step is to perform the necessary repairs to resolve the B10C221 fault code. Here are the common repair procedures:
3.1 Replacing the Refrigerant Pressure and Temperature Sensor
- Locate the Sensor: Identify the location of the refrigerant pressure and temperature sensor in the A/C system.
- Disconnect the Electrical Connector: Disconnect the electrical connector from the sensor.
- Remove the Old Sensor: Use the appropriate tools to remove the old sensor from the A/C line or component.
- Install the New Sensor: Install the new sensor, ensuring it is properly tightened to prevent leaks.
- Reconnect the Electrical Connector: Reconnect the electrical connector to the new sensor.
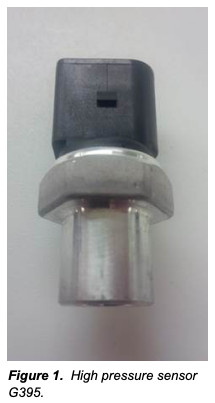 Refrigerant Pressure Sensor Audi
3.2 Addressing Refrigerant Leaks
- Locate the Leak: Use a leak detector or UV dye to identify the source of the refrigerant leak.
- Repair or Replace Leaking Components: Depending on the severity of the leak, either repair the component (e.g., tighten a loose fitting) or replace it (e.g., replace a damaged hose or condenser).
- Recharge the System: After repairing the leak, recharge the A/C system with the correct amount of refrigerant according to the manufacturer’s specifications.
3.3 Fixing Wiring and Connector Issues
- Repair Damaged Wiring: Repair any damaged wiring by splicing in new wires or replacing sections of the harness.
- Clean Corroded Connectors: Clean corroded connectors with a wire brush or electrical contact cleaner.
- Replace Faulty Connectors: Replace any faulty connectors that cannot be repaired.
3.4 Step-by-Step Repair Procedure for B10C221
| Step |
Action |
Expected Result |
| 1 |
Sensor Replacement |
Ensures accurate refrigerant pressure and temperature readings, resolving potential sensor malfunction. |
| 2 |
Leak Repair |
Restores proper refrigerant levels, preventing future low-pressure issues. |
| 3 |
Wiring and Connector Fixes |
Establishes reliable electrical connections, eliminating communication errors between the sensor and the ECU. |
| 4 |
System Recharge |
Replenishes the refrigerant to optimal levels, enabling efficient cooling performance. |
| 5 |
System Testing |
Verifies the integrity of the A/C system post-repair, ensuring all components function correctly and the B10C221 code is cleared. |
| 6 |
Professional Validation with AutoExplain.com |
Obtains expert confirmation of the repair’s effectiveness and receives additional support if needed. |
3.5 Common Mistakes During Repair
- Using Incorrect Parts: Always use the correct replacement parts specified for the vehicle.
- Improper Installation: Ensure all components are installed correctly and torqued to the proper specifications.
- Neglecting System Recharge: Failing to properly recharge the A/C system after repairs can lead to continued issues.
4. Preventing Future B10C221 Fault Codes
Preventing future B10C221 fault codes involves regular maintenance and proactive care of the vehicle’s A/C system. Here are some best practices:
4.1 Regular A/C System Maintenance
- Annual Inspections: Conduct annual inspections of the A/C system to check for leaks, damage, and proper operation.
- Refrigerant Recharge: Periodically recharge the refrigerant to maintain optimal system performance.
- Component Cleaning: Keep the A/C system components clean to prevent corrosion and damage.
4.2 Best Practices for A/C System Care
- Use A/C Regularly: Operate the A/C system regularly, even in cooler months, to keep the components lubricated and prevent seals from drying out.
- Avoid Overcharging: Avoid overcharging the A/C system with refrigerant, as this can damage the compressor and other components.
- Address Issues Promptly: Address any A/C system issues promptly to prevent further damage and costly repairs.
4.3 Tips for Avoiding Future Issues
- Use Quality Parts: Always use high-quality replacement parts that meet or exceed OEM specifications.
- Follow Manufacturer Recommendations: Follow the manufacturer’s recommendations for A/C system maintenance and repair.
- Seek Professional Advice: Consult with a qualified technician for any complex A/C system issues.
5. How AutoExplain.com Can Help With Your Audi B10C221 Fault Code
AutoExplain.com offers comprehensive support for diagnosing and repairing the Audi B10C221 fault code. Here’s how we can assist you:
5.1 Remote Diagnostic Support for Audi Vehicles
Our team of experienced technicians provides remote diagnostic support via WhatsApp and email, helping you pinpoint the root cause of the B10C221 code quickly and accurately.
5.2 Step-by-Step Guidance for Repair Procedures
We offer step-by-step guidance for performing the necessary repairs, ensuring you complete each task correctly and efficiently.
5.3 ECU Programming and Software Updates
AutoExplain.com provides ECU programming and software updates to ensure your Audi’s A/C system is running with the latest software, addressing any potential software-related issues that may contribute to the B10C221 code.
5.4 Benefits of Using AutoExplain.com
- Expert Support: Access to a team of knowledgeable and experienced automotive technicians.
- Remote Assistance: Convenient remote support, eliminating the need for costly on-site visits.
- Timely Solutions: Quick and effective solutions to resolve the B10C221 code and restore your Audi’s A/C system.
 Automotive AC Pressure Test Gauge
6. Essential Tools for Repairing the Audi B10C221 Fault Code
Having the right tools is crucial for effectively diagnosing and repairing the B10C221 fault code. Here’s a list of essential tools:
6.1 Diagnostic Tools
- OBDII/ODIS Scanner: For reading and clearing fault codes.
- Multimeter: For testing electrical components and circuits.
- Refrigerant Gauge Set: For checking refrigerant pressure levels.
6.2 Repair Tools
- Socket Set: For removing and installing various components.
- Wrench Set: For tightening and loosening bolts and nuts.
- A/C Vacuum Pump: For evacuating the A/C system before recharging.
- Refrigerant Recharging Machine: For accurately recharging the A/C system with refrigerant.
- Leak Detector: For locating refrigerant leaks in the system.
6.3 Safety Equipment
- Safety Glasses: To protect your eyes from debris and chemicals.
- Gloves: To protect your hands from chemicals and sharp objects.
7. Step-by-Step Guide: Clearing the B10C221 Code After Repair
Once the necessary repairs have been completed, it’s important to clear the B10C221 code from the vehicle’s computer to ensure the system is functioning correctly.
7.1 Using an OBDII Scanner
- Connect the Scanner: Plug the OBDII scanner into the vehicle’s diagnostic port.
- Turn on the Ignition: Turn the ignition to the “on” position without starting the engine.
- Access the Fault Codes: Navigate to the fault codes section in the scanner menu.
- Select the B10C221 Code: Locate the B10C221 code in the list of fault codes.
- Clear the Code: Select the option to clear the code from the vehicle’s computer.
- Verify the Code is Cleared: After clearing the code, re-scan the system to ensure the B10C221 code is no longer present.
7.2 Using ODIS Software
- Connect to Vehicle: Establish a connection between the ODIS software and the vehicle’s diagnostic port.
- Perform Diagnostic Scan: Initiate a diagnostic scan to identify any stored fault codes.
- Select Fault Code: Choose the B10C221 code from the list of identified faults.
- Clear Fault Memory: Use the function in ODIS to clear the fault memory for the selected code.
- Confirm Code Clearance: Run another scan to verify that the B10C221 code has been successfully cleared from the system.
7.3 Verifying the Repair
- Test the A/C System: After clearing the code, test the A/C system to ensure it is functioning correctly.
- Monitor System Performance: Monitor the system’s performance over time to ensure the code does not return.
8. Advanced Techniques for Audi A/C System Diagnostics
For complex or intermittent issues, advanced diagnostic techniques may be necessary to accurately diagnose and repair the A/C system.
8.1 Using a Digital Multimeter
- Measure Voltage: Use a multimeter to measure the voltage at various points in the A/C system to check for proper electrical supply.
- Check Continuity: Use a multimeter to check the continuity of circuits to identify any breaks or shorts in the wiring.
- Test Sensor Resistance: Use a multimeter to test the resistance of sensors to determine if they are functioning within the manufacturer’s specified range.
8.2 Using an Oscilloscope
- Waveform Analysis: Use an oscilloscope to analyze the waveforms of signals from sensors and actuators to identify any abnormalities or distortions.
- Signal Timing: Use an oscilloscope to measure the timing of signals to check for proper synchronization and coordination between components.
8.3 Performing a System Pressure Test
- Connect Gauge Set: Connect a refrigerant gauge set to the A/C system’s high and low-pressure ports.
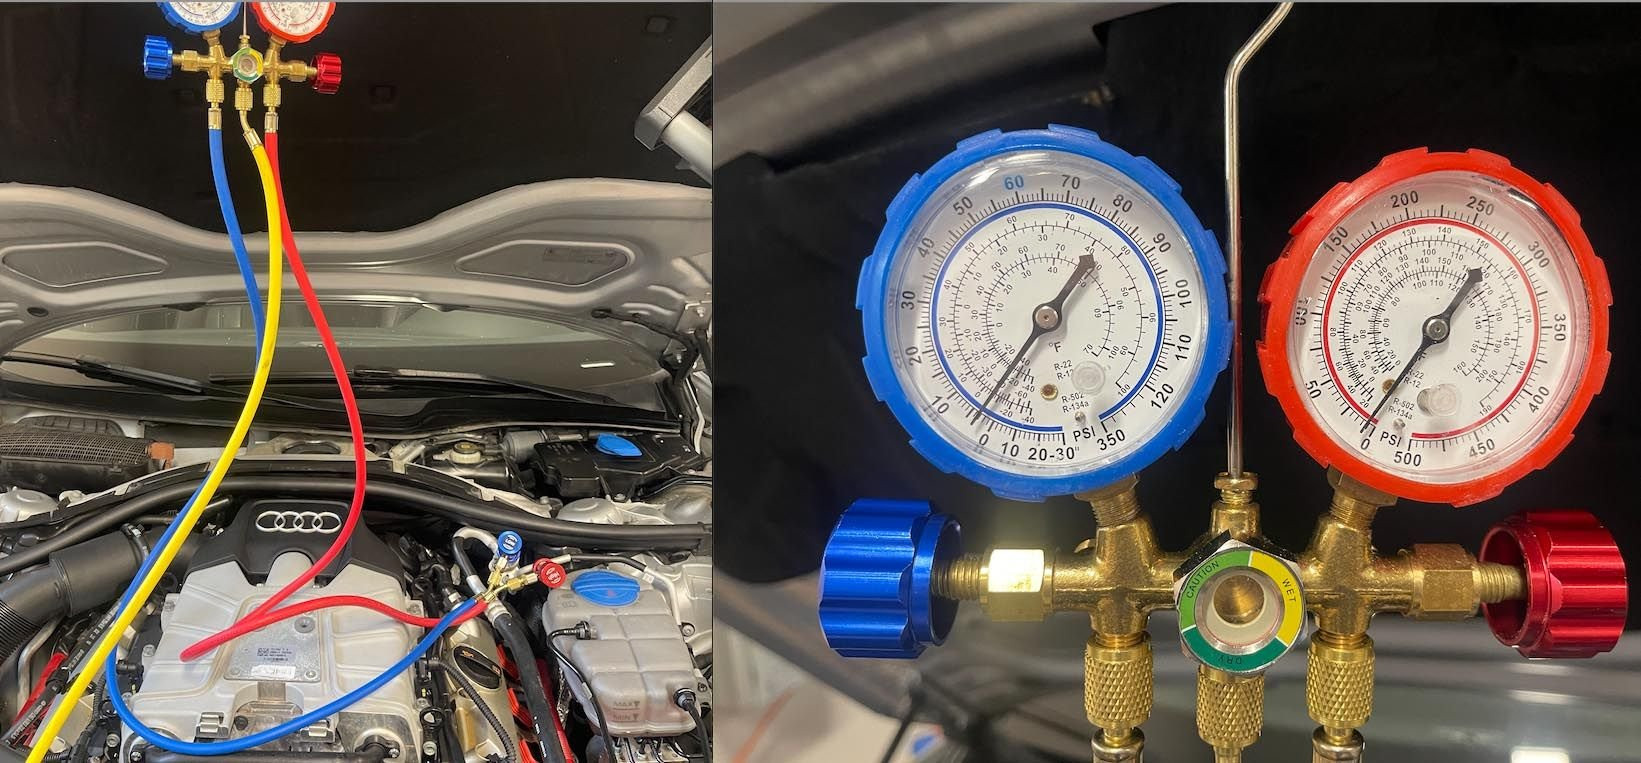 Automotive AC Pressure Test Gauge
- Measure Pressure: Measure the high and low-side pressures with the A/C system running and compare the readings to the manufacturer’s specifications.
- Analyze Results: Analyze the pressure readings to identify any issues such as low refrigerant levels, compressor problems, or restrictions in the system.
9. Key Considerations for Audi A/C System Repairs
When working on Audi A/C systems, keep these key considerations in mind to ensure successful repairs:
9.1 Using Genuine Audi Parts
- Quality Assurance: Genuine Audi parts are designed and manufactured to meet the highest standards of quality and performance.
- Compatibility: Genuine Audi parts are guaranteed to be compatible with the vehicle’s A/C system, ensuring proper fit and function.
- Warranty Coverage: Genuine Audi parts are typically covered by a warranty, providing added peace of mind.
9.2 Following Audi Repair Procedures
- Accuracy: Audi repair procedures are developed by the manufacturer and provide detailed instructions for performing repairs correctly.
- Efficiency: Following Audi repair procedures can help you complete repairs quickly and efficiently.
- Safety: Audi repair procedures emphasize safety and provide guidance on how to perform repairs safely.
9.3 Adhering to Environmental Regulations
- Refrigerant Handling: Adhere to all environmental regulations regarding the handling and disposal of refrigerant.
- Leak Prevention: Take steps to prevent refrigerant leaks during repairs.
- Proper Disposal: Properly dispose of used refrigerant and A/C system components according to environmental regulations.
10. FAQs About the Audi B10C221 Fault Code
Here are some frequently asked questions about the Audi B10C221 fault code:
10.1 What does the B10C221 code indicate?
The B10C221 code indicates that the sensor for refrigerant pressure and temperature is reporting a value below the expected lower limit.
10.2 Can I fix the B10C221 code myself?
While some basic troubleshooting steps can be performed by vehicle owners, complex repairs typically require professional expertise and specialized equipment.
10.3 How much does it cost to fix the B10C221 code?
The cost to fix the B10C221 code can vary depending on the cause and the extent of the repairs needed. Contact AutoExplain.com for an estimate.
10.4 Is it safe to drive with the B10C221 code?
While it’s generally safe to drive with the B10C221 code, the A/C system may not function properly, leading to discomfort in hot weather.
10.5 What are the common causes of the B10C221 code?
Common causes include low refrigerant levels, a faulty refrigerant pressure and temperature sensor, and wiring or connector issues.
10.6 How can AutoExplain.com help with the B10C221 code?
AutoExplain.com provides remote diagnostic support, step-by-step repair guidance, and ECU programming services to help you resolve the B10C221 code quickly and efficiently.
10.7 What tools are needed to diagnose the B10C221 code?
Essential tools include an OBDII scanner, multimeter, and refrigerant gauge set.
10.8 How often should I have my A/C system serviced?
It’s recommended to have your A/C system serviced annually to check for leaks, damage, and proper operation.
10.9 What should I do if the B10C221 code returns after repair?
If the B10C221 code returns after repair, there may be an underlying issue that needs to be addressed. Contact AutoExplain.com for further assistance.
10.10 Where can I find a reliable technician to fix my Audi’s A/C system?
AutoExplain.com can connect you with a network of qualified technicians who specialize in Audi A/C system repairs.
Facing the B10C221 fault code on your Audi can be daunting, but you don’t have to tackle it alone. Whether it’s remote diagnostics, step-by-step repair guidance, or ECU programming, AutoExplain.com is equipped to provide the expert support you need.
Don’t let A/C issues slow you down. Contact AutoExplain.com today via WhatsApp at (+84)967469410 or email at [email protected], and let us help you restore your Audi’s A/C system to its optimal condition. Our office is located at 1500 N Grant ST Sten Denver, CO 80203. Visit our website AutoExplain.com for more information.