Mercedes Code P0016 indicates a timing misalignment between the crankshaft and camshaft, potentially impacting engine performance; AutoExplain.com delivers expert insights into diagnosing and resolving this issue. Understanding the intricacies of this error code, along with its symptoms and common causes, is the first step towards efficient repairs; trust AutoExplain for professional guidance on addressing timing-related engine problems, offering effective solutions. Proper diagnosis, including checking camshaft position sensor, crankshaft position sensor, and overall engine timing, is crucial for successful resolution.
Mercedes-Benz vehicles are renowned for their engineering and advanced technology. However, like all automobiles, they can experience technical issues. One such issue is the dreaded P0016 error code. This trouble code relates to the camshaft position sensor and crankshaft position sensor correlation and can trigger a check engine light. Understanding this code is the first step toward accurately diagnosing and resolving the problem.
1.1 What Does Mercedes Code P0016 Mean?
The diagnostic trouble code (DTC) P0016, when triggered in a Mercedes-Benz, signifies a discrepancy between the signals from the crankshaft position sensor and the camshaft position sensor. The engine control unit (ECU) relies on these sensors to accurately time the ignition and fuel injection processes.
When the ECU detects that the camshaft and crankshaft signals are out of sync, it interprets this as a timing issue, which can affect engine performance. This code is often described as “Camshaft Position A – Camshaft position sensor Correlation (Bank 1 Sensor A).” Bank 1 refers to the side of the engine containing cylinder number 1. Sensor A typically refers to the intake camshaft sensor.
Mercedes Benz code P0016
1.2 Symptoms of Mercedes Code P0016
Recognizing the symptoms associated with the P0016 code can help in early detection and prevent potential engine damage. Common symptoms include:
Check Engine Light: This is often the first and most obvious sign. The check engine light illuminates on the dashboard, indicating that the ECU has detected a problem.
Rough Running Engine: The engine may run unevenly, leading to vibrations or a shaky idle.
Reduced Engine Performance: The vehicle may exhibit a noticeable decrease in power and acceleration.
Poor Fuel Economy: A timing misalignment can lead to inefficient combustion, resulting in lower miles per gallon.
Engine Stalling: In severe cases, the engine may stall, especially at idle or during low-speed maneuvers.
Difficulty Starting: The engine might take longer to start than usual. In some instances, it may require multiple attempts before it finally turns over.
1.3 Severity of the P0016 Code
The severity of the P0016 code should not be underestimated. While the engine may still run, the underlying timing issue can lead to further complications if left unaddressed. Prolonged driving with this condition can cause:
Increased Wear and Tear: Mismatched timing can put extra strain on engine components, accelerating wear and tear.
Catalytic Converter Damage: Inefficient combustion can cause unburned fuel to enter the exhaust system, potentially damaging the catalytic converter.
Engine Damage: In extreme cases, severe timing misalignment can lead to internal engine damage, such as bent valves or damaged pistons.
2. Potential Causes of Mercedes Code P0016
Identifying the root causes of the P0016 code is crucial for effective diagnosis and repair. Several factors can contribute to this issue, ranging from faulty sensors to mechanical problems.
2.1 Common Causes
Faulty Camshaft Position Sensor: The camshaft position sensor provides critical data to the ECU. If this sensor is failing or providing inaccurate readings, it can trigger the P0016 code.
Faulty Crankshaft Position Sensor: Similar to the camshaft position sensor, a malfunctioning crankshaft position sensor can disrupt the timing signals, leading to the error code.
Timing Chain Issues: A stretched or worn timing chain can cause the camshaft and crankshaft to lose synchronization. This is a common cause, especially in older or high-mileage vehicles.
Timing Chain Tensioner Problems: The timing chain tensioner maintains proper tension on the chain. If the tensioner fails, the chain can become loose, leading to timing misalignment.
Damaged Timing Chain Guides: The timing chain guides ensure that the chain runs smoothly. If these guides are broken or worn, they can cause the chain to skip or lose alignment.
Oil Control Valve (OCV) Issues: The OCV controls the oil flow to the camshaft phasers. A malfunctioning OCV can cause incorrect camshaft timing, triggering the P0016 code.
Camshaft Phaser Problems: The camshaft phasers adjust the camshaft timing based on engine load and speed. If these phasers are not functioning correctly, it can lead to timing discrepancies.
Wiring and Connector Issues: Damaged, corroded, or loose wiring and connectors associated with the camshaft and crankshaft sensors can disrupt the signals to the ECU.
ECU Malfunctions: Although less common, a faulty ECU can misinterpret sensor signals, leading to the erroneous triggering of the P0016 code.
2.2 Detailed Explanation of Each Cause
Faulty Camshaft Position Sensor: The camshaft position sensor detects the position of the camshaft and sends this information to the ECU. This data is used to control fuel injection and ignition timing. A faulty sensor may provide incorrect or intermittent signals, leading to the P0016 code.
Testing: Use a multimeter to check the sensor’s resistance and voltage. Compare the readings with the manufacturer’s specifications.
Replacement: If the sensor fails the tests, replace it with a new, OEM-quality sensor.
Faulty Crankshaft Position Sensor: The crankshaft position sensor monitors the position and speed of the crankshaft. This information is vital for timing the spark and fuel delivery. A failing sensor can disrupt the timing signals, triggering the P0016 code.
Testing: Use an oscilloscope to check the sensor’s signal pattern. Look for irregularities or dropouts in the waveform.
Replacement: Replace the sensor if it does not meet the manufacturer’s specifications.
Timing Chain Issues: The timing chain connects the crankshaft and camshaft, ensuring they rotate in sync. Over time, the chain can stretch due to wear, causing timing misalignment.
Inspection: Visually inspect the timing chain for signs of wear or damage. Check the chain’s tension and compare it to the manufacturer’s specifications.
Replacement: Replace the timing chain, sprockets, and tensioner as a set to ensure proper synchronization.
Timing Chain Tensioner Problems: The timing chain tensioner maintains the correct tension on the timing chain. If the tensioner fails, the chain can become loose, leading to timing errors.
Inspection: Check the tensioner for signs of wear or damage. Ensure that it is functioning correctly and maintaining proper tension on the chain.
Replacement: Replace the tensioner if it is faulty or worn.
Damaged Timing Chain Guides: The timing chain guides ensure that the chain runs smoothly and prevents it from skipping. If these guides are broken or worn, they can cause timing misalignment.
Inspection: Inspect the guides for cracks, breaks, or excessive wear.
Replacement: Replace the damaged guides to ensure proper chain alignment.
Oil Control Valve (OCV) Issues: The OCV regulates oil flow to the camshaft phasers, which control camshaft timing. A malfunctioning OCV can cause incorrect timing, triggering the P0016 code.
Testing: Use a scan tool to activate the OCV and monitor its response. Check the valve for proper movement and oil flow.
Replacement: Replace the OCV if it is not functioning correctly.
Camshaft Phaser Problems: Camshaft phasers adjust the camshaft timing based on engine load and speed. If these phasers are not functioning correctly, it can lead to timing discrepancies.
Testing: Use a scan tool to monitor the camshaft phaser’s performance. Check for proper adjustment and response to engine load.
Replacement: Replace the camshaft phasers if they are faulty or worn.
Wiring and Connector Issues: Damaged, corroded, or loose wiring and connectors associated with the camshaft and crankshaft sensors can disrupt the signals to the ECU.
Inspection: Inspect the wiring and connectors for damage, corrosion, or loose connections.
Repair: Repair or replace any damaged wiring or connectors. Clean corroded connections and ensure they are securely fastened.
ECU Malfunctions: Although less common, a faulty ECU can misinterpret sensor signals, leading to the erroneous triggering of the P0016 code.
Testing: Consult a professional technician to diagnose and test the ECU.
Replacement: Replace the ECU if it is found to be faulty.
3. Diagnosing Mercedes Code P0016
Diagnosing the P0016 code requires a systematic approach to identify the root cause. Proper diagnosis involves a combination of visual inspections, sensor testing, and the use of diagnostic tools.
Multimeter: Used to test the voltage and resistance of the sensors and wiring.
Oscilloscope: Provides a visual representation of the sensor signals, allowing for more detailed analysis.
Timing Light: Used to verify the engine timing.
Socket Set and Wrenches: Necessary for removing and installing sensors and components.
Wiring Diagram: Helps in tracing and testing the wiring circuits.
3.2 Step-by-Step Diagnostic Procedure
Read and Record the DTC:
Connect the OBD-II scanner to the vehicle’s diagnostic port.
Read and record all diagnostic trouble codes, including the P0016 code.
Note any other codes that may be present, as they could provide additional clues.
Visual Inspection:
Inspect the wiring and connectors associated with the camshaft and crankshaft sensors.
Look for signs of damage, corrosion, or loose connections.
Check the timing chain and tensioner for visible wear or damage.
Camshaft and Crankshaft Sensor Testing:
Use a multimeter to test the resistance and voltage of the camshaft and crankshaft sensors.
Compare the readings with the manufacturer’s specifications.
Use an oscilloscope to analyze the sensor signals for irregularities or dropouts.
Timing Verification:
Use a timing light to verify the engine timing.
Ensure that the timing marks align correctly.
Check for any signs of timing misalignment.
OCV Testing:
Use a scan tool to activate the OCV and monitor its response.
Check the valve for proper movement and oil flow.
Timing Chain Inspection (If Necessary):
If the previous steps do not reveal the cause, inspect the timing chain, tensioner, and guides more closely.
Remove the valve cover to access the timing chain components.
Check for signs of wear, damage, or looseness.
ECU Testing (If Necessary):
If all other components test within specifications, the ECU may be the cause.
Consult a professional technician to diagnose and test the ECU.
3.3 Common Diagnostic Mistakes to Avoid
Overlooking Wiring Issues: Damaged or corroded wiring can often be the culprit. Always thoroughly inspect the wiring and connectors before replacing sensors.
Ignoring Timing Chain Wear: A stretched timing chain is a common cause of the P0016 code. Do not overlook the timing chain, especially in high-mileage vehicles.
Failing to Verify Timing: Always verify the engine timing after replacing sensors or components.
Replacing Sensors Without Testing: Avoid replacing sensors without properly testing them first. This can lead to unnecessary expenses and wasted time.
Neglecting Other Codes: Pay attention to any other diagnostic trouble codes that may be present. They could provide valuable clues to the root cause of the P0016 code.
4. Repairing Mercedes Code P0016
Once the cause of the P0016 code has been identified, the next step is to perform the necessary repairs. The specific repair will depend on the underlying issue, ranging from sensor replacement to timing chain repair.
4.1 Step-by-Step Repair Procedures
Replacing a Faulty Camshaft or Crankshaft Sensor:
Disconnect the negative battery cable.
Locate the faulty sensor.
Disconnect the electrical connector from the sensor.
Remove the sensor mounting bolts.
Remove the old sensor.
Install the new sensor, ensuring it is properly aligned.
Tighten the mounting bolts to the specified torque.
Reconnect the electrical connector.
Reconnect the negative battery cable.
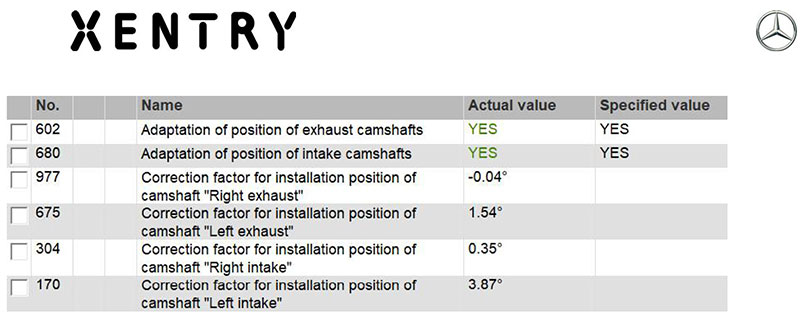
Reset adaptations after repair, clear the diagnostic trouble codes using Xentry Diagnosis software and test the vehicle.
Clear P0016 code Mercedes using Xentry
Replacing the Timing Chain, Tensioner, and Guides:
Disconnect the negative battery cable.
Remove the valve cover, front engine cover, and other necessary components to access the timing chain.
Align the engine to the timing marks.
Secure the camshafts and crankshaft in their timed positions.
Remove the old timing chain, tensioner, and guides.
Install the new timing chain, tensioner, and guides, ensuring they are properly aligned and tensioned.
Verify the engine timing by aligning the timing marks.
Reassemble the engine components, including the valve cover and front engine cover.
Reconnect the negative battery cable.
Clear the diagnostic trouble codes and test the vehicle.
Repairing Wiring and Connector Issues:
Disconnect the negative battery cable.
Inspect the wiring and connectors for damage, corrosion, or loose connections.
Repair any damaged wiring by splicing in new sections of wire and using heat-shrink tubing to protect the connections.
Clean corroded connectors with a wire brush or electrical contact cleaner.
Ensure that all connectors are securely fastened.
Reconnect the negative battery cable.
Clear the diagnostic trouble codes and test the vehicle.
Replacing a Faulty OCV:
Disconnect the negative battery cable.
Locate the faulty OCV.
Disconnect the electrical connector from the valve.
Remove the OCV mounting bolts.
Remove the old OCV.
Install the new OCV, ensuring it is properly aligned.
Tighten the mounting bolts to the specified torque.
Reconnect the electrical connector.
Reconnect the negative battery cable.
Clear the diagnostic trouble codes and test the vehicle.
Sensor Replacement
If sensor issues are identified:
Replace affected camshaft position sensor(s)
Ensure usage of genuine Mercedes parts for reliability
When replacing sensors, apply dielectric grease to the O-ring and ensure proper torque (72 inch-pounds for most models)
The procedure generally involves:
Removing air intake components to access sensors6
Disconnecting the electrical connector
Removing the retaining bolt (usually E8 Torx size)
Installing the new sensor with proper alignment6
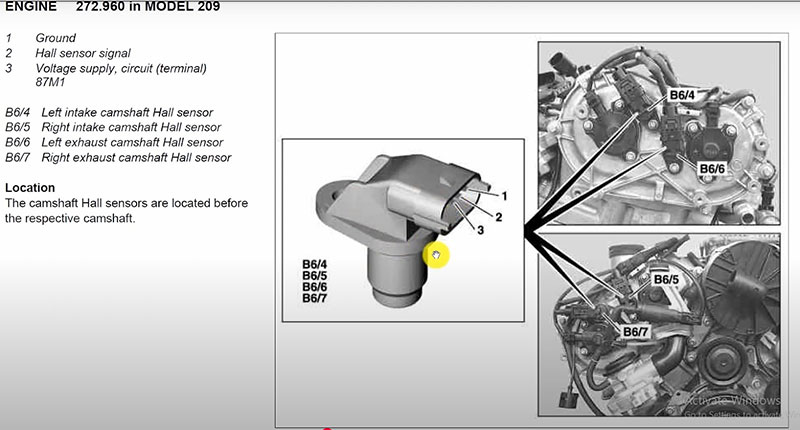
Module related to Mercedes Benz fault code P0016
4.2 Parts Needed for Repair
Camshaft Position Sensor
Crankshaft Position Sensor
Timing Chain Kit (Including Chain, Tensioner, and Guides)
Oil Control Valve (OCV)
Wiring and Connectors
Engine Control Unit (ECU)
4.3 Estimated Cost of Repairs
The cost of repairing the Mercedes P0016 code can vary widely depending on the underlying cause and the parts and labor required. Here are some estimated costs:
Camshaft or Crankshaft Sensor Replacement: $150 – $300 (including parts and labor)
Timing Chain Replacement: $800 – $2,000 (including parts and labor)
Wiring Repair: $100 – $300 (including parts and labor)
OCV Replacement: $200 – $400 (including parts and labor)
ECU Replacement: $500 – $1,500 (including parts and labor)
4.4 Tips for Successful Repair
Use High-Quality Parts: Always use OEM-quality parts to ensure proper fit and performance.
Follow the Manufacturer’s Specifications: Adhere to the manufacturer’s torque specifications and procedures during installation.
Verify Timing After Repair: Always verify the engine timing after replacing sensors or components.
Clear the Diagnostic Trouble Codes: Clear the diagnostic trouble codes after completing the repairs and test the vehicle to ensure the issue is resolved.
Seek Professional Help When Needed: If you are not comfortable performing the repairs yourself, seek the help of a qualified mechanic.
5. Preventing Mercedes Code P0016
Preventing the Mercedes P0016 code involves regular maintenance and addressing potential issues before they escalate.
5.1 Regular Maintenance Tips
Regular Oil Changes: Use high-quality oil and change it at the recommended intervals to ensure proper lubrication of engine components.
Timing Chain Inspection: Inspect the timing chain, tensioner, and guides during routine maintenance to identify potential issues early.
Sensor Maintenance: Keep the camshaft and crankshaft sensors clean and free from debris.
Check Wiring and Connectors: Regularly inspect the wiring and connectors for damage, corrosion, or loose connections.
Monitor Engine Performance: Pay attention to any changes in engine performance, such as rough running, reduced power, or poor fuel economy.
5.2 Best Practices for Mercedes-Benz Vehicle Care
Follow the Manufacturer’s Recommendations: Adhere to the manufacturer’s recommended maintenance schedule.
Use Genuine Mercedes-Benz Parts: Use genuine Mercedes-Benz parts to ensure proper fit and performance.
Address Issues Promptly: Address any potential issues promptly to prevent them from escalating into more significant problems.
Keep the Vehicle Clean: Regularly wash and wax the vehicle to protect it from the elements.
Store the Vehicle Properly: Store the vehicle in a garage or under a cover to protect it from extreme weather conditions.
6. Advanced Troubleshooting Techniques
For complex cases where standard diagnostic procedures fail to identify the root cause, advanced troubleshooting techniques can be employed.
6.1 Using an Oscilloscope for Signal Analysis
An oscilloscope provides a visual representation of the sensor signals, allowing for detailed analysis. This can help identify subtle issues that may not be apparent with a multimeter or scan tool.
Connect the Oscilloscope: Connect the oscilloscope to the camshaft and crankshaft sensor signal wires.
Analyze the Waveforms: Analyze the waveforms for irregularities, dropouts, or phase shifts.
Compare with Known Good Signals: Compare the waveforms with known good signals to identify deviations.
6.2 Performing a Compression Test
A compression test can help identify internal engine issues that may be contributing to the P0016 code.
Prepare the Engine: Warm up the engine and disable the ignition and fuel systems.
Remove the Spark Plugs: Remove all spark plugs from the engine.
Insert the Compression Tester: Insert the compression tester into each cylinder, one at a time.
Crank the Engine: Crank the engine for several seconds and record the compression reading.
Analyze the Results: Compare the compression readings for each cylinder. Significant variations may indicate internal engine damage.
6.3 Checking for Vacuum Leaks
Vacuum leaks can affect engine performance and potentially contribute to the P0016 code.
Inspect Vacuum Lines: Inspect all vacuum lines for cracks, leaks, or loose connections.
Use a Smoke Tester: Use a smoke tester to introduce smoke into the intake system and identify any leaks.
Repair or Replace Leaking Components: Repair or replace any leaking vacuum lines or components.
Let AutoExplain Handle Your Mercedes P0016 Troubles
Dealing with Mercedes fault code P0016 can be frustrating and time-consuming. While some repairs can be done by experienced DIYers, certain issues truly require a professional:
🔧 Complex Diagnostic Issues: Still stuck after basic testing? We’ll help you dig deeper. 🔧 ECU Testing & Replacement: Requires advanced tools and programming expertise. 🔧 Internal Engine Repairs: For engine tear-downs or timing alignment, trust experienced hands.
AutoExplain is here to help!
We provide:
✅ Remote diagnostic support to pinpoint the exact issue ✅ Step-by-step repair instructions with diagrams and videos ✅ Expert advice from Mercedes-certified technicians ✅ Cost-effective help without the dealership price tag ✅ 24/7 online support—wherever you are in the world
📲 Contact us now via WhatsApp: +1(936)2896695 Let’s get your Mercedes running right again—fast, smart, and hassle-free!
Frequently Asked Questions (FAQ)
1. What does the P0016 code mean on a Mercedes-Benz?
The P0016 code indicates a timing misalignment between the camshaft and crankshaft. It suggests that the engine control unit (ECU) has detected a discrepancy in the signals from the camshaft position sensor and crankshaft position sensor.
2. What are the common symptoms of the P0016 code?
Common symptoms include a check engine light, rough running engine, reduced engine performance, poor fuel economy, engine stalling, and difficulty starting.
3. What are the potential causes of the P0016 code?
Potential causes include a faulty camshaft position sensor, faulty crankshaft position sensor, timing chain issues, timing chain tensioner problems, damaged timing chain guides, oil control valve (OCV) issues, camshaft phaser problems, wiring and connector issues, and ECU malfunctions.
4. How do I diagnose the P0016 code?
Diagnosing the P0016 code involves reading and recording the DTC, performing a visual inspection, testing the camshaft and crankshaft sensors, verifying the timing, testing the OCV, inspecting the timing chain, and testing the ECU (if necessary).
5. Can I fix the P0016 code myself?
Some repairs, such as sensor replacement, can be performed by experienced DIYers. However, complex repairs, such as timing chain replacement or ECU testing, should be performed by a professional technician.
6. How much does it cost to fix the P0016 code?
The cost of repairing the P0016 code can vary depending on the underlying cause and the parts and labor required. Sensor replacement may cost $150 – $300, while timing chain replacement may cost $800 – $2,000.
7. How can I prevent the P0016 code?
Preventing the P0016 code involves regular oil changes, timing chain inspection, sensor maintenance, checking wiring and connectors, and monitoring engine performance.
8. What services does AutoExplain.com offer for diagnosing and repairing the P0016 code?
AutoExplain.com offers remote diagnostic support, step-by-step repair guidance, expert technical advice, access to a network of experienced technicians, and cost-effective solutions.
9. How can AutoExplain.com help me save money on automotive repairs?
AutoExplain.com offers remote diagnostic and repair support services that can often be performed for a fraction of the cost of traditional repair shops.
Do you find yourself struggling with the complexities of Mercedes-Benz diagnostics and repairs? Do you need expert guidance to resolve the frustrating P0016 code? Contact AutoExplain.com today for fast, reliable, and professional technical support. Reach out via WhatsApp at +1(936)2896695 or email us at [email protected]. You can also visit our office at 4590 Angus Road, New York, United States, or explore our website, AutoExplain.com, for more information. Let AutoExplain.com be your trusted partner in automotive diagnostics and repair.