If I had a dollar for every time someone walked into my garage asking, “Can you reset my check engine light?” — I’d probably have enough to buy a brand-new VAS6154 interface.
But the truth is, clearing fault codes is just scratching the surface. What really separates a weekend warrior with a generic scanner from a professional technician is the ability to dig deep into the vehicle’s control modules — and for Audi, VW, Skoda, and SEAT, that means using ODIS Service.
I remember the first time I launched ODIS Service. It looked complicated. Too many tabs. Too many terms. But once I got the hang of it, it felt like I had the dealer’s toolbox right on my laptop. Since then, I’ve used ODIS to:
Diagnose intermittent ABS faults on a 2015 Audi A4
Code a new ECU into a 2020 VW Golf
Perform online updates for a DSG transmission
Reset adaptations for injectors on a Skoda Octavia with rough idle
And believe me — when you do it right, the car drives out smoother than it came in.
So, whether you’re just getting started or looking to master your diagnostics game, this guide will walk you through everything I’ve learned about how to use ODIS Service — the right way.
ODIS Service (Offboard Diagnostic Information System) is the official diagnostic software developed by the Volkswagen Group (VAG) for its full lineup of vehicles, including Audi, Volkswagen, Skoda, SEAT, and Bentley. It’s the same tool used at authorized dealerships and service centers, providing full access to factory-level diagnostics, programming, and repair workflows.
ODIS supports nearly all Audi models manufactured from the early 2000s to the latest 2025 releases, including:
Audi A1, A3, A4, A6, A8
Q2, Q3, Q5, Q7, Q8
e-tron models (BEV/HEV)
RS and S performance models
ODIS Service can be used in two modes:
Offline Mode: Perform standard diagnostics, adaptations, and limited coding without internet access.
Online Mode: Access to Audi servers for SVM coding, security access (GEKO), ECU flashing, and guided functions that require authentication.
Note: Official online functions require a valid license and registered ODIS account, which are typically available to authorized workshops.
The ODIS Service software is used to:
Read and clear fault codes (DTCs)
Perform guided fault finding
Adapt or replace electronic modules
Flash ECUs
Run online coding and programming
Calibrate sensors and actuators
And much more!
Let me tell you about the first time I tried to use ODIS. I had just bought a used VAS5054A clone from eBay and thought I was ready to go. Turns out, I didn’t even have the correct drivers installed. Save yourself the headache and make sure you have the following ready:
Hardware:
Software:
Internet:
Pro tip: Always install ODIS on a clean Windows system to avoid conflicts.
Step 1: Connect the hardware
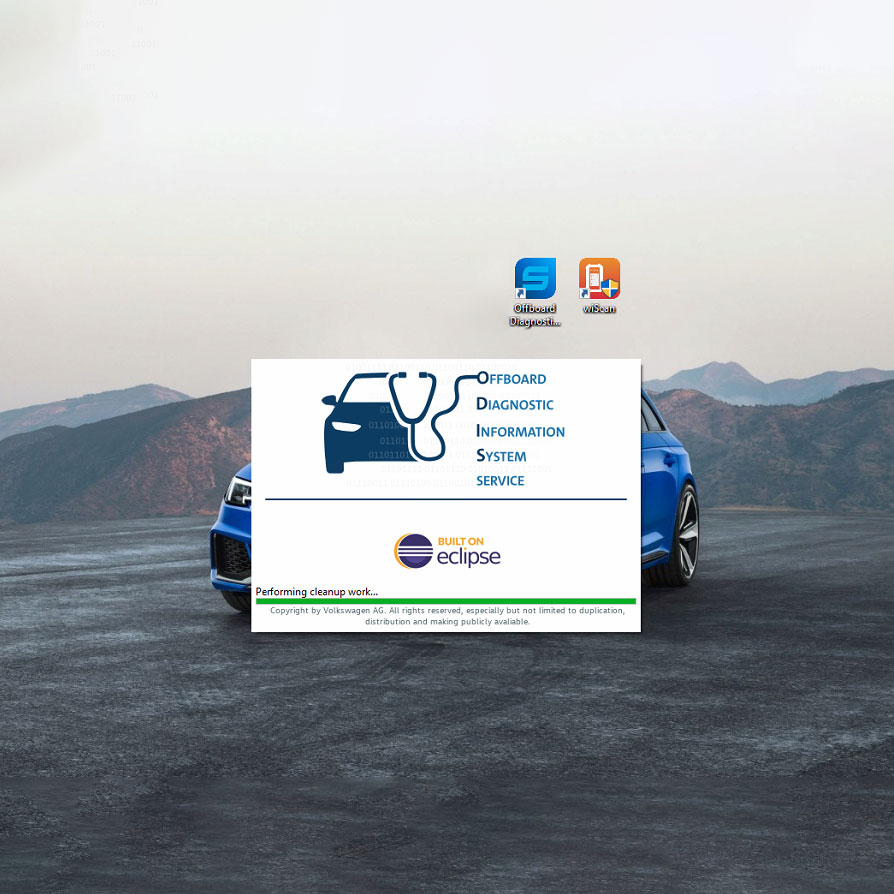
Step 2: Launch ODIS Service software
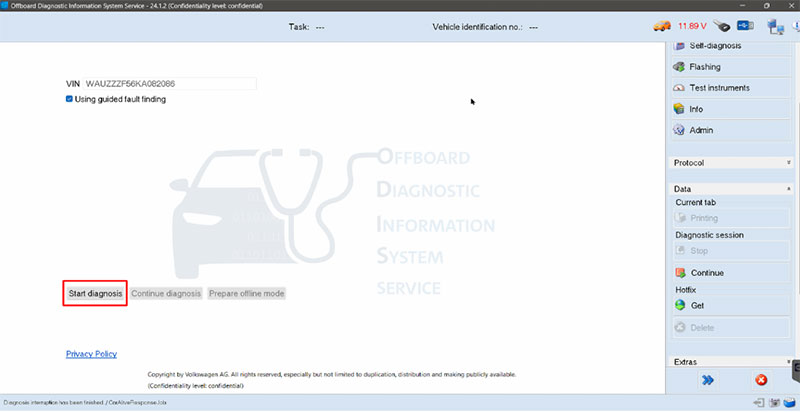
Step 3: Automatic VIN recognition
Step 4: Start the diagnostic process
Step 5: Complete Vehicle Information After Starting Diagnosis
After you click “Start Diagnosis”, a new window titled “Basic vehicle characteristics” will appear. This screen displays the vehicle information that has been automatically read via the VCI and allows you to manually select or confirm any missing details.
Instructions:

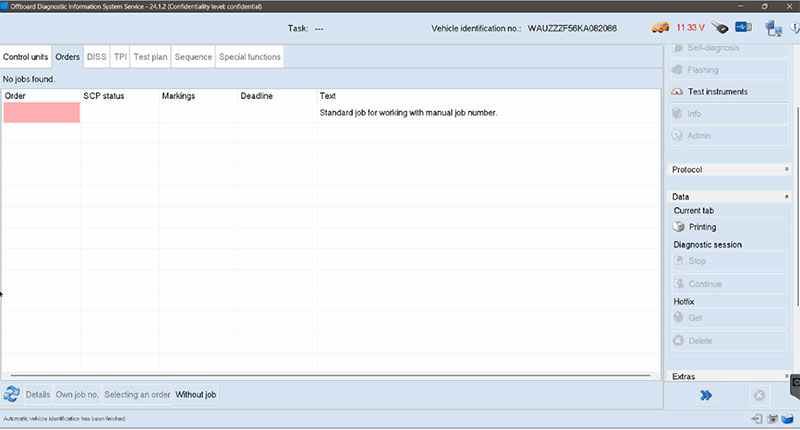
Step 6: Starting the Vehicle Diagnostic Session
After completing vehicle identification and selecting all required information (manufacturer, model, year, engine, etc.), the software will move to the main diagnostic interface.
At this stage, you will see a screen similar to the one shown in the image. This is the “Orders” tab, which manages job numbers or work orders.
Instructions:
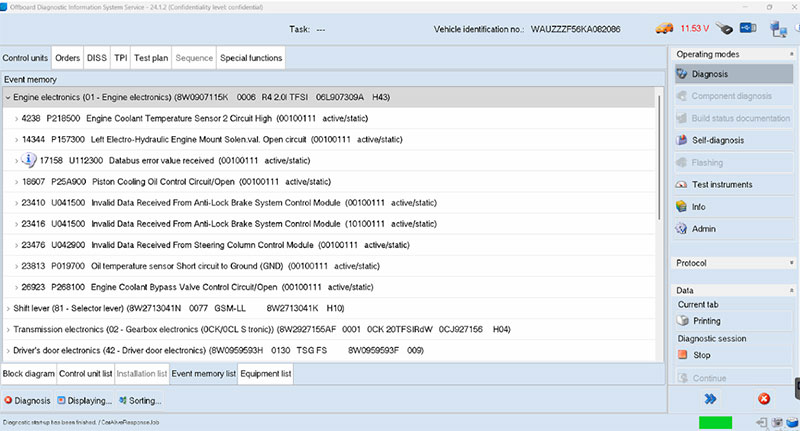
Step 7: Diagnostic Scan Results – Viewing Control Units and Fault Codes
Once the vehicle diagnostic scan is complete, ODIS Service will display a full list of control modules that it was able to connect to, along with any detected fault codes (DTCs – Diagnostic Trouble Codes).
Understanding the Diagnostic Results Screen:
Source: VAG Expertise: Advanced Coding and Diagnostic Techniques Guide Book
=> You can read this book to learn more about how to clear DTC, save file PDF, change language, coding offline, perform basic setting, use special function with ODIS service
Let’s break down exactly what functions you can perform with ODIS Service, with a clear line between what’s available in Service versus Engineering. I’ll also share my own workshop experiences with each to give you some context for when and how they come in handy.
This is your go-to function. It allows you to scan every module in the vehicle — engine, transmission, ABS, airbag, HVAC, and more. After repairs, you can clear stored faults.
Real case: A customer brought in a 2017 Skoda Octavia with a flashing glow plug light. ODIS showed a static DTC for the brake light switch. Replaced it, cleared the code — no more warning.
ODIS Service-exclusive feature. GFF guides you through logical steps to find the root cause of an issue. It uses vehicle-specific data, wiring diagrams, and test routines.
My story: A 2016 Audi Q5 had adaptive cruise control that kept disabling. GFF helped me pinpoint a misaligned radar sensor after a minor bumper bump. Saved me from blindly replacing parts.
✅ Available in ODIS Service only
These are critical calibrations used after part replacements. Examples include:
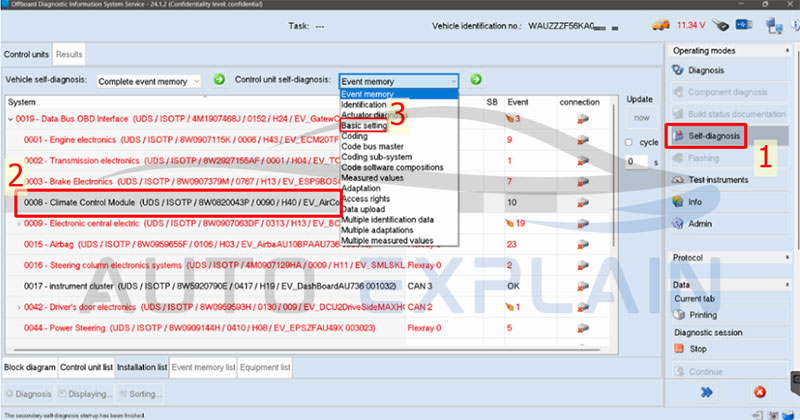
Garage note: After cleaning the EGR valve on a 2.0 TDI Passat, I used Basic Settings to reinitialize the EGR position — idle smoothed out immediately.
⚠️ Custom calibrations or undocumented procedures usually require ODIS Engineering
Use this to change module behavior:
Example: A Golf Mk7 owner asked me to enable tear wipe (rear wiper swipe after front wipers). A quick trip into Adaptations did the trick.
✅ Most available in ODIS Service, but retrofitting features (like cruise control) may require Engineering
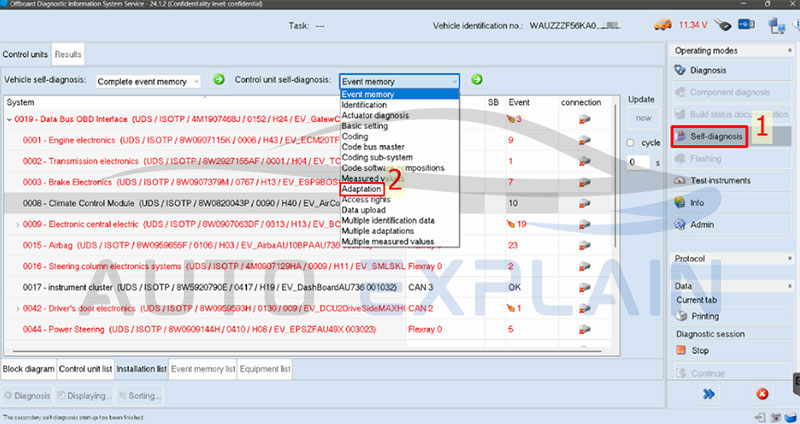
=> Learn how to perform adaptation with ODIS Service in the book Master VAG Coding – Vol.1: Start with ODIS, ElsaWin, PETKA
Resets after maintenance:
Tip from the shop: After doing a full service on a VW Tiguan, I used ODIS to adjust the inspection interval to 15,000 km to match the customer’s usage pattern — not the default 30,000 km long-life setting.
ODIS Service allows limited offline coding:
Real example: Swapped a faulty BCM in an Audi A3. ODIS Service pulled the SVM code from GEKO and automatically applied it. Done in under 10 minutes.
⚠️ Manual long coding, byte-level adjustments, and retrofits need ODIS Engineering
If you’re GEKO-registered, you can:
My warning: I once attempted a DSG TCU flash on a drained battery — car went dark. Lesson learned: always use a power supply during flashing.
✅ Available in ODIS Service, but login required
Critical for common rail diesel engines. When replacing injectors, you must enter each injector’s alphanumeric code.
On the job: A 2015 Crafter had hard starts after injector replacement. Turned out the new codes weren’t coded in. Entered them via ODIS — engine started smoothly right after.
Retracts the rear calipers before pad replacement.
Pro shop tip: On a Passat B7, forgetting to run the EPB retract fried the caliper motor. ODIS lets you retract and re-engage safely every time.
You can reset modules after replacement and clear stored crash data (if permitted).
Workshop memory: After replacing an airbag control module in a 2013 A6, I used ODIS to reset the crash record — cleared all errors and restored system readiness.
⚠️ Deep EEPROM-level crash clearing is outside the scope of ODIS Service — use Engineering or third-party tools
=> Highly recommended to you: How to use ODIS Engineering
=> If you’re serious about working with VAG cars, you’ll want to check out a book we’ve been using a lot in the shop — “Master VAG Coding – Vol.1: Start With ODIS, ElsaWin, PETKA & Workshop Tools” . It breaks things down in a super practical way, with real examples from actual repairs. Honestly, it’s one of the few guides that makes ODIS feel less overwhelming.
While ODIS Service is a powerful diagnostic tool — and the go-to software for dealer-level diagnostics — it definitely has its limits. I’ve run into them many times in the workshop, especially when trying to perform more advanced coding or retrofits. Here’s what you need to be aware of before diving in too deep:
ODIS Service does not allow you to access or edit long coding in modules the way VCDS, OBDeleven, or ODIS Engineering can. If you’re trying to enable hidden features (like needle sweep, cornering lights, or disabling Start/Stop), you’ll likely hit a wall.
Example: I once tried to enable Scandinavian DRL on a 2015 Golf using ODIS Service — no luck. Switched to ODIS Engineering and the function appeared right away.
If you’re retrofitting parts like cruise control, front assist, or a virtual cockpit, ODIS Service usually isn’t enough. It lacks access to custom adaptation channels and security functions needed for these changes.
Tip: For full retrofit support, ODIS Engineering is a better fit — but even then, some functions require parameter files or SVM codes from VW servers.
Many high-level functions — like component protection removal, online coding, or control unit parameterization — require a GEKO (dealer) login and stable internet. Without it, you’re locked out of software updates and security-related operations.
ODIS Service does not support EEPROM-level modifications, unlocking immobilizers, or changing security access levels manually. That’s by design — to prevent tampering. But it also means you can’t do some of the deeper programming work that independent garages often need.
Note: Tools like VCP, VVDI, or even specialized EEPROM programmers are needed for those jobs.
Although you can do basic scans and some adaptations offline, most of ODIS’s power comes from its connection to VW’s online servers. Without that, your ability to code, adapt, or flash is reduced.
Even though ODIS is powerful, it’s not perfect. Here are some common issues you might face while using ODIS Service — and how I’ve handled them in my own workshop:
Cause: Driver issues, incompatible interface, or bad USB port
Solution:
Cause: Missing files, corrupt installation, antivirus interference
Solution:
Cause: Low-spec laptop, background apps, or outdated Java/.NET
Solution:
Cause: No GEKO account or unstable internet
Solution:
Cause: Module requires login or security seed key
Solution:
If you’re serious about working on Volkswagen, Audi, Skoda, or SEAT vehicles, mastering ODIS Service is a game-changer. Whether you’re clearing faults, performing guided diagnostics, or coding new modules — this tool puts dealership-level power in your hands.
So what’s next?
✅ Get your ODIS setup installed
✅ Grab a quality interface like the VAS6154
✅ Bookmark this guide and start exploring real-world diagnostics today
And if you’re looking to go even deeper — from flashing ECUs to unlocking advanced features — don’t forget to check out “ODIS Service & Engineering – The Real-World Guide” by Autoexplain. It’s the manual I wish I had when I started.
Absolutely — if you’re working on VAG vehicles regularly, ODIS Service gives you official-level access, accurate diagnostics, and safety with coding and calibrations. It has helped me fix issues faster, with more confidence, and without relying on trial-and-error guessing.
But it’s not perfect. For deep coding, retrofits, or advanced adaptations, you’ll want to pair it with ODIS Engineering or tools like VCDS, OBDeleven, or VCP.
So, if you’re serious about VAG diagnostics, ODIS Service is your foundation — and once you’re comfortable with it, you’ll never look at generic scan tools the same way again.
Contact AutoExplain today for expert assistance:
WhatsApp: +1(936)2896695
Email: [email protected]
Website: AutoExplain